
Conall Curach is a Final Fantasy Crystal Chronicles dungeon accessible from Year 4.
It’s located on the southern edge of the Rebena Plains region, past the Miasma Stream west of the Plains of Fum.
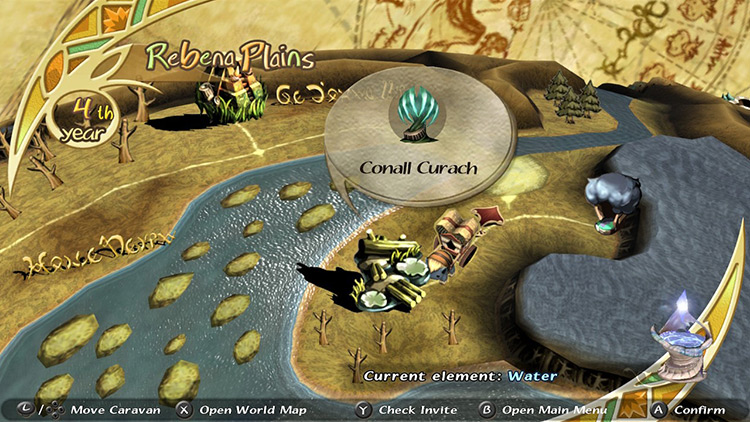
Players must change their Crystal Chalice’s element to Water at the Mushroom Forest in Iron Mine Downs before crossing the Jegon River to the Plains of Fum.
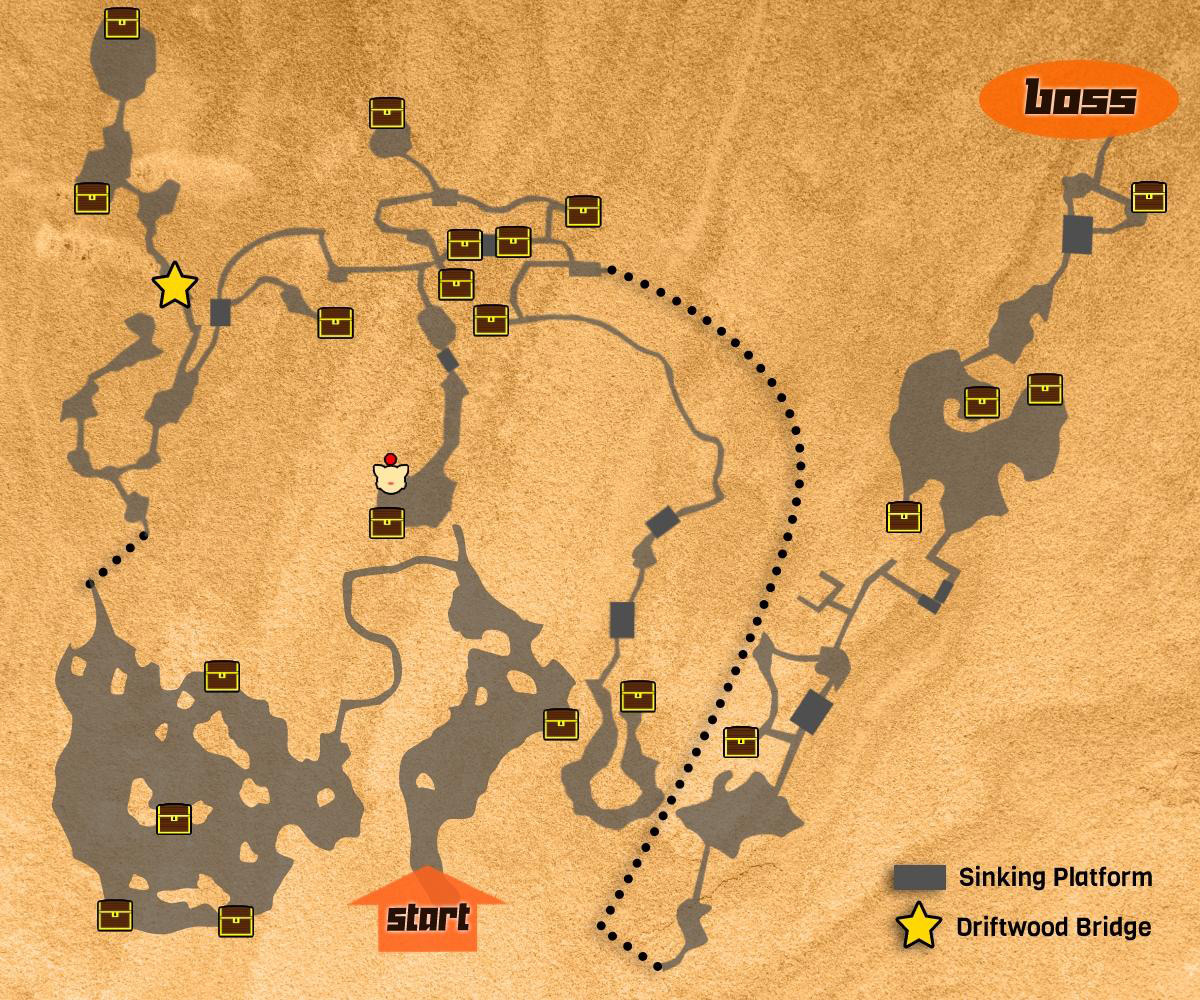
The fastest route to the boss room goes like this:
- First Area: Head northwest whenever possible.
- Second Area: Go RIGHT, RIGHT, LEFT, then straight EAST.
- Third Area: Follow the right edge until the Behemoths, then follow the left edge.
Below we’ll cover a complete walkthrough on how to collect every chest and the Moogle Stamp before defeating the boss.
TABLE OF CONTENTS
- Map
- Walkthrough
- Step #1: Hug the Right Wall
- Step #2: Collect All Four Chests in the Swamp
- Step #3: Right at First Fork
- Step #4: Left for Treasure, Right to Continue at Second Fork
- Step #5: Right for Treasure, Left to Continue at Third Fork
- Step #6: Go South for Moogle Stamp
- Step #7: Cross the Sinking Platform (Twice)
- Step #8: Go West for Treasure, East to the Next Area
- Step #9: Hug the Left Wall
- Step #10: Fight Through the Behemoths
- Step #11: Get the Last Phoenix Down
- Boss: Dragon Zombie
- Changes with Dungeon Cycles
- Obtainable Items
Map
Walkthrough
Conall Curach is the longest and most confusing dungeon so far.
There are tons of detours, secret areas, and a multitude of strong monsters spread throughout.
Follow these instructions closely so you can get everything in your first run.
Step #1: Hug the Right Wall
Stay close to the right edge of the map as you advance into the dungeon.
You’ll run into some Snow Mu on your way to a chest protected by two Ice Bombs.
- Snow Mu can interrupt your actions with a melee hit. They’re weak to Fire.
- Ice Bombs blow up after being defeated. They’re vulnerable to Fire and Thunder.

The chest contains Phoenix Down. If I had to guess, you’ll spend at least one before the end of this combat-heavy dungeon.
Keep heading north from where you found the chest, fighting any Magic Plants and Sahagins along the way.
- Magic Plants are resistant to all elements. Melee is preferred.
- Sahagins pop out of the water unannounced. Fire is recommended.
Eventually, you’ll step onto a narrow wooden path over the swamp water.
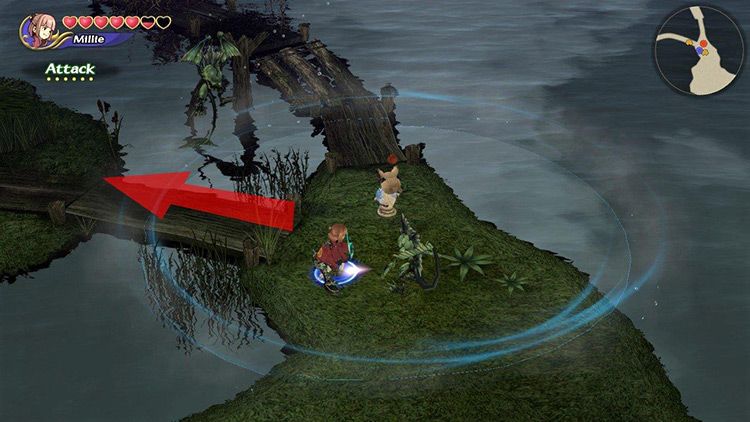
Brace for combat against some Sahagins at a crossroads, then follow the narrow path to the left until you reach an open area.
Step #2: Collect All Four Chests in the Swamp
This area is rather large and confusing, but you’ll be fine if you follow my instructions.
There are plenty of enemies roaming the swamp, so be careful. These include Magic Plants, Sahagins, and Thunder Bombs.
Tip: Thunder Bombs are weak to Fire and Blizzard.
As you step off the wooden path, head southwest and follow the map’s southern edge to find two chests containing Recipes.
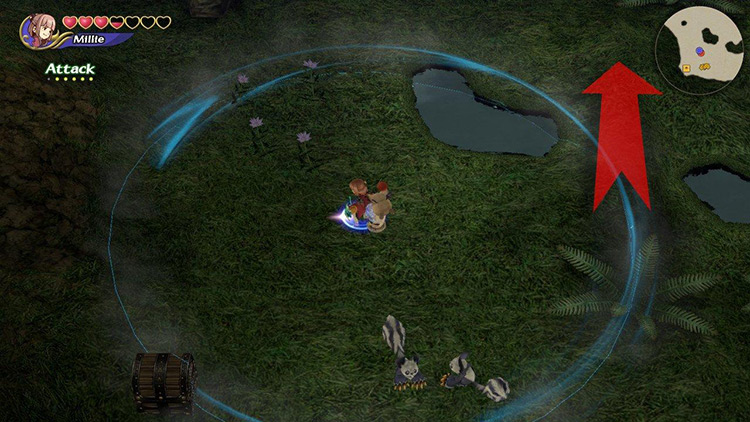
From the location of the westmost chest, walk northeast toward a third chest.
Once there, keep walking straight to the north, and you’ll come across the fourth and final chest in this area.
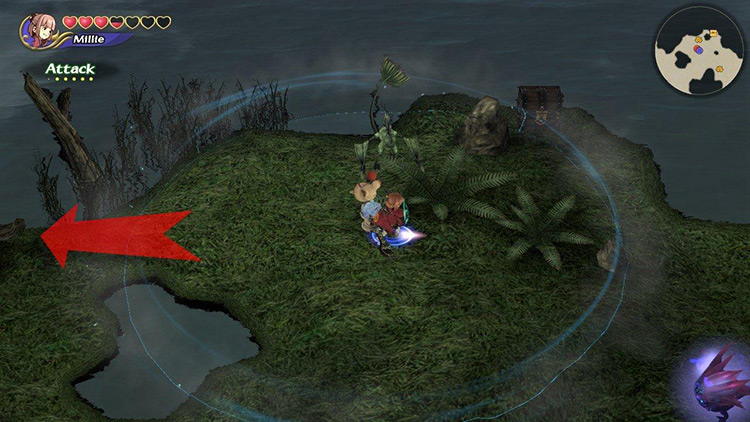
From there, just head northwest, following the coastline until crossing into the next area.
Step #3: Right at First Fork
You’ll quickly find a fork in the road in Area #2.
The left road takes you to some Gigan Toad enemies and another Selkie stone tablet, while the right road takes you further into the dungeon.
Tip: Gigan Toads are weak to Fire, and Thunder can paralyze them. They’re immune to Blizzard.
Kill the Gigan Toads if you want, then head right.
Step #4: Left for Treasure, Right to Continue at Second Fork
At the second fork in the road, you want to head left first to collect some treasure, then right to keep advancing toward the boss.
Usually, the left-side road is out of order.
However, if you blew up the bridge in Daemon’s Court twice before coming here, the debris will have floated here to create a path.
Follow the path over these logs until finding a chest to the left. Take it and head north until you find yourself in a Selkie gravesite.
You’ll be attacked by a Sahagin Lord and five Stone Sahagin. It feels a lot like a mid-boss fight.
- Stone Sahagins are immune to most magic. Try melee on them.
- The Sahagin Lord has modest magic resistance and a lot of HP.
Kill them and claim the item in the chest behind the larger gravestone before returning to the crossroads and going right.
Step #5: Right for Treasure, Left to Continue at Third Fork
The next fork is the opposite.
Go right for a chest with a powerful Artifact, then go left to move on to the next area.
Step #6: Go South for Moogle Stamp
Go south at the earliest opportunity and follow the path until you reach a clearing. There are some enemies and a chest close to a tree.
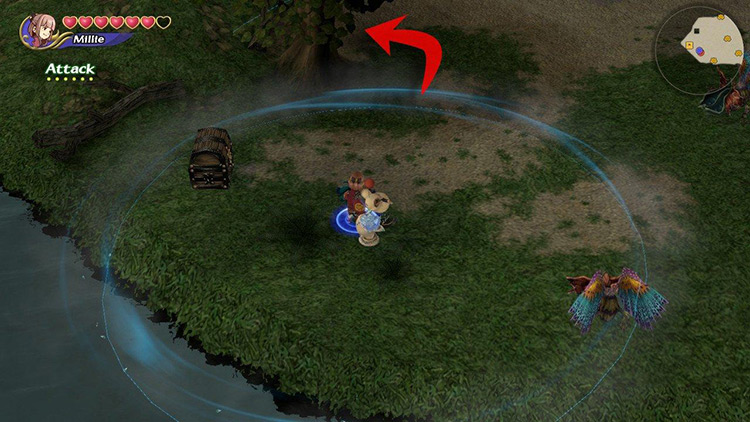
Take a look behind the tree to find this dungeon’s Moogle Nest.
Enter to get your Moogle Stamp, then go back to the crossroads.
Grab the chest immediately to your right, then go right again toward the sinking platform.
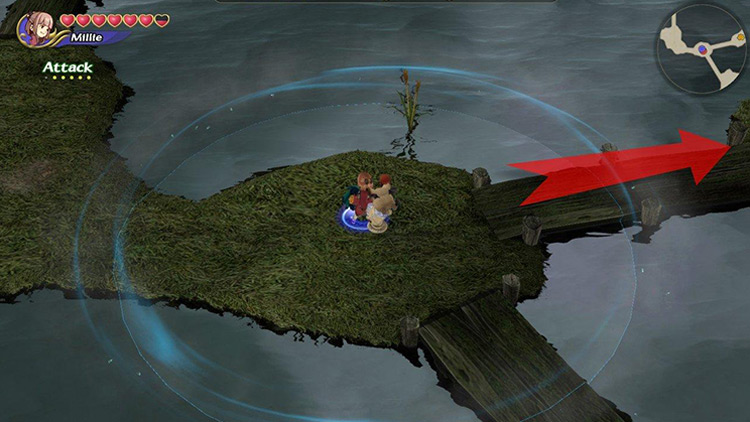
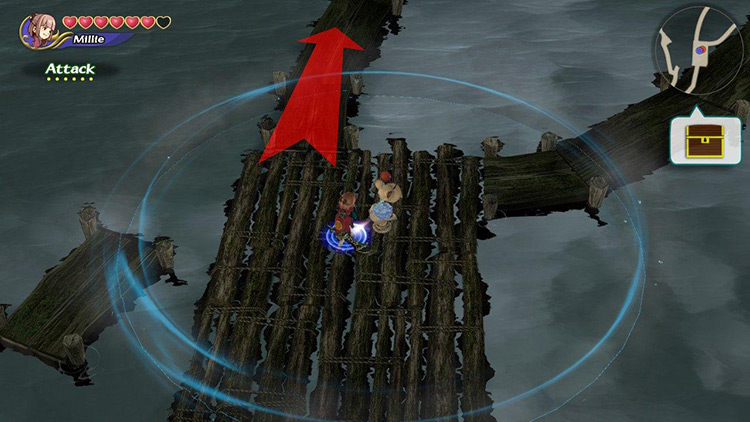
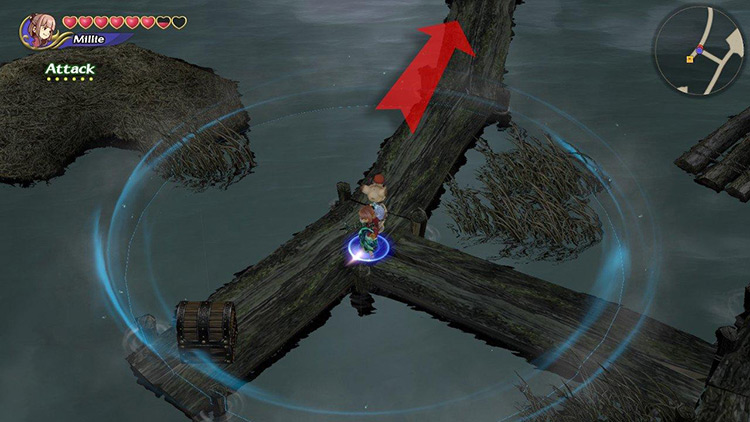
Step #7: Cross the Sinking Platform (Twice)
There are two ways to cross this patch: the long way around and the quick way around.
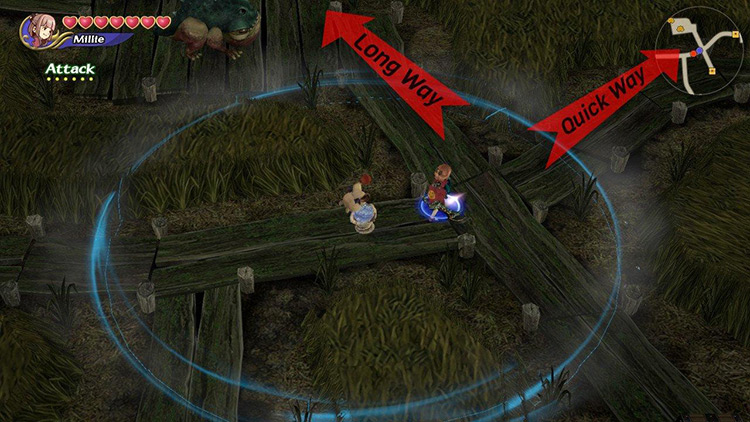
- The quick way around is crossing the sinking platform. You’ll grab two chests as you do.
- The long way to the north is full of enemies, but also two chests full of treasure.
You should explore both sides for completion’s sake, then move on to the next step.
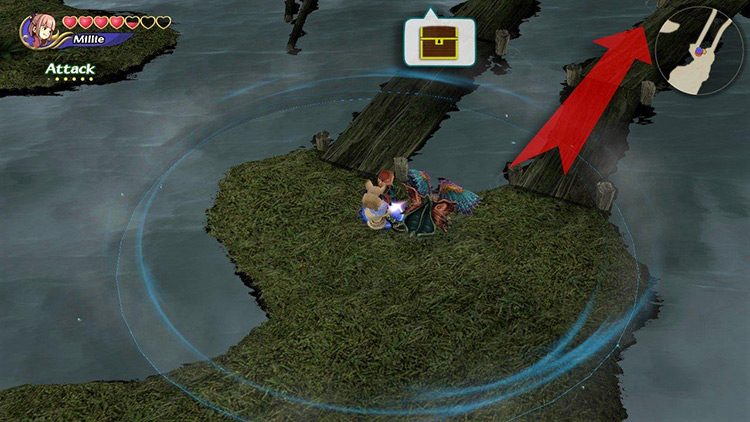
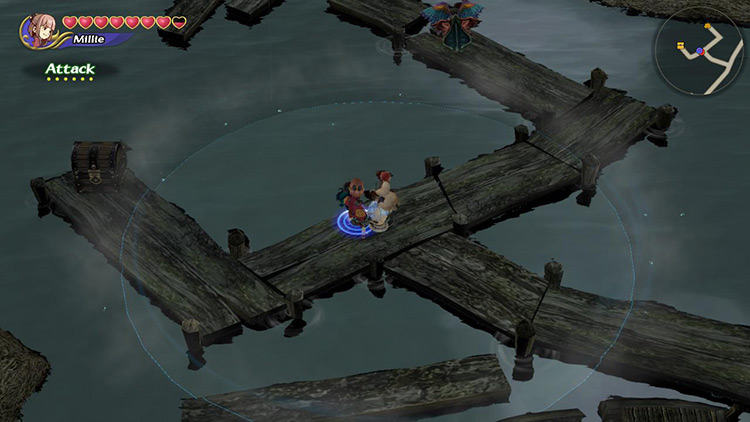
Step #8: Go West for Treasure, East to the Next Area
Follow the road southeast from the sinking platform, and you’ll see a two-way split.
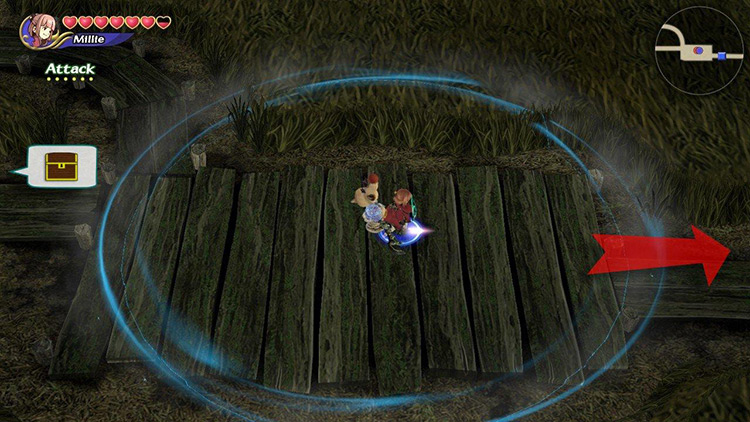
Heading east will get you to the next area, but going west will lead you to a couple of chests, including a powerful Artifact.
Let’s explore that option.
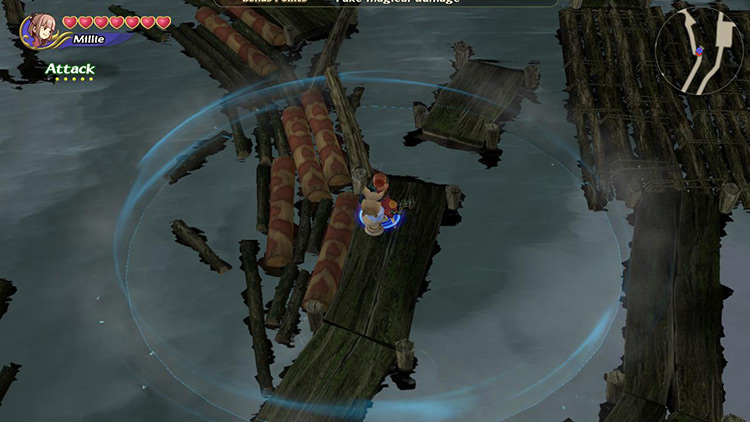
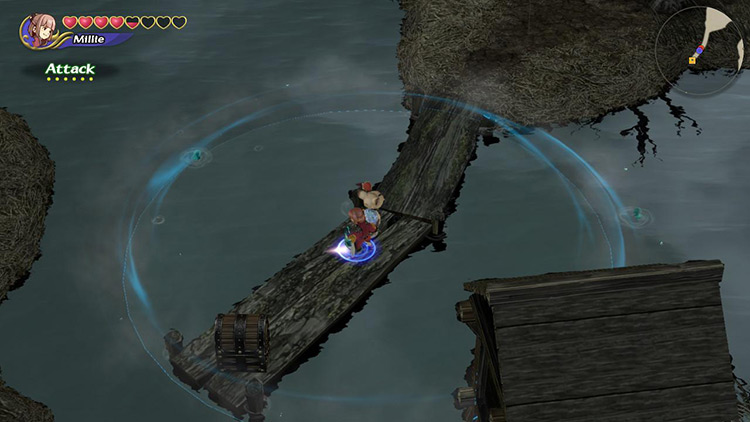
First, you’ll find a Recipe chest on some planks to the right, then you’ll follow a narrow road deep into the reeds.
Eventually, you’ll reach a U-shaped area where three Abaddon enemies roam.

Tip: Abbadons look scary, but one Gravity hit can immobilize them instantly.
Fight past the three Abaddons to find the Artifact chest at the end of the U-shaped area, then walk back to the beginning of the road and walk east into the next area.
Step #9: Hug the Left Wall
The last area before the boss is less about finding your way and more about combat.
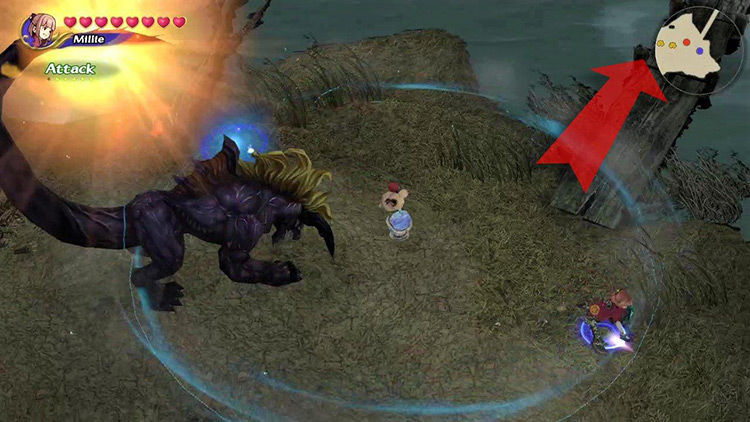
You’ll be attacked by a Behemoth backed by a Hell Plant and two Stone Sahagins in an open area almost right away.
Tip: Behemoths are extremely powerful and resistant to damage. Use Thunder to paralyze them for an easier encounter.
Defeat the enemies and keep going, turning left at the earliest opportunity for a chest containing a Phoenix Down.
This area is a bit annoying due to the Ghost enemies.
Tip: These transparent creatures are nigh-invulnerable to all damage unless you hit them with Holy first.
Keep walking down this path, turning left at every opportunity. You’ll eventually come across another chest containing a Recipe to the left of a Magic Plant.
Continue following the main path until the next open area.
Step #10: Fight Through the Behemoths
This large open area is full of Behemoths assisted by many smaller monsters.
You can sneak past some of them, but it might be better to bite the bullet and fight them on your own terms.
There are 4 Behemoths in total, and you’ll meet a new kind of enemy: the Dark Flan.
Tip: Like the Ghost, the Dark Flan must be hit with Holy to make it vulnerable to other sources of damage.
Follow the left coastline as you step into this dangerous area. You’ll soon find a chest containing a Recipe on a tiny pier.
After plundering the chest, you want to follow the right-side coastline instead.
Pass the planks you walked on to get here and follow the edge northward. You’ll eventually reach another chest right next to the water.
Continue in this direction until finding the third and final chest on Behemoth territory, next to a dead tree.
Keep walking northward from here, across a small wooden bridge and a tiny island, until reaching a sinking platform guarded by two Magic Plants.
Step #11: Get the Last Phoenix Down
Kill the Magic Plants, and take the right path to find the last chest of the dungeon: another Phoenix Down.
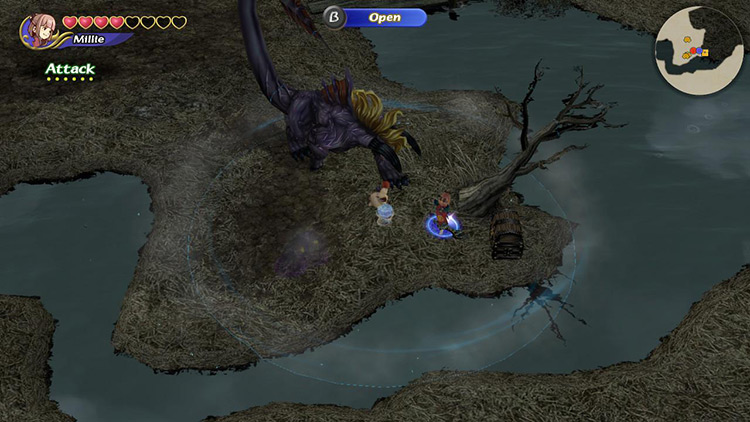
Keep following the road to the north to enter the boss arena.
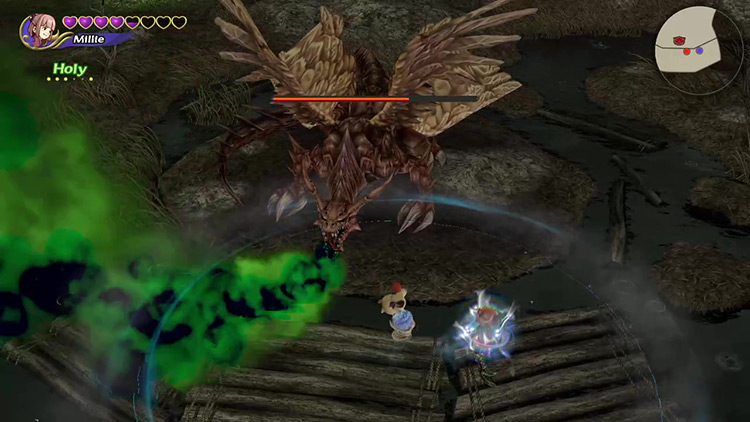
Boss: Dragon Zombie
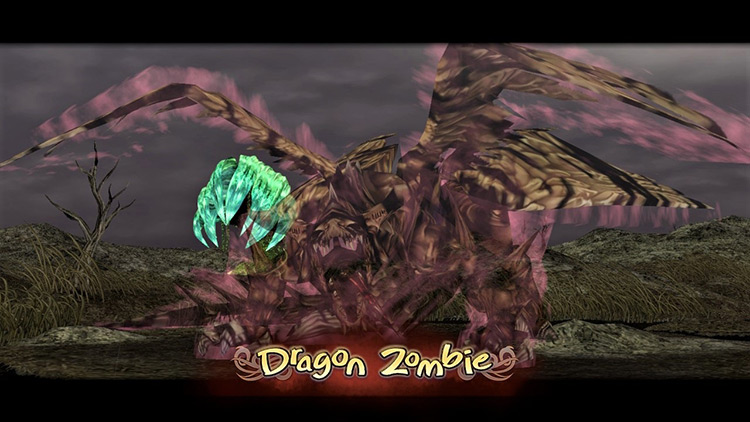
The Dragon Zombie is a straightforward boss with some powerful moves.
You have little freedom of movement during this boss fight, but it’s enough to dodge most of the Dragon Zombie’s attacks.
Tip #1: Kill the Stone Sahagins
As usual, your first order is to eliminate any adds. In this case, that means Stone Sahagins.
At first, it’s just one, but they’ll keep popping out of the water periodically.
Don’t let them accumulate, or they’ll make walking on these platforms impossible.
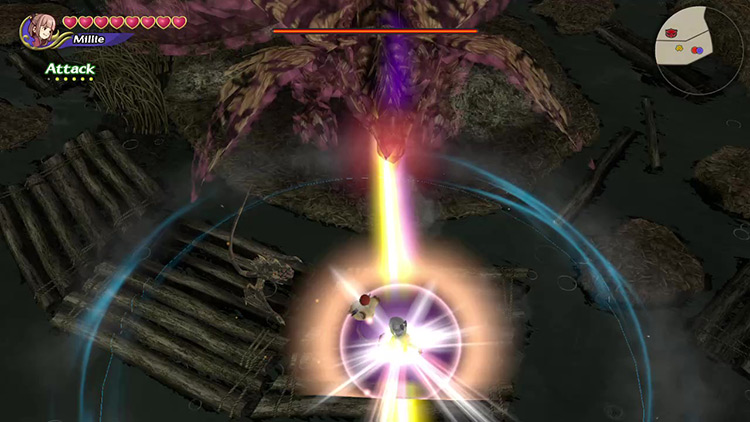
Moreover, the Dragon Zombie sometimes fires a petrifying beam. If it hits you with even a single Sahagin nearby, you can say goodbye to a fair bit of HP.
Tip #2: Use Holy to Remove Protection
As you probably already noticed, the Dragon Zombie is transparent.
In FFCC, that means you have to hit it with Holy to make it vulnerable to damage.
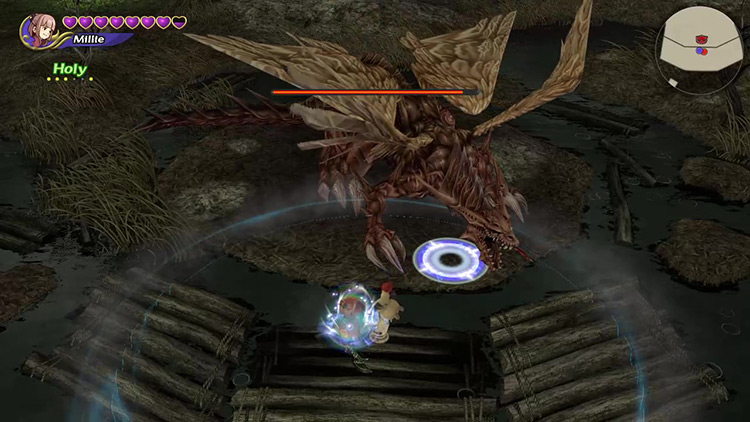
Note: Make Holy by fusing an elemental spell (Fire/Blizzard/Thunder) with Raise, in that order.
You can continue casting Holy for massive damage if your character is primarily a spellcaster.
Alternatively, switch to your melee weapon and beat it down until it becomes transparent again.
Tip #3: Keep Cure and a Phoenix Down at Hand
Most of the Dragon’s attacks are easy to dodge if you avoid standing in front of it and keep moving to the sides.
Still, you’ll eventually get hit by either a tornado or a lunge.
Plus the poison breath move is super hard to avoid.
What I’m saying is you’ll take quite a bit of damage during this fight.
Instead of obsessing about avoiding damage, focus on dealing damage to the boss and take a second to cast Cure when your health drops below three hearts or so.
Changes with Dungeon Cycles
You’ll find better treasure and stronger monsters throughout the level on your next visit to collect myrrh.
The Dragon Zombie also gets a power-up. It’ll deal more damage, and its HP is through the roof from Cycle 2 onward.
Obtainable Items
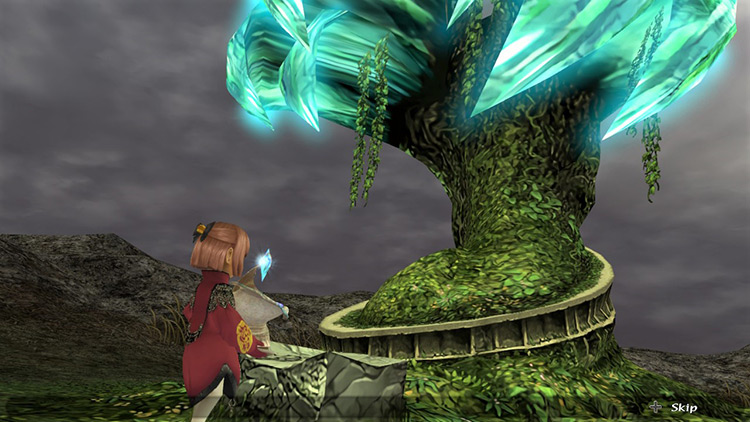
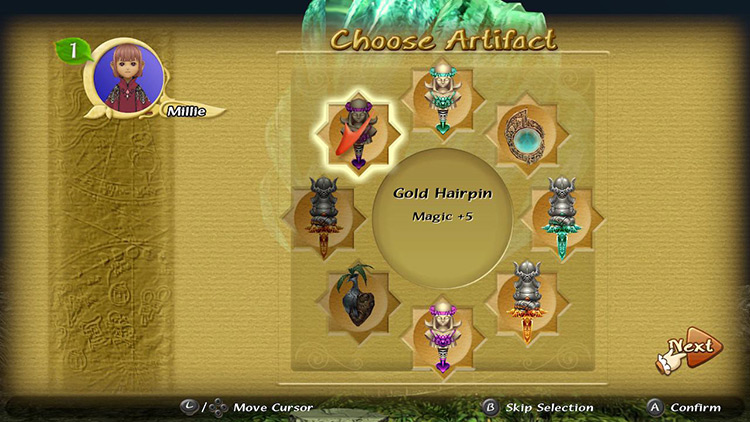
You’ll find Artifacts, crafting Recipes, and Materials throughout the dungeon. You get to keep all Recipes and Materials, but you can only choose one Artifact to take with you.
Chest Items
SCROLL
| Cycle | First | Second | Third |
|---|---|---|---|
| Recipes | Eternal Armor Lightning Belt Lightning Gloves Lightning Sallet Lightning Shield Master’s Weapon Mighty Weapon Mythril Armor Mythril Belt Mythril Gloves Mythril Sallet Mythril Shield Soul of the Lion Valiant Weapon Victorious Weapon |
Eternal Armor Eternal Sallet Gold Gloves Holy Armor Holy Shield Lightning Belt Lightning Gloves Lightning Sallet Lightning Shield Magic Shield Master’s Weapon Mighty Weapon Mythril Armor Pure Armor Pure Belt Soul of the Dragon Soul of the Lion Time Sallet Valiant Weapon Victorious Weapon Wind Belt |
Diamond Armor Diamond Belt Diamond Gloves Diamond Sallet Diamond Shield Eternal Sallet Gold Gloves Holy Armor Holy Shield Legendary Weapon Magic Shield Master’s Weapon Mighty Weapon Pure Armor Pure Belt Soul of the Dragon Time Sallet Valiant Weapon Victorious Weapon Wind Belt |
| Artifacts | Candy Ring Cure Ring Faerie Ring Green Beret Kaiser Knuckles Loaded Dice Mage Masher Main Gauche Maneater Red Slippers Sparkling Bracer Star Pendant |
Candy Ring Cure Ring Flametongue Green Beret Loaded Dice Main Gauche Mjollnir Noah’s Lute Red Slippers Sage’s Staff Star Pendant Teddy Bear |
Chicken Knife Cure Ring Dark Matter Flametongue Giant’s Glove Heavy Armband Mjollnir Noah’s Lute Sage’s staff Star Pendant Teddy Bear Tome of Ultima |
Monster Items
SCROLL
| Cycle | First | Second | Third |
|---|---|---|---|
| Abaddon | Jagged Scythe | Jagged Scythe | Jagged Scythe Legendary Weapon (R) |
| Behemoth | Orichalcum | Diamond Ore Orichalcum |
Diamond Ore Orichalcum |
| Ghost | Blue Silk | Blue Silk Diamond Ore |
Diamond Ore White Silk |
| Gigan Toad | Toad Oil | Toad Oil | Ancient Potion Toad Oil |
| Ice Bomb | Chilly Gel | Chilly Gel | Chilly Gel |
| Thunder Bomb | Thunderball | Thunderball | Thunderball |
| Sahagin Lord | Pressed Flower Remedy |
Pressed Flower Remedy |
Pressed Flower Remedy |
| Stone Sahagin | Bronze Iron |
Alloy Iron |
Alloy Mythril |
Boss Items
Each boss has four drop pools per cycle.
Your Bonus Points determine which rewards you qualify to get. The higher your points, the more chances you have to get good rewards.

Higher ranks can randomly get any of the previous reward pools. There’s also a tiny chance that the contrary might happen, giving you higher-level rewards at low scores.
SCROLL
| Cycle | First | Second | Third |
|---|---|---|---|
| 0+ BP | Giant’s Glove Goblin Pocket Rat’s Tail Sage’s Staff |
Ice Brand Star Pendant Wonder Bangle Wonder Wand |
Gold Hairpin Ogrekiller Star Pendant Teddy Bear |
| 193+ BP | Cure Ring Gold Hairpin Flametongue Teddy Bear |
Cure Ring Loaded Dice Rat’s Tail Rune Ball |
Cure Ring Kris Orichalcum (M) Sasuke’s Blade |
| 240+ BP | Ice Brand Star Pendant Wonder Bangle Wonder Wand |
Gold Hairpin Ogrekiller Star Pendant Teddy Bear |
Dragon’s Fang Lunar Weapon Red Slippers Twisted Headband |
| 301+ BP | Cure Ring Loaded Dice Rat’s Tail Rune Ball |
Cure Ring Kris Orichalcum (M) Sasuke’s Blade |
Diamond Armor Engetsuring Life Ring Tome of Ultima |

-
Final Fantasy Crystal Chronicles Remastered
- Conall Curach Dungeon Guide + Map (FFCC Remastered)
Related Posts:
 Rebena Te Ra Dungeon Guide + Map (FFCC Remastered)
 Selepation Cave Dungeon Guide + Map (FFCC Remastered)
 Daemon’s Court Dungeon Guide + Map (FFCC Remastered)
 Tida Village Dungeon Guide + Map (FFCC Remastered)
 Mt. Kilanda Dungeon Guide + Map (FFCC Remastered)
 Veo Lu Sluice Dungeon Guide + Map (FFCC Remastered)
 Mushroom Forest Dungeon Guide + Map (FFCC Remastered)
 Goblin Wall Dungeon Guide + Map (FFCC Remastered)