
Mount Kilanda is a Final Fantasy Crystal Chronicles dungeon accessible from Year 4 onward.
It’s located south of your Hometown and the rest of the map, on an island accessible by boat.
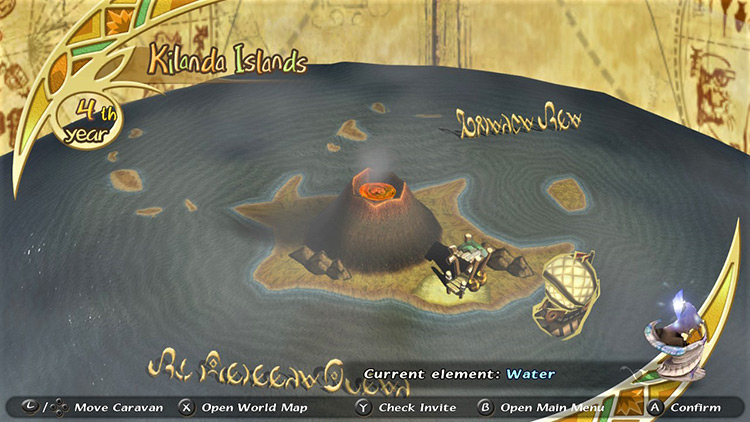
You must pay a 500gil fare to the Lilty captain at the Jegon River ports in Iron Mine Downs or the Plains of Fum to reach Mt. Kilanda.
It’s a straightforward dungeon. Follow these simple steps so you don’t miss anything important:
- Collect magicite and chests.
- Use water pots to raise stone bridges from lava rivers.
- Obtain the Moogle Stamp.
- Kill giant sword-bearing Goblins.
- Keep going north to reach the boss room.
- Defeat the Iron Giant.
Let’s break it down step by step.
TABLE OF CONTENTS
Map
Walkthrough
Mount Kilanda is a combat-heavy dungeon with a very basic gimmick:
Basically you just keep going north, and you’ll eventually reach the boss.
But we’ll review it in detail so you don’t miss any chests or essential drops.
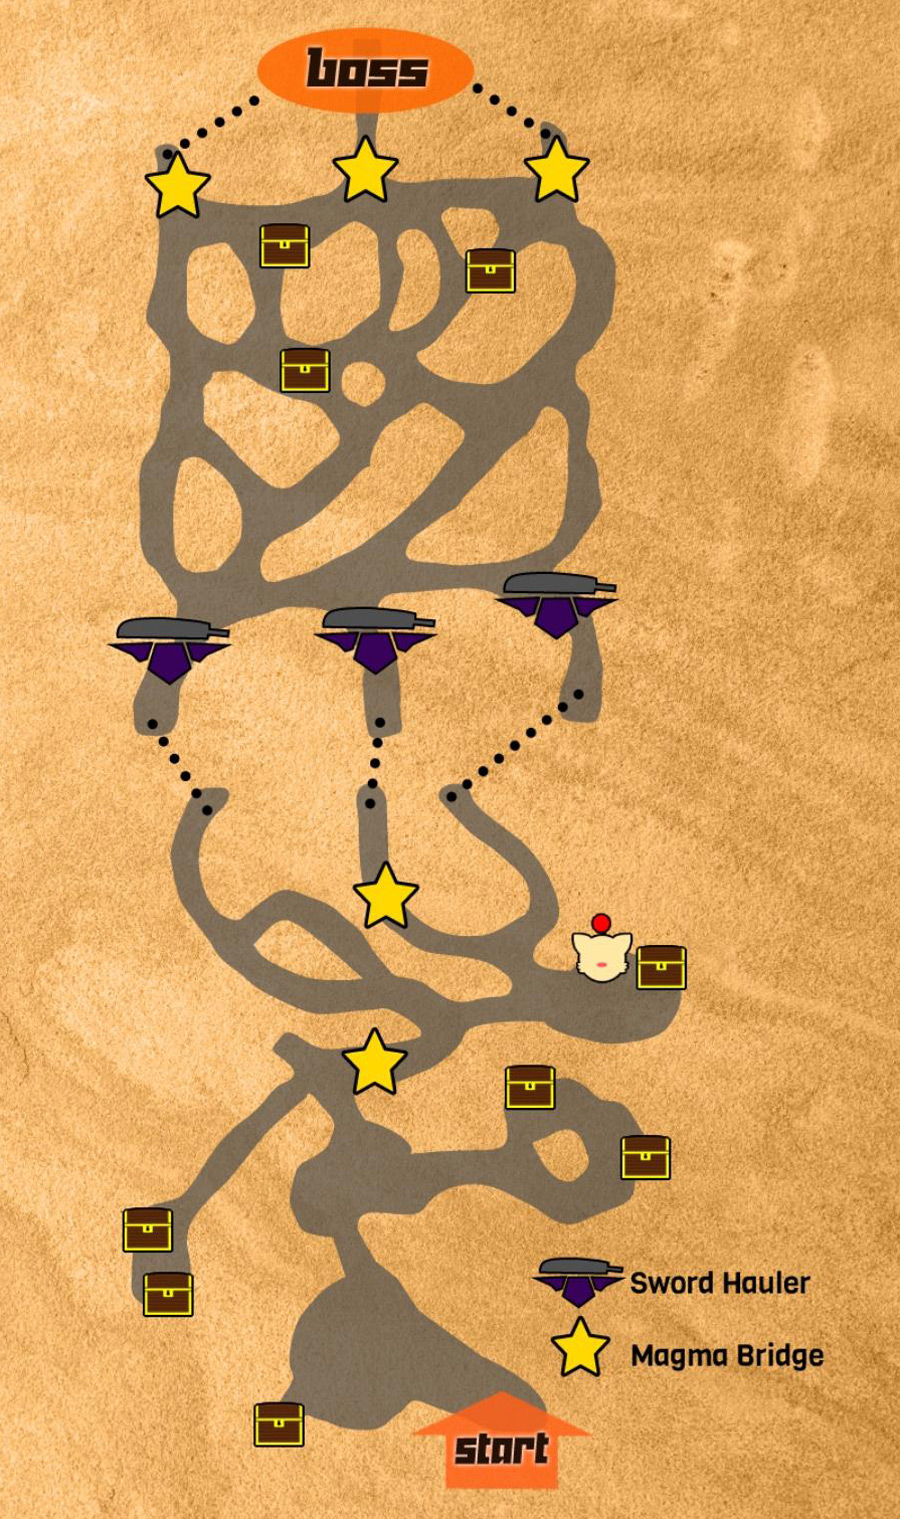
Step #1: Collect Chests and Magicite
Run straight left from your starting position to find a chest containing a magicite. It can be one of the basic elements (Fire, Thunder, Blizzard) or Cure.
From there, head north toward a crossroad with two volcano-themed enemies: the Lava Mu and the Lava Ahriman.
They’re not much different from their regular, non-lava versions other than immunity to Fire magic.
- Lava Mu is weak to Blizzard.
- Lava Ahriman should be hit with Gravity for a faster win.
They’ll drop the Fire and Cure magicites, growing your spell collection.
Explore the eastward passage to find a couple of chests protected by three monsters: two Lava Ahriman and a Lamia.
Tip: Lamias are weak to Blizzard, so Blizzara remains a good option. Melee is also great, depending on your stats.
Open the two chests and return to the crossroads where you fought the first enemies. Go north, take a left turn and walk down the long mountain path for another two chests.

A Lava Ahriman will block your way, and a Lava Mu will pop out behind you. Try to get them both on the same side of you to avoid getting overwhelmed.
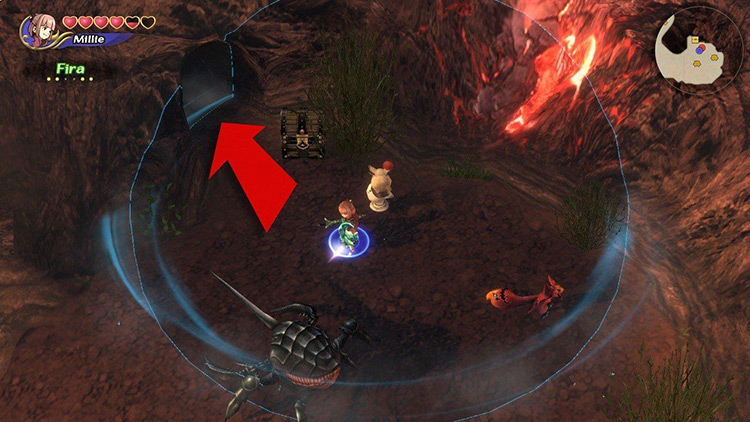
Collect your treasure and climb back up the mountain until coming across a vase next to a glowing pit.
Step #2: Raise Bridges with Water Pots
Throwing a water pot into one of these glowing pits will create a bridge nearby.
These are present throughout the dungeon and always come as a pair – one pot per lava pit.
Note: A bug might cause these bridges to get built off-camera. You’ll return to find the pot unscathed and a bridge that wasn’t there before. Convenient.
Step #3: Getting Your Moogle Stamp
Cross the newly created bridge and brace for combat against a couple of Blazer Beetles. They’ll drop Blizzard and Thunder upon defeat.
Continue walking eastward, and you’ll find a treasure chest by a cave protected by a Blazer Beetle + Lava Mu combo.
Check the cave after collecting your treasure to find a Moogle Nest, and then get your Moogle Stamp.
Tip: It’s an excellent time to trim Mog’s hair if you haven’t yet. It helps him carry the chalice without tiring himself in this hot environment.
Upon exiting the Moogle Nest, head northwest toward a glowing lava pit with a water pot nearby. Use them to make a bridge and cross over to head into the next area.
Watch out for a couple of Blazer Beetles on the road.
Step #4: Hunt the Sword-bearers
One of the first things you’ll see as you enter the second area will be a small Goblin carrying an enormous sword.

Do your best to kill this guy ASAP, then run eastward to try and catch a second sword-bearer.
This will help you during the boss fight, but it’s not worth dying over. Pull back if you’re feeling overwhelmed by the monsters on the road.
Step #5: Keep North to Reach the Boss Room
You’ll eventually reach the boss room if you keep walking northward.
This area is full of Lava Ahrimans, Coeurls, and Ogres.
- Ogres are weak to Thunder.
- Melee is best against Coeurls.
I recommend taking some time to explore this area and defeat some monsters. Most of the good drops in this map are from monsters.
There are also three chests waiting to be found around the central area.
Tip: One of these chests contains Kilanda Sulfur, which you can use to make your ferry traveling cheaper.
Get all the drops and treasure you want before heading north, raising a bridge on your way to the boss.
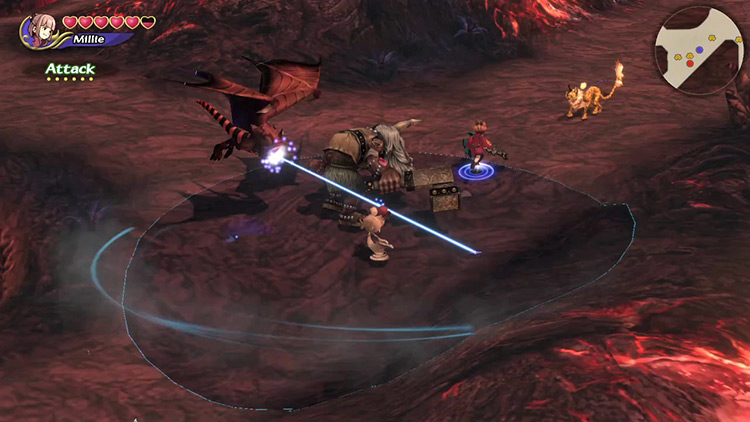
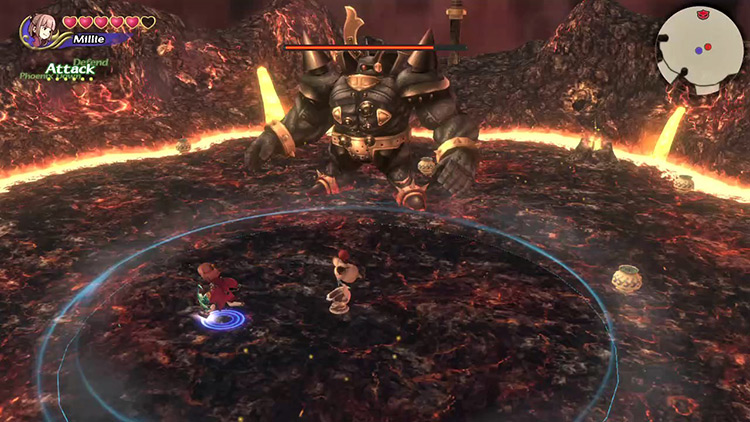
Boss: Iron Giant

The Iron Giant is a powerful boss specializing in close-range combat.
Follow these tips for an easier battle.
Tip #1: Focus on the Goblin Mages
As always, Tip #1 is to defeat the adds.
The Iron Giant spawns with two Goblin Mages who’ll run around trying to freeze, shock, or burn you.
Goblins are weak to Fire, so Fira or Firaga are great options to deal with them fast.
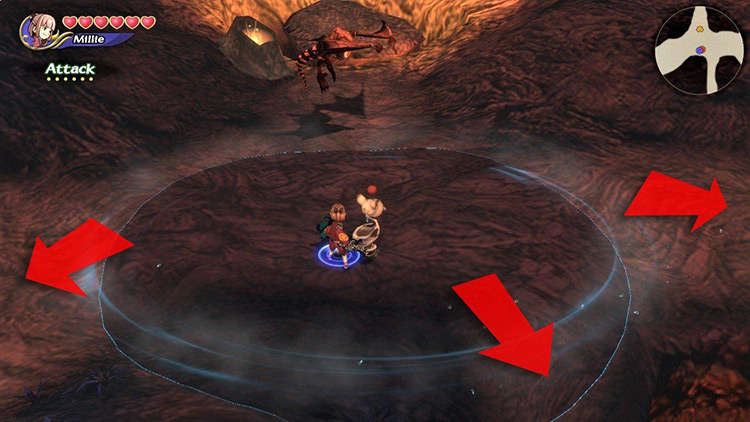
Tip #2: Keep Your Distance
In the beginning, the boss will alternate between three moves:
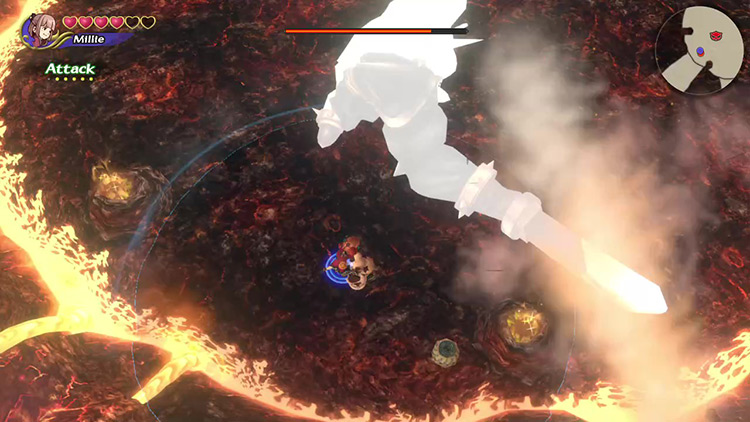
- A close-ranged horizontal sword slash
- A ranged energy blast
- A brutal forward swing with mid-range
The closer you are to the Iron Giant, the harder these moves are to dodge.

Keep a sensible distance (just outside the horizontal slash range), and you’ll have the advantage.
Tip #3: Watch Out for Broken Swords
The Iron Giant’s colossal weapon will break after a while.
Some spares are lying around, but it’ll eventually run out of them, too.
Note: It’ll have fewer spares if you managed to kill the two sword-bearing goblins earlier.
Without a weapon, the boss will resort to two new moves:
- An old-fashioned tackle
- A damaging thunder shockwave
They’re both easy to detect. If you’re keeping your distance, you should have no trouble getting out of the way in time.
Tip #4: Weak to Holy
If you choose to take on the Iron Giant with a magic-focused character, try creating Holy by fusing a basic element (Fire/Blizzard/Thunder) + Raise.
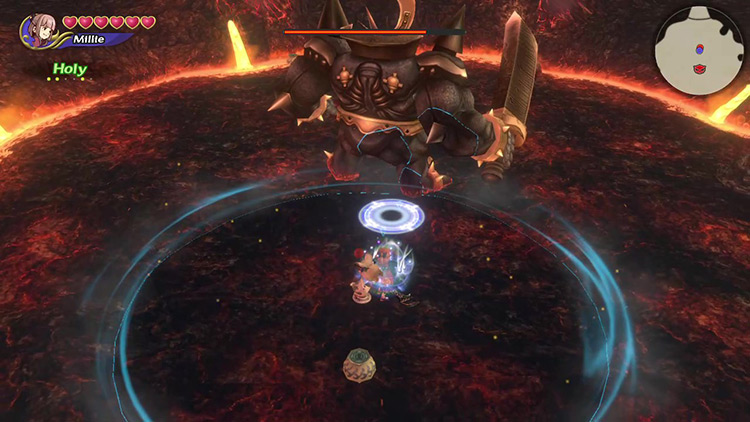
Make sure Raise is after the other magicite, or you’ll make Slow.
Few enemies have any resistance against this element, and the Iron Giant isn’t an exception. Use this for massive damage.
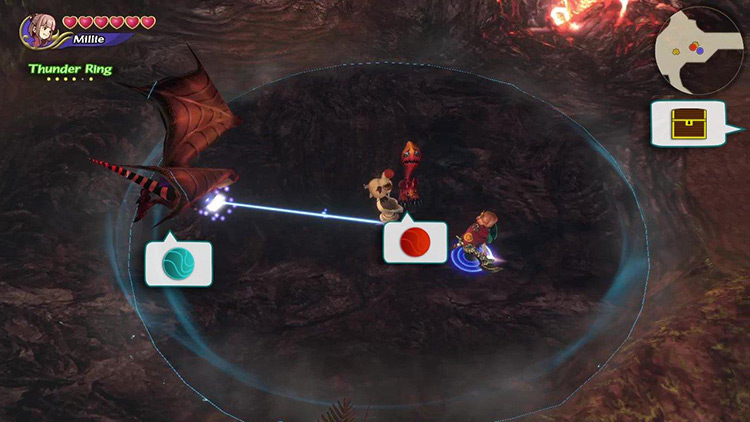
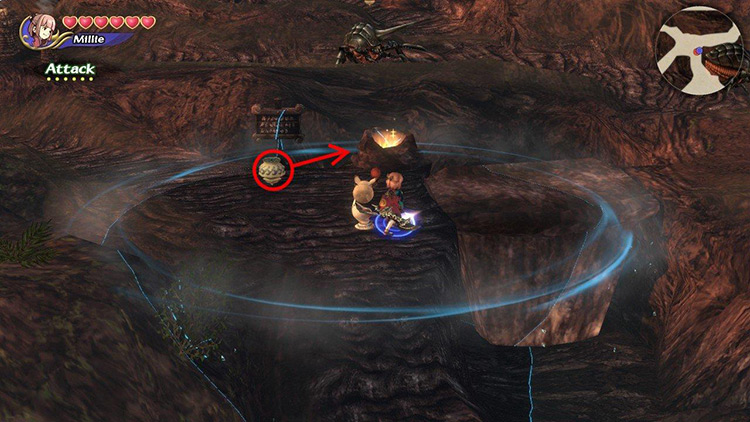
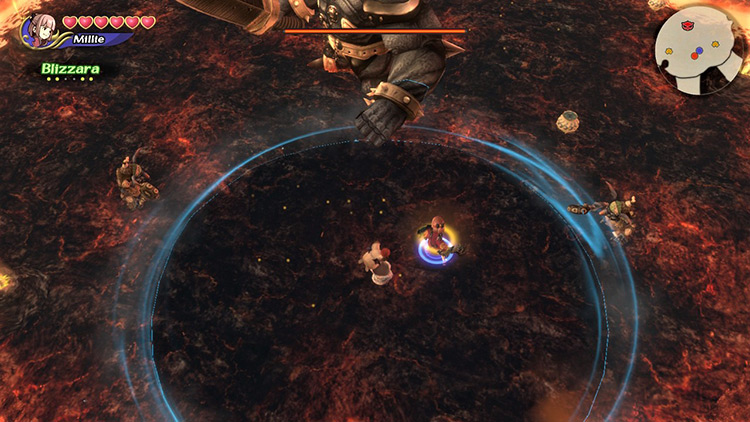
Tip #5: Use Steam to Damage the Boss
You’ll have noticed a bunch of water pots and glowing lava pits around the battle arena.
Activating these will cause a stream of vapor to escape from the rock wall. It’ll significantly damage the boss if you line up the shot.
It’s easy to hurt yourself with the vapor streams, so use this strategy at your own risk.
Changes with Dungeon Cycles
Along with the usual stronger monsters and improved rewards, higher dungeon cycles also grant the Iron Giant a brand-new move.
From Cycle 2 onward, the boss will cast Graviga when it runs out of giant swords. It makes the boss look like General Radahn from Elden Ring, but it’s not especially powerful.
Just run away to avoid the attack.
Obtainable Items
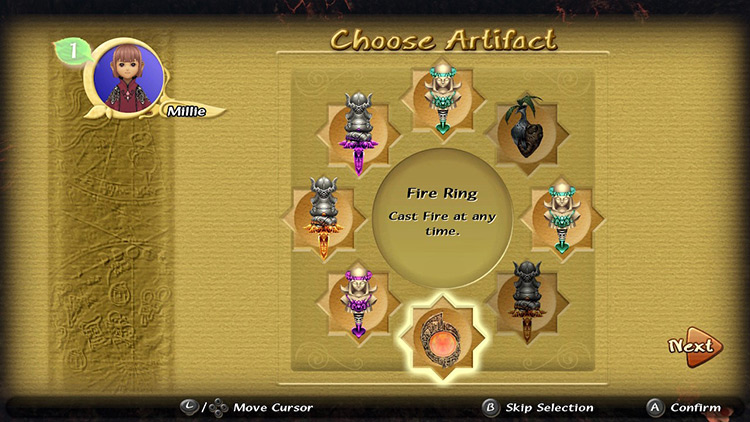
You’ll find Artifacts, crafting Recipes, and Materials throughout the dungeon. You get to keep all Recipes and Materials, but you can only choose one Artifact to take with you.
Chest Items
SCROLL
| Cycle | First | Second | Third |
|---|---|---|---|
| Recipes | Flame Belt Flame Craft Flame Sallet Flame Shield Gloves Master’s Weapon Warrior’s Weapon |
Flame Armor Flame Belt Flame Craft Flame Gloves Flame Sallet Flame Shield Master’s Weapon Mighty Weapon Zeal Kit |
Flame Armor Flame Belt Flame Gloves Flame Sallet Flame Shield Healing Kit Legendary Weapon Master’s Weapon Mighty Weapon Valiant Weapon Victorious Weapon Zeal Kit |
| Materials | Iron Mythril |
Alloy Iron Mythril |
Alloy Diamond Ore Mythril |
Monster Items
SCROLL
| Cycle | First | Second | Third |
|---|---|---|---|
| Blazer Beetle | Hard Shell (M) | Hard Shell (M) | Hard Shell (M) |
| Coeurl | Coeurl’s Whisker (M) | Coeurl’s Whisker (M) | Ancient Potion (M) Coeurl’s Whisker (M) |
| Lava Ahriman | Engetsurin Faerie’s Tear (M) Flametongue Giant’s Glove Magma Rock (M) Power Wristband |
Engetsurin Faerie’s Tear (M) Giant’s Glove Heavy Armband Magma Rock (M) Twisted Headband |
Angel’s Tear (M) Faerie’s Tear (M) Heavy Armband Magma Rock (M) Masquerade Onion Sword Twisted Headband |
| Ogre | Black Hood Buckler Cat’s Bell Faerie Ring Fire Ring Moon Pendant Noah’s Lute Ogre Fang (M) Sage’s Staff |
Black Hood Chicken Knife Fire Ring Kris Moon Pendant Noah’s Lute Ogre Fang (M) Red Slippers Sage’s Staff |
Chicken Knife Diamond Armor (R) Fire Ring Gold Hairpin Kris Moon Pendant Ogre Fang (M) Red Slippers Star Pendant Teddy Bear Wonder Wand |
Boss Items
Each boss has four drop pools per cycle.
Your Bonus Points determine which rewards you qualify to get. The higher your points, the more chances you have to get good rewards.
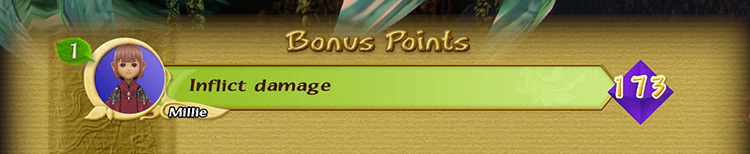
Higher ranks can randomly get any of the previous reward pools. There’s also a tiny chance that the contrary might happen, giving you higher-level rewards at low scores.
SCROLL
| Cycle | First | Second | Third |
|---|---|---|---|
| 0+ BP | Book of Light Drill Engetsurin Moon Pendant |
Fire Ring Green Beret Main Gauche Silver Bracer |
Chicken Knife Mjollnir Red Slippers Star Pendant |
| 102+ BP | Drill Kris Power Wristband Star Pendant |
Cat’s Bell Drill Fang Charm Fire Ring |
Fire Ring Flametongue Mage’s Staff Orichalcum (M) |
| 127+ BP | Fire Ring Green Beret Main Gauche Silver Bracer |
Chicken Knife Mjollnir Red Slippers Star Pendant |
Legendary Weapon Red Eye Twisted Headband Wonder Wand |
| 159+ BP | Cat’s Bell Drill Fang Charm Fire Ring |
Fire Ring Flametongue Mage’s Staff Orichalcum (M) |
Celestial Weapon Main Gauche Masamune Rune Bell |

-
Final Fantasy Crystal Chronicles Remastered
- Mt. Kilanda Dungeon Guide + Map (FFCC Remastered)
Related Posts:
 River Belle Path Dungeon Guide + Map (FFCC Remastered)
 Goblin Wall Dungeon Guide + Map (FFCC Remastered)
 Mushroom Forest Dungeon Guide + Map (FFCC Remastered)
 Mine of Cathuriges Dungeon Guide + Map (FFCC Remastered)
 Tida Village Dungeon Guide + Map (FFCC Remastered)
 Selepation Cave Dungeon Guide + Map (FFCC Remastered)
 Daemon’s Court Dungeon Guide + Map (FFCC Remastered)
 Veo Lu Sluice Dungeon Guide + Map (FFCC Remastered)