
The Mushroom Forest is the second dungeon players reach during their first year in Final Fantasy Crystal Chronicles.
It’s located in the southwestern corner of the Iron Mine Downs region and contains a Water Elemental Hot Spot.
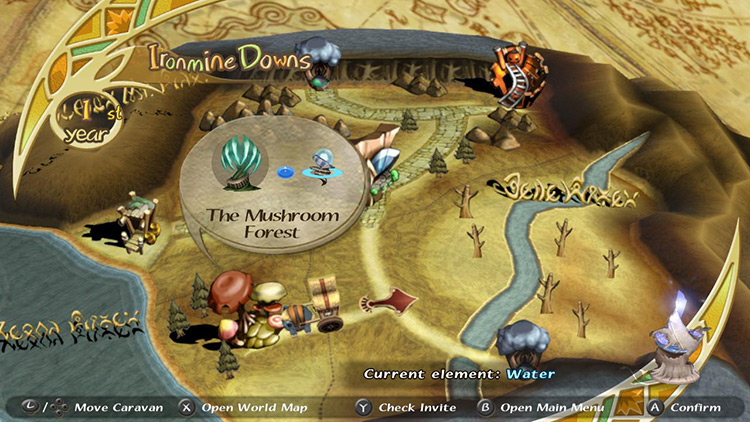
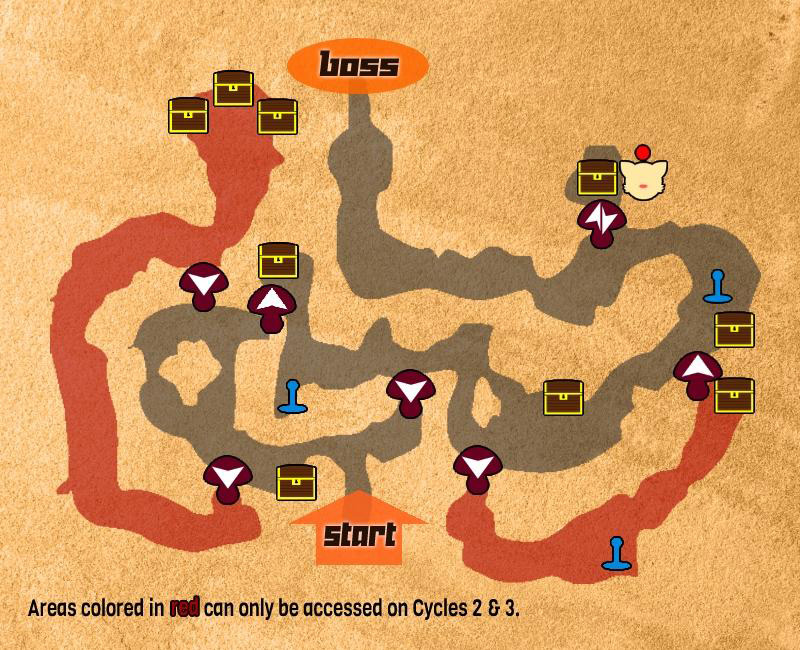
This dungeon is a bit confusing at first due to some blocked-off paths that’ll leave you scratching your head, but it’s actually quite linear once you’ve figured it out.
Here are some things to remember as you make your way through Mushroom Forest for the first time:
- Start by going left
- Ignore the blocked-off areas
- Use mushrooms to reach higher places
- Don’t forget your Moogle Stamp (covered in detail below).
Let’s break it down step by step.
TABLE OF CONTENTS
Map
Walkthrough
Going into Mushroom Forest, you’ll immediately face left and right roads.
Step #1: Go Left
There’s nothing of interest to the right, so take a left and prepare for your first battle against a Carrion Worm.
Fire is super-effective against Carrion Worms, but you don’t have magicite yet, so use Focus Attacks or regular melee combos to take it out.
You’ll get a Cure magicite for your trouble. Pick up the magicite, open the chest to the south, and keep moving forward.
Step #2: Ignore the Blocked-Off Path
As you advance, you’ll notice an inaccessible path down to the left of your current platform.
You’re not missing some secret path or puzzle. There’s no way down there until the second time you come to collect Myrrh, so keep moving forward and don’t worry about it.
Next up is a temporary bifurcation of the path.
A Hell Plant guards one side, and the other hides a Gremlin.
- Hell Plants are weak to Fire and can poison you with their seed projectiles.
- Gremlins are weak to Ice and can inflict Slow with melee attacks.
Both paths lead to the same place, so I recommend starting with the left path (Hell Plant) and then moving on to the Gremlin.
Another Hell Plant and a Carrion Worm await after the paths join back up.
Deal with the monsters and keep following the path until you come across a suspicious-looking mushroom cap.
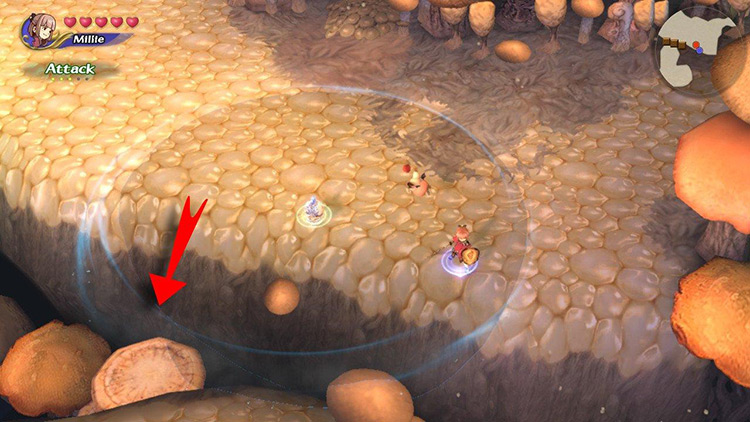
Step #3: Jump on that Mushroom

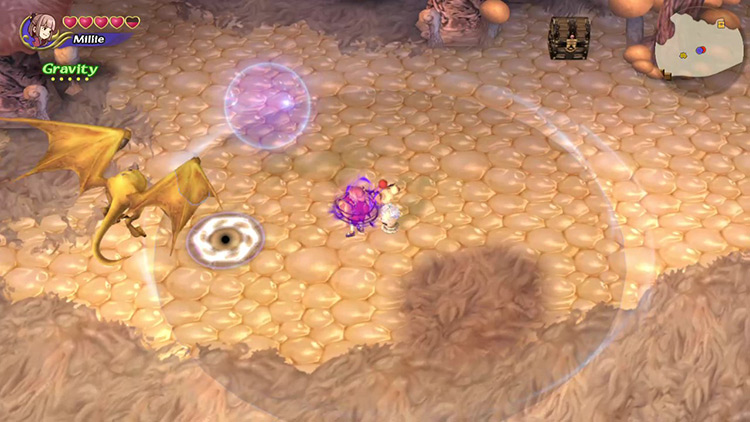
Use this mushroom to jump to the next platform, and be prepared to fight an Ahriman the moment you land. Kill it and plunder the chest it was guarding for an Artifact.
Tip: Gravity can immobilize an Ahriman for a few seconds. Create Gravity by fusing two different elemental magicites (Fire, Thunder, Blizzard) in your command list.
A Gremlin roams the area just a few steps southward. Take care not to alert it before killing the Ahriman.
Head south until you find a Water Hot Spot, then head east past a springy mushroom leading back to the beginning of the dungeon.
You’ll find a Hell Plant and a Hedgehog Pie right before a fork in the road.
Killing this Hedgehog Pie should award you the Fire magicite, making the rest of the dungeon much more manageable.
Step #4: Fight your Way Through
The road south hides a Hell Plant, so go around the other path to get behind it for an easier fight.
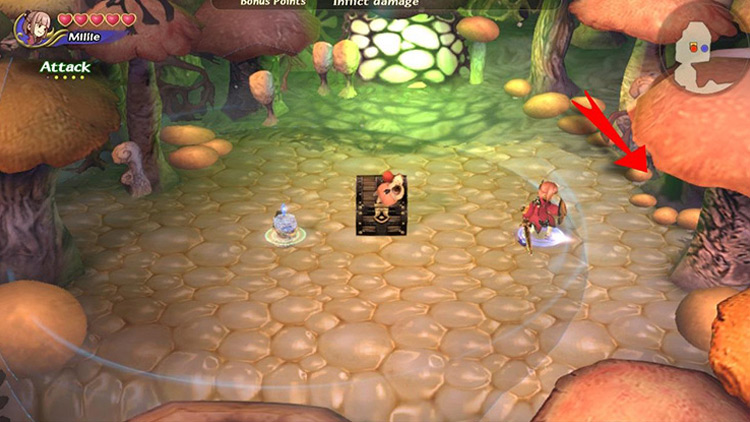
Keep hugging the southern wall and kill the Carrion Worm roaming the open area, then keep moving eastward to find an Ahriman guarding a chest.
Brace for another fight right after defeating the Ahriman and collecting your loot. This time, it’s the Hedgehog Pie + Hell Plant combo.
Once they’re down, keep moving to the northeast for another dynamic duo: a Hedgehog Pie and an Ahriman guarding a chest. You know what to do.
Note: There’s another inaccessible platform south of this area. This one will become accessible on Cycle 3.
Get your loot and keep heading northward. You’ll go past a Water Hot Spot before facing a Hell Plant blocking your path.
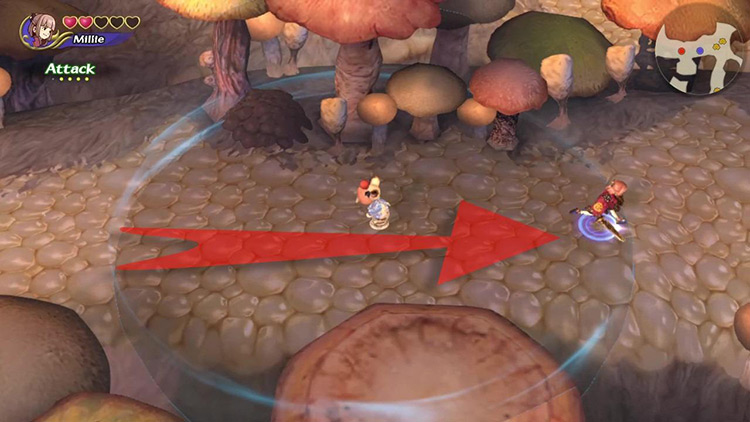
Kill it with your preferred method and immediately take a right to find a giant springy mushroom.
Step #5: Jump Up for a Moogle Stamp
This mushroom cap will propel you toward an area with an unprotected chest. If that seems suspicious, it’s because it is.
Grab your treasure and examine the mushrooms to the right to find a hidden Moogle Nest.
The point of coming here is to get this dungeon’s Moogle Stamp, but it’s an excellent time to try spraying Mog with paint.
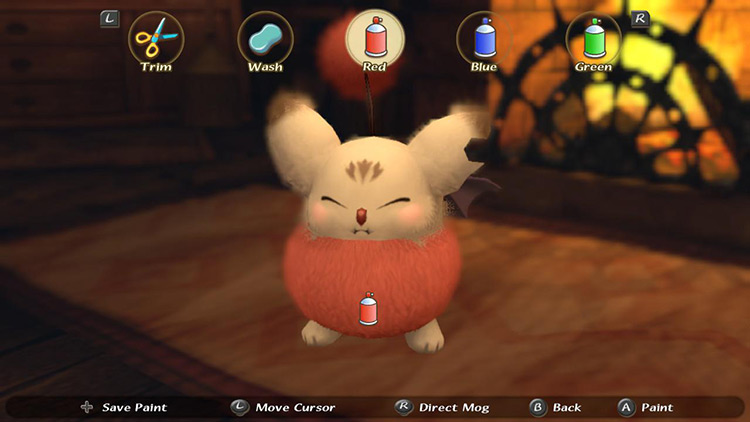
Tip: Different colors confer different effects. Paint Mog red to increase his chances of casting Fire against the flammable boss ahead.
When you’re done, head back to the main road for the last stretch before the boss.
Step #6: Make a Beeline for the Boss
The way forward is simple but full of enemies.
Just start moving forward and keep your weapon in hand.
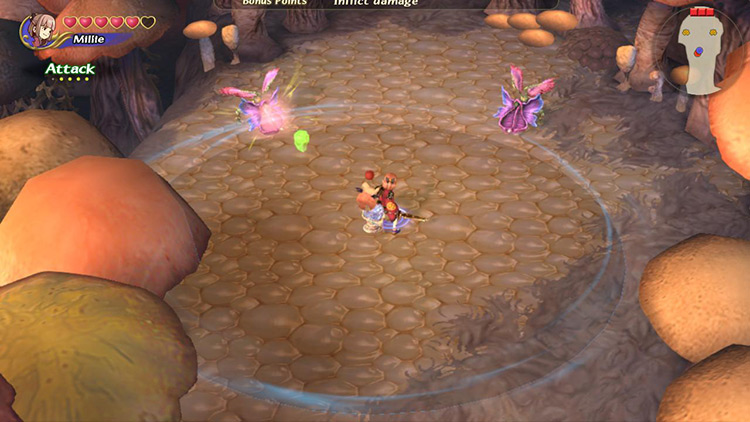
Before reaching the boss area, you’ll fight:
- A lone Hell Plant
- A Hedgehog Pie with a Hell Plant
- A lone Gremlin
- Two Hell Plants guarding the boss entrance
Remember to heal and set your Command List before heading into the boss area.
Boss: Malboro
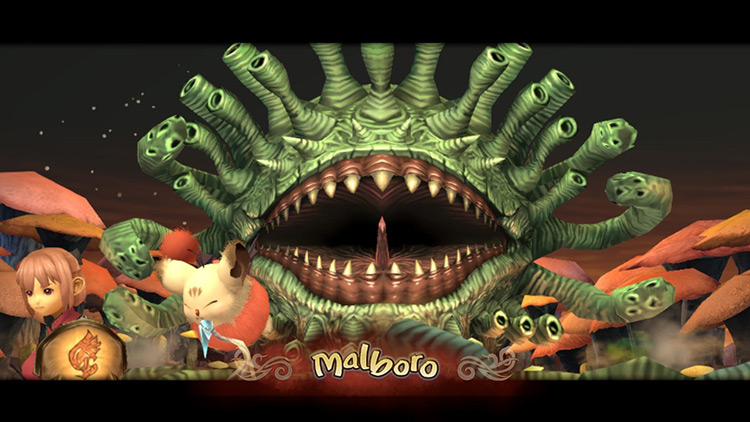
Final Fantasy’s classic Malboro comes back in Crystal Chronicles as a boss.
The first minute or two of this battle might feel overwhelming, but it’ll be a breeze once you figure out its patterns.
Follow these tips for an easier fight.
Tip #1: Destroy the Turrets
Your first priority during this boss fight is getting rid of the Hell Plants protecting the Malboro.
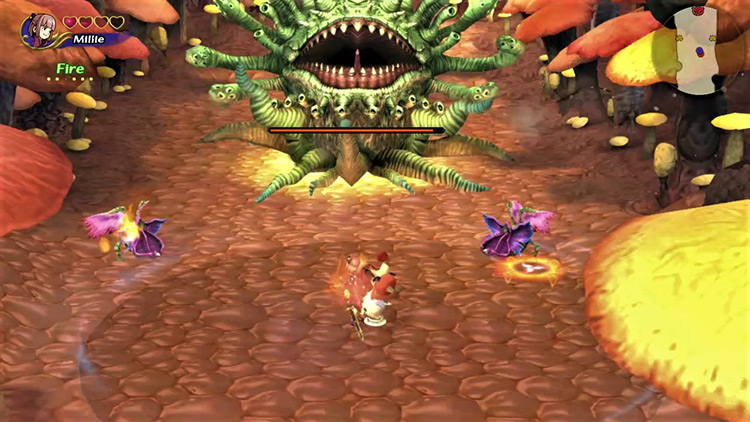
They’re the real damage dealers in the fight, while the Malboro focuses more on inflicting status ailments like Slow and Poison.
The boss will keep summoning Hell Plants every couple of minutes. Drop whatever you’re doing and kill them whenever that happens.
Tip #2: Set Them on Fire
The Malboro is weak to Fire damage – as are the Hell Plants it summons.
Starting the fight with a few well-placed Fire spells will let you kill the Hell Plants and make the fight much easier.
Don’t worry if you take damage while doing this. You’ll have time to heal after the Hell Plants are cooked.
Note: Melee weapons are an excellent second-best option.
Tip #3: Evade Horizontally
The Malboro’s attacks have considerable range, but it’s easy to avoid damage if you keep moving around.
Since it’s rooted in place, most of its attacks are easier to avoid running from side to side instead of putting distance between you and the boss.
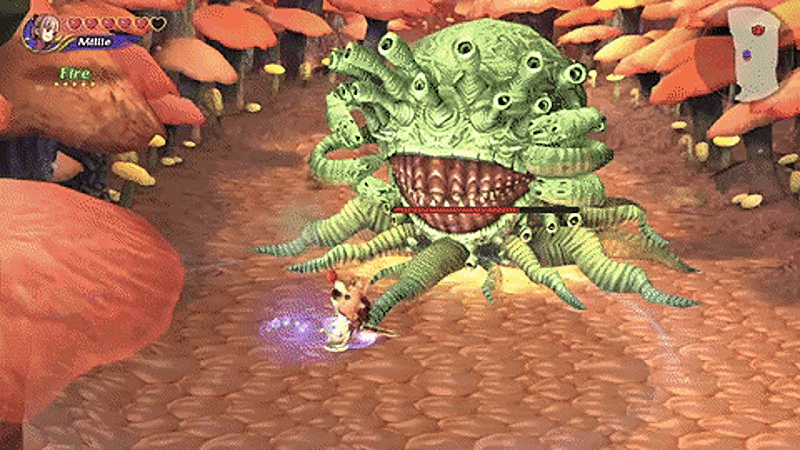
This is especially true of the Malboro’s signature Bad Breath move, which covers one side of the map with poisonous miasma.
Ideally, you’ll deal damage, run to the other side, then deal damage again and repeat the cycle indefinitely.
Tip #4: Don’t Fear the Vacuum
One of the Malboro’s scariest-looking moves is using a strong inhalation to pull your characters toward it.
Tip: It’ll do this more often if you get too far away.
Most of us instinctively know to keep our distance from giant monsters, but it’s not necessary in this case.
Don’t resist the inhalation by running in the opposite direction. Instead, use this time to cast your spells or unleash a flurry of blows on the Malboro.
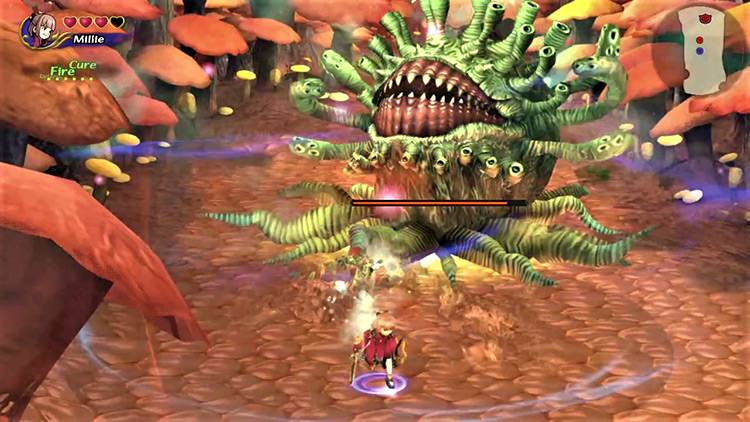
Tip #5: Keep Clear & Cure Handy
The most important tip for this battle is to keep Clear and Cure in your Command List.
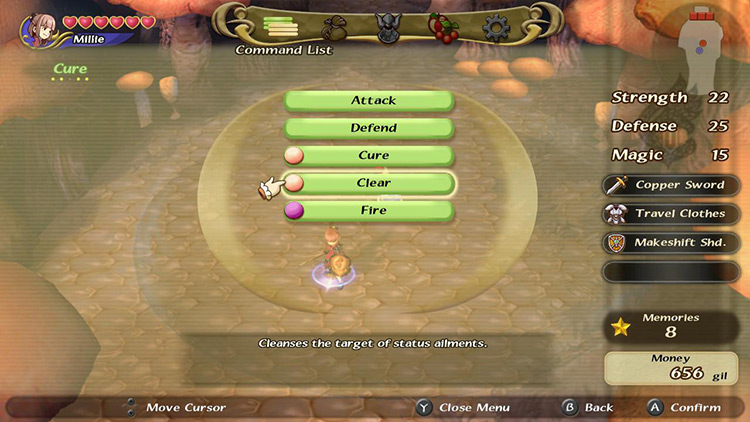
The Malboro might not deal that much direct damage, but its status ailments – specifically Poison – can do a number on you (or any party members).
You might also get afflicted with Slow or Curse, both of which make the battle longer than it needs to be.
Nothing that casting Clear or Cure can’t take care of.
Changes with Dungeon Cycles
Besides getting more, stronger monsters to protect higher-value loot, the Mushroom Forest’s layout changes a bit with each new cycle.
- Cycle 2 reveals a new path near the beginning of the level, leading to three chests.
- Cycle 3 opens up another new path near the mid-point leading to a single new chest.
The most important changes pertain to the Malboro boss fight on Cycle 3.
- The Malboro is protected by Stone Plants (immune to Fire, Blizzard, and Thunder).
- It gains the Blizzaga spell, which freezes almost the entire boss room.
Tips: Try this fight as a Liltie with high melee damage to take care of Stone Plants, and bring equipment with the Resist Ice effect if possible.
Obtainable Items
You’ll find Artifacts, crafting Recipes, and Materials throughout the dungeon.
You get to keep all Recipes and Materials, but you can only choose one Artifact to take with you.
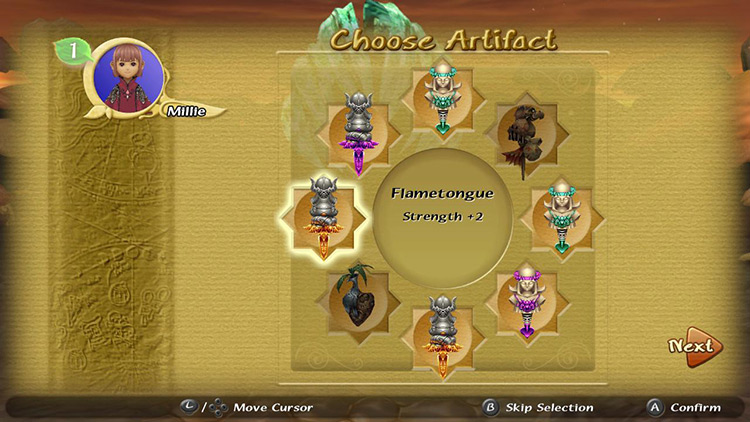
Chest Items
There are four Artifact chests in Mushroom Forest the first time you visit. Three more Recipe chests become available on the second cycle, then a fourth one on the third.
SCROLL
| Cycle | First | Second | Third |
|---|---|---|---|
| Recipes | None present | Bronze Belt Fiend Kit Iron Belt Iron Gloves Iron Shield Mythril Belt Mythril Gloves Mythril Sallet Mythril Shield |
Daemon Kit Gold Gloves Fiend Kit Mythril Belt Mythril Gloves Mythril Sallet Mythril Shield Pure Belt Time Sallet |
| Artifacts | Buckler Double Axe Cat’s Bell Dragon’s Whisker Earth Pendant Green Beret Mage Masher Maneater Moogle Pocket Shuriken Silver Bracer Silver Spectacles |
Black Hood Cat’s Bell Double Axe Earth Pendant Flametongue Green Beret Ice Brand Kris Sage’s Staff Silver Bracer |
Sage’s Staff Rune Staff Mage’s Staff Kris Moogle Pocket Earth Pendant Black Hood Wonder Bangle Flametongue Ice Brand Loaded Dice Sasuke’s Blade |
Monster Items
SCROLL
| Cycle | First | Second | Third |
|---|---|---|---|
| Ahriman | Iron (M) | Iron (M) | Mythril (M) |
| Ice Ahriman (MP only) | None present | Chilly Gel (M) Faerie’s Tear (M) |
Angel’s Tear (M) Chilly Gel (M) |
| Carrion Worm | No drops | No drops | Mythril (M) |
| Gremlin | Bronze (M) Bronze Belt Bronze Sallet |
Bronze Belt Bronze Sallet Mythril Belt Mythril Sallet |
Mytrhril Belt Mythril Sallet Pure Belt Time Sallet |
| Hedgehog Pie | Bronze (M) Crystal Ball (M) Gold (M) Silver (M) |
Crystal Ball (M) Gold (M) Silver (M) |
Crystal Ball (M) Gold (M) Silver (M) |
| Dark Hedgehog | None present | None present | Fiend Kit Jade (M) Ruby (M) Tome of Speed |
| Stone Hedgehog | None present | None present | Alloy (M) Diamond Ore (M) Jade (M) Ruby (M) |
| Hell Plant | Bronze (M) Bronze Armor Bronze Gloves Novice’s Weapon |
Bronze (M) Bronze Armor Bronze Gloves Master’s Weapon Mythril Armor Mythril Shield Novice’s Weapon Valiant Weapon |
Gold Gloves Holy Armor Magic Shield Master’s Weapon Mighty Weapon Mythril Armor Mythril Gloves Mythril Shield Pure Armor Valiant Weapon Victorious Weapon |
| Ochu | None present | Tiny Crystal (M) | Mythril (M) Tiny Crystal (M) |
Boss Items
Each boss has four reward pools per cycle. Your Bonus Points determine which pool becomes available to you after beating the boss.

You won’t always get to choose from the best-possible reward pool. Higher ranks will sometimes get one of the previous reward pools instead.
SCROLL
| Cycle | First | Second | Third |
|---|---|---|---|
| 0+ BP | Buckler Dragon Whisker Earth Pendant Shuriken |
Buckler Earth Pendant Maneater Sage’s Staff |
Ancient Potion Cat’s Bell Sasuke’s Blade Wonder Bangle |
| 108+ BP | Flametongue Mage Masher Moogle Pocket Silver Spectacles |
Black Hood Double Axe Moogle Pocket Silver Bracer |
Green Beret Mage’s Staff Orichalcum Wonder Bangle |
| 135+ BP | Buckler Earth Pendant Maneater Sage’s Staff |
Ancient Potion Cat’s Bell Sasuke’s Blade Wonder Bangle |
Diamond Armor Double Axe Moogle Pocket Silver Bracer |
| 169+ BP | Black Hood Double Axe Moogle Pocket Silver Bracer |
Green Beret Mage’s Staff Orichalcum Wonder Bangle |
Ashura Cat’s Bell Earth Pendant Malboro Seed |

-
Final Fantasy Crystal Chronicles Remastered
- Mushroom Forest Dungeon Guide + Map (FFCC Remastered)