To unlock the Level 50 dungeon Haukke Manor (Hard), you’ll need to accept the Level 50 quest “Maniac Manor” from Lauriane in Mor Dhona (X:22.1 Y:8.6) inside the Seventh Heaven Bar.
But first, you need to clear Haukke Manor’s normal mode and finish the Level 50 final Main Scenario Quest (MSQ) “The Ultimate Weapon” from Raubahn in Northern Thanalan (X:15.0, Y:16.0). We’ve organized all of the quest requirements below:
Step-by-Step Unlock Guide

- Complete the Level 28 Main Scenario Quest (MSQ) “Skeletons in Her Closet” from Ursandel in Old Gridania (X:11.9, Y:4.5).
- Finish the Level 50 MSQ “The Ultimate Weapon” from Raubahn in Northern Thanalan (X:15.0, Y:16.0).
- Accept the quest “Maniac Manor” from Lauriane in Mor Dhona (X:22.1 Y:8.6).
Detailed Unlock Guide

As with every hard dungeon in the game, you need to unlock and clear its normal version first. Head to Old Gridania (X:11.9, Y:4.5) and accept the Level 28 Main Scenario Quest (MSQ) “Skeletons in Her Closet.”
This quest is deep into the Main Scenario Questline for A Realm Reborn, so you’ll need to do every quest leading up to it beforehand.
“Skeletons in Her Closet” will also grant you access to Haukke Manor’s normal mode. Clear the dungeon using the Duty Finder, or solo it while unsynced to finish the quest.
Continue with the MSQs until you finish the Level 50 MSQ “The Ultimate Weapon” from Raubahn in Northern Thanalan (X:15.0, Y:16.0). Finishing this quest allows you to unlock the expert-level dungeons in Final Fantasy XIV: A Realm Reborn, including Haukke Manor (Hard).
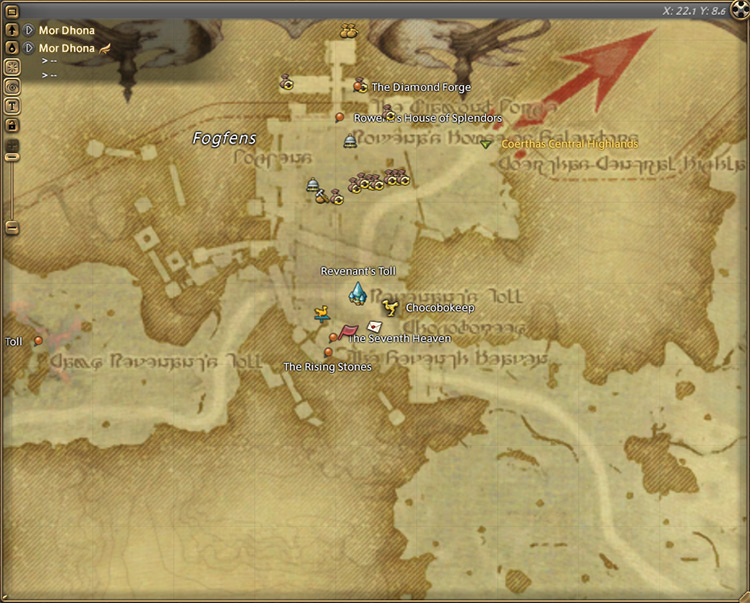
Once you’re finished with all the required MSQs, head to the Seventh Heaven bar and talk to Lauriane in Mor Dhona (X:22.1 Y:8.6).
She’ll tell you about a stranger she encountered in Gridania that talked about the horrors that are taking place inside the manor yet again.
Speak with Ursandel again in Old Gridania (X:11.9, Y:4.5) to get more information.
Your old acquaintance will confirm Lauriane’s rumors and ask for your help in clearing the manor once again. It would seem that voidsents have taken over the manor this time around, and Wood Wailers are currently fighting for their lives inside the manor.
After talking to Ursandel, Haukke Manor (Hard) will be unlocked.
While this dungeon can be cleared easily on your own while unsynced, you may encounter it during duty roulettes. Here’s a breakdown of each boss and their mechanics to help you out:
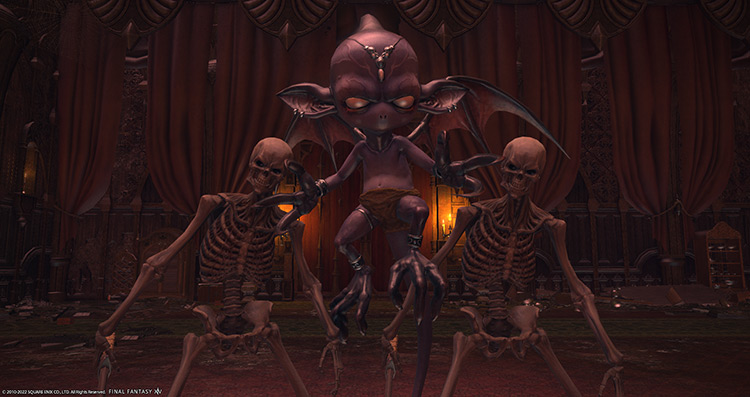
Boss #1: Manor Jester
Mechanics:
- Blizzard: The boss’ fast-casting normal attack.
- Void Blizzard: A single-target attack that also inflicts a “Slow” debuff. This debuff increases the delay between its target’s attacks. Healers should dispel this debuff as soon as possible.
- Void Blizzard III: A hard-hitting tankbuster on the primary target. Mitigate and heal through the attack.
- Manor Butler: The boss will continuously summon skeletal butlers throughout the fight using a purple resurrection circle. These butlers can use “Hell Slash,” a heavy-hitting attack.
- Manor Steward: While it’s not guaranteed, the boss may also resurrect this stronger version of the “Manor Butler” mob. If the boss summons this mob, focus on killing it first.
- Nether Burst (Manor Steward): A strong room-wide AoE attack. Mitigate and heal through the damage.
Rewards
- 5 Allagan Tomestone of Poetics
| Name | Type | Rarity |
|---|---|---|
| Demagogue Wristlets | Bracelets | Dungeon (Green) |
| Hoplite Wristlets | Bracelets | Dungeon (Green) |
| Peltast Wristlets | Bracelets | Dungeon (Green) |
| Strategos Wristlets | Bracelets | Dungeon (Green) |
| Toxotes Wristlets | Bracelets | Dungeon (Green) |
| Austere Leggings | Feet | Dungeon (Green) |
| Blessed Espadrilles | Feet | Dungeon (Green) |
| Demagogue Pattens | Feet | Dungeon (Green) |
| Hetairos Jackboots | Feet | Dungeon (Green) |
| Hoplite Sabatons | Feet | Dungeon (Green) |
| Lord’s Sabatons | Feet | Dungeon (Green) |
| Noble’s Leg Guards | Feet | Dungeon (Green) |
| Peltast Leggings | Feet | Dungeon (Green) |
| Strategos Duckbills | Feet | Dungeon (Green) |
| Thick Sollerets | Feet | Dungeon (Green) |
| Toxotes Moccasins | Feet | Dungeon (Green) |
| War Caligae | Feet | Dungeon (Green) |
| Demagogue Ring | Ring | Dungeon (Green) |
| Hoplite Ring | Ring | Dungeon (Green) |
| Peltast Ring | Ring | Dungeon (Green) |
| Strategos Ring | Ring | Dungeon (Green) |
| Toxotes Ring | Ring | Dungeon (Green) |
Boss #2: Ash
Mechanics:
- Abyssal Wing: A frontal cleave attack on the boss’ primary target. The tank should always face the boss away from the party.
- Abyssal Charge: The boss will summon weapons around him that will dash toward five different directions. Avoid as necessary.
- Prime Guillotine: Blue line attacks will appear in set patterns throughout most of the arena. Players hit by these attacks will be inflicted with a “Silence” debuff, preventing them from casting any spells. Identify the pattern and dodge accordingly.
- Tenebrous Missile: The boss will target a random player with a single-target attack. Afterward, a spinning weapon will appear underneath where the target was standing when the cast went off. Standing too close to the spinning weapon will result in a knockback and “Heavy” debuff, slowing the player’s movement. Bait the missiles in one area and move out as soon as the attack goes off.
- Abyssal Transfixion: A single-target attack on the primary tank that applies a “Paralysis” debuff. This debuff interrupts a player’s action every three seconds for 30 seconds. Healers can dispel this debuff.
Rewards
- 10 Allagan Tomestone of Poetics
| Name | Type | Rarity |
|---|---|---|
| Austere Ringbands | Hands | Dungeon (Green) |
| Blessed Halfgloves | Hands | Dungeon (Green) |
| Demagogue Halfgloves | Hands | Dungeon (Green) |
| Hetairos Armguards | Hands | Dungeon (Green) |
| Hoplite Gauntlets | Hands | Dungeon (Green) |
| Lord’s Gauntlets | Hands | Dungeon (Green) |
| Noble’s Armguards | Hands | Dungeon (Green) |
| Peltast Mitts | Hands | Dungeon (Green) |
| Strategos Gloves | Hands | Dungeon (Green) |
| Thick Vambraces | Hands | Dungeon (Green) |
| Toxotes Bracers | Hands | Dungeon (Green) |
| War Mitt Gauntlets | Hands | Dungeon (Green) |
| Blessed Monocle | Head | Dungeon (Green) |
| Demagogue Mask | Head | Dungeon (Green) |
| Hetairos Elmo | Head | Dungeon (Green) |
| Hoplite Circlet | Head | Dungeon (Green) |
| Lord’s Celata | Head | Dungeon (Green) |
| Noble’s Goggles | Head | Dungeon (Green) |
| Peltast Helm | Head | Dungeon (Green) |
| Strategos Coif | Head | Dungeon (Green) |
| Thick Chain Coif | Head | Dungeon (Green) |
| Toxotes Bandana | Head | Dungeon (Green) |
| War Mesail | Head | Dungeon (Green) |
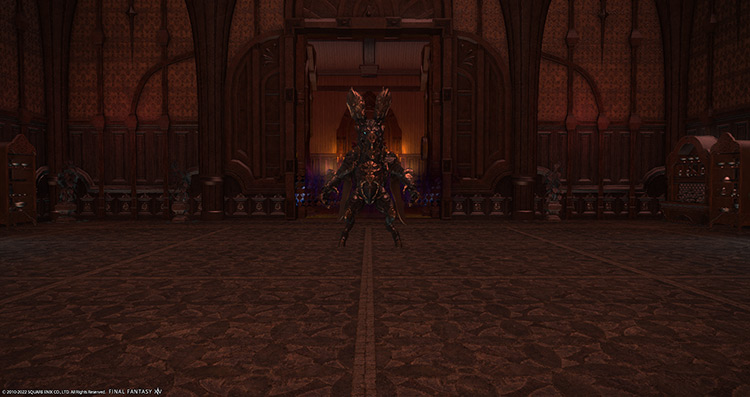
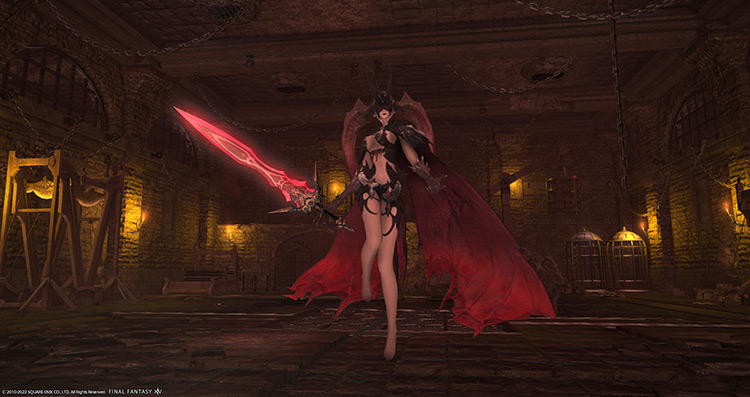
Boss #3: Halicarnassus
Mechanics:
Phase 1: Manor Sentry
Always tank the boss in the middle of the arena to avoid overlapping damage and prepare for mechanics later in the fight.
- Void Thunder III: A tankbuster attack on the primary target. Use mitigation skills and heal through the damage.
- Void Fire II: A random player will be targeted with a large circular AoE. Move out of this as necessary.
- Dark Mist: The boss will cast a point-blank AoE that inflicts a “Terror” debuff. This debuff will freeze a player in their place for 10 seconds, leaving them vulnerable to AoEs. Move out of the boss’ hitbox to avoid.
- Manor Sentry: At around 80% HP, the boss will summon the “Manor Sentry.” Burn this mob down as soon as possible to mitigate the incoming “Blood Rain” AoE damage.
- Stone (Manor Sentry): The sentry’s fast-casting normal attack.
- Stoneskin (Manor Sentry): The sentry will buff the boss with a shield, absorbing a set amount of damage (similar to the old White Mage “Stoneskin”).
- Dread Gaze (Manor Sentry): A look-away mechanic that inflicts “Paralysis” on affected players. Face your character away from the sentry before the cast goes off.
- Fatal Allure (Phase 1): The boss will sacrifice her selected minion, absorbing them to heal herself, gain buffs, and increase the damage of the incoming “Blood Rain” attack. The sentry grants the boss stun and silence resistance.
- Blood Rain: An unavoidable room-wide AoE that deals damage based on the HP of the minion that the boss absorbed. Lower the sentry’s HP as much as possible to mitigate the attack.
Phase 2: Manor Maidservant
- Void Fire IV: An improved version of the “Void Fire II” AoE due to the absorbed “Manor Sentry.”
- Manor Maidservant: The boss will summon her Phase 2 minions at around 60% HP. Similar to the sentry, bring their HP down as much as possible.
- Void Fire III (Manor Maidservant): A non-telegraphed AoE attack on a random target. Spread out to avoid overlapping damage.
- Fatal Allure (Phase 2): The second maidservant she absorbs will give her a “Damage Up” buff after absorbing them.
- Blood Rain (Phase 2): Since there are two maidservants to absorb, the boss will cast this attack twice. Remember to mitigate and heal through both attacks quickly.
Phase 3: Lady Amandine
If the boss is brought down to 30-35% very quickly, she may instantly absorb “Lady Amandine” and wipe the party with “Blood Rain”.
If your party is having trouble with this, stop hitting the boss at around 40% HP to let Amandine spawn.
- Void Thunder IV: An improved version of the “Void Thunder III” tankbuster due to the absorbed “Manor Maidservants.”
- Lady Amandine: The boss from Haukke Manor’s normal mode returns as Halicarnassus’ minion for the third phase. The boss will spawn Amandine at around 30-35% HP.
- Fire (Lady Amandine): Amandine’s fast-casting normal attack.
- Dark Mist (Lady Amandine): Amandine’s version of “Dark Mist.” Move out to avoid the “Terror” debuff.
- Void Thunder III (Lady Amandine): Amandine’s version of “Void Thunder III.” Mitigate and heal through the attack.
- Fatal Allure (Phase 3): After absorption, Lady Amandine will give the boss a “Haste” buff, making the boss’ attacks go off faster.
- Beguiling Mist + Void Fire IV: The boss will cast a room-wide AoE that inflicts the “Seduced” debuff, causing players to move toward the boss for four seconds. Then, she’ll use “Void Fire IV” immediately after. Move to the corners of the room to give yourself enough room to avoid the succeeding “Void Fire IV.”
Rewards
- 15 Allagan Tomestone of Poetics
- Succubus Triple Triad Card (not guaranteed)
| Name | Type | Rarity |
|---|---|---|
| Austere Cowl | Body | Dungeon (Green) |
| Blessed Gown | Body | Dungeon (Green) |
| Hetairos Mail | Body | Dungeon (Green) |
| Hoplite Tabard | Body | Dungeon (Green) |
| Lord’s Cuirass | Body | Dungeon (Green) |
| Noble’s Jacket | Body | Dungeon (Green) |
| Peltast Acton | Body | Dungeon (Green) |
| Thick Haubergeon | Body | Dungeon (Green) |
| Toxotes Tunic | Body | Dungeon (Green) |
| War Harness | Body | Dungeon (Green) |
| Austere Tights | Legs | Dungeon (Green) |
| Blessed Slops | Legs | Dungeon (Green) |
| Demagogue Chausses | Legs | Dungeon (Green) |
| Hetairos Breeches | Legs | Dungeon (Green) |
| Hoplite Trousers | Legs | Dungeon (Green) |
| Lord’s Trousers | Legs | Dungeon (Green) |
| Noble’s Brais | Legs | Dungeon (Green) |
| Peltast Breeches | Legs | Dungeon (Green) |
| Strategos Breeches | Legs | Dungeon (Green) |
| Thick Skirt | Legs | Dungeon (Green) |
| Toxotes Kecks | Legs | Dungeon (Green) |
| War Subligar | Legs | Dungeon (Green) |
Extra Treasure Coffers
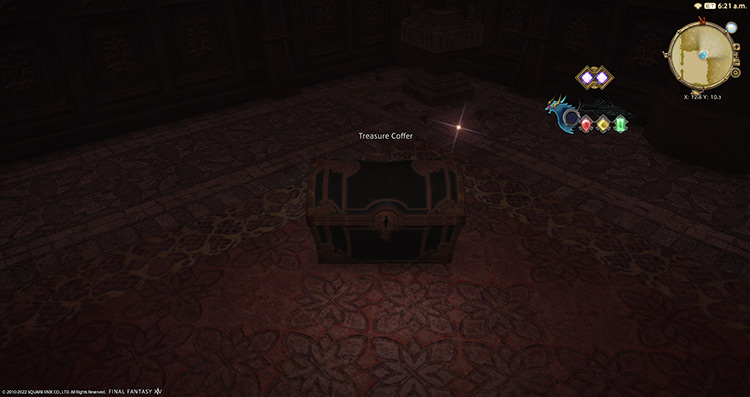
Apart from the boss rewards, there are four treasure coffers located throughout the dungeon that you can open for more gear rewards:
- (X:10.4, Y:11.5)
- (X:12.6, Y:10.2)
- (X:10.3, Y:12.1)
- (X:10.8, Y:12.1)
-
Final Fantasy XIV
- FFXIV Haukke Manor (Hard): How To Unlock + Boss Guide
Related Posts:
 FFXIV Haukke Manor (Normal): Unlock + Dungeon Boss Guide
 FFXIV Pharos Sirius (Normal): How To Unlock + Dungeon Guide
 FFXIV Copperbell Mines (Hard): How To Unlock + Boss Guide
 FFXIV Lapis Manalis: Unlock + Dungeon Boss Guide
 FFXIV Dohn Mheg: How To Unlock + Boss Guide
 FFXIV The Qitana Ravel: Unlock + Boss Guide
 FFXIV Bardam’s Mettle: How To Unlock + Full Boss Guide
 FFXIV Sohm Al (Normal): How To Unlock + Dungeon Guide