| All Razor Claw Locations | ||
|---|---|---|
| # | Location | Repeatable? |
| 1 | Veilstone City — Hidden in Cyrus’s office inside Galactic HQ. | No |
| 2 | Victory Road — Inside a Poké Ball close to the cave’s rear entrance. | No |
| 3 | Route 224 — Inside a Poké Ball on a small island southwest from the beach. | No |
| 4 | Battle Frontier — Sold at the item kiosk for 48 BP. | Yes |
The earliest available Razor Claw you can get is inside Team Galactic HQ in Veilstone City. The item is hidden, so using the Dowsing Rod Pokétch app is helpful here.
There are a few other locations where you can get this item, but alternatively you can also buy Razor Claws at the Battle Frontier. This is the only way to get unlimited copies of the item in the game.
Razor Claw Locations
Location 1: Galactic HQ (Step-by-Step)
The first Razor Claw you can get in the game is only available after defeating Snowpoint City’s Gym Leader Candice and speaking to Commander Jupiter at Lake Acuity.
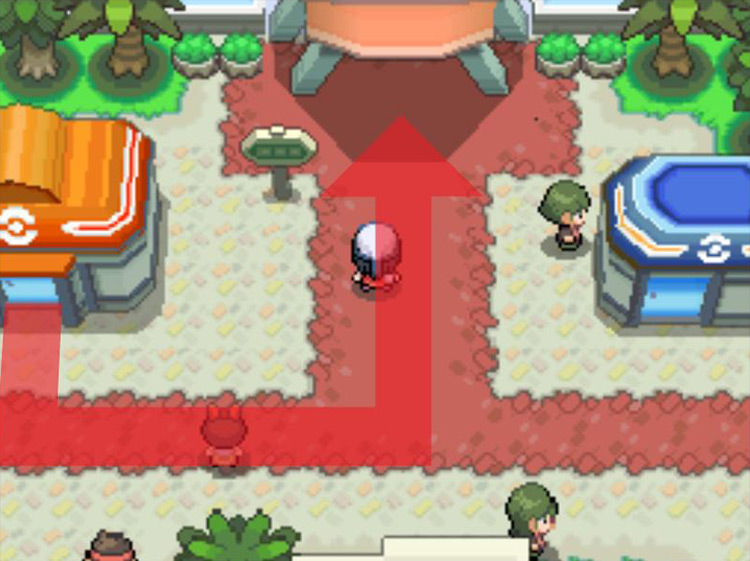
With those prerequisites covered, Fly to Veilstone City and head up the street to the northeast.
Climb the long staircase up to the Galactic HQ building.
If you haven’t been through the HQ building via the back entrance, speak to the Galactic Grunt loitering out front to begin the chain of events to unlock it.
Otherwise, walk through the front doors.
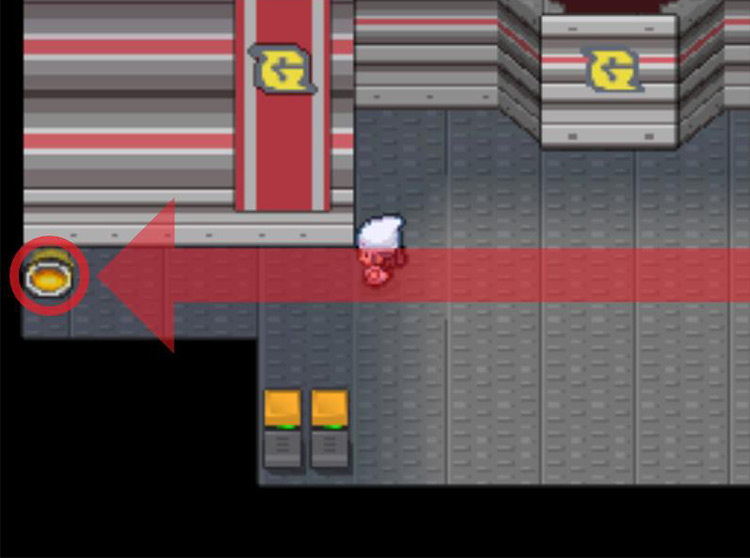
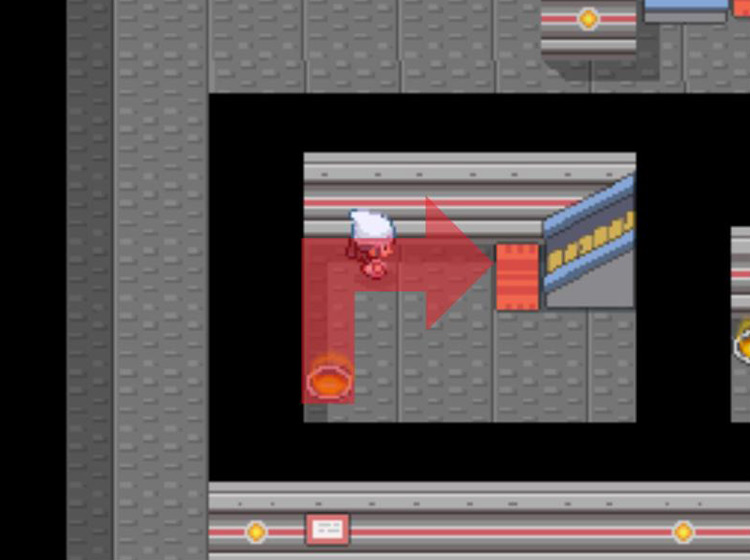
Head through the security door to the left of the reception desk, then climb the staircase.
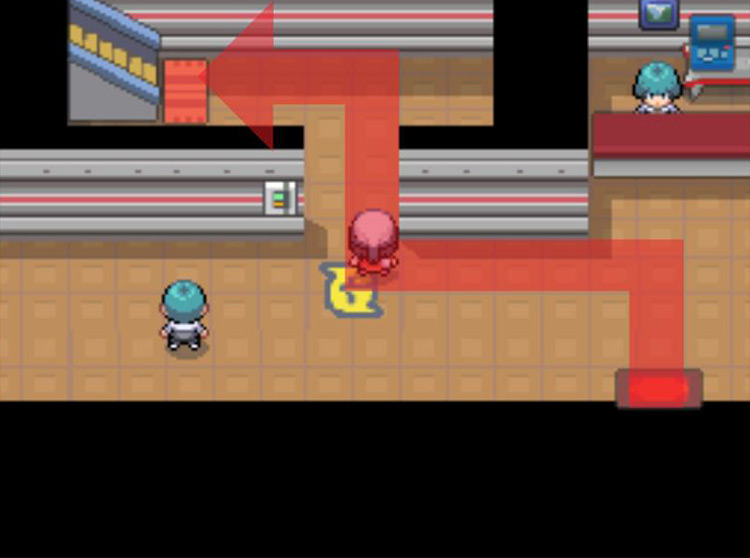
Head eastward through the hallway.
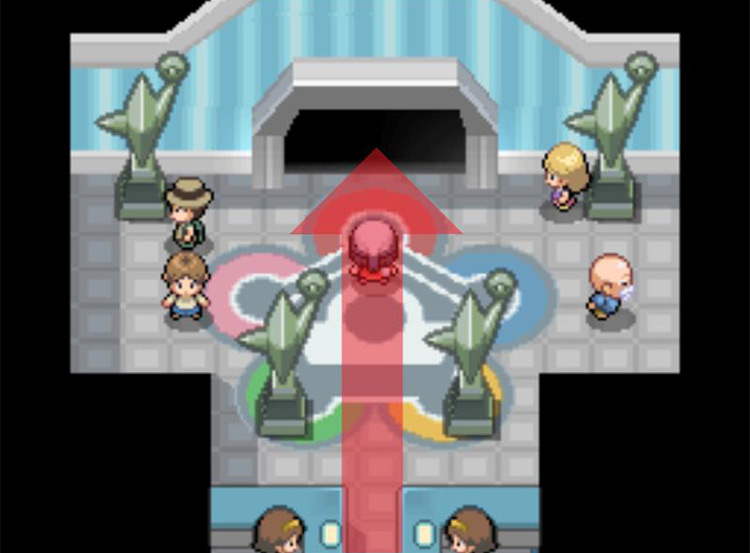
Turn northward into the Galactic TV Room and step on the Warp Tile.
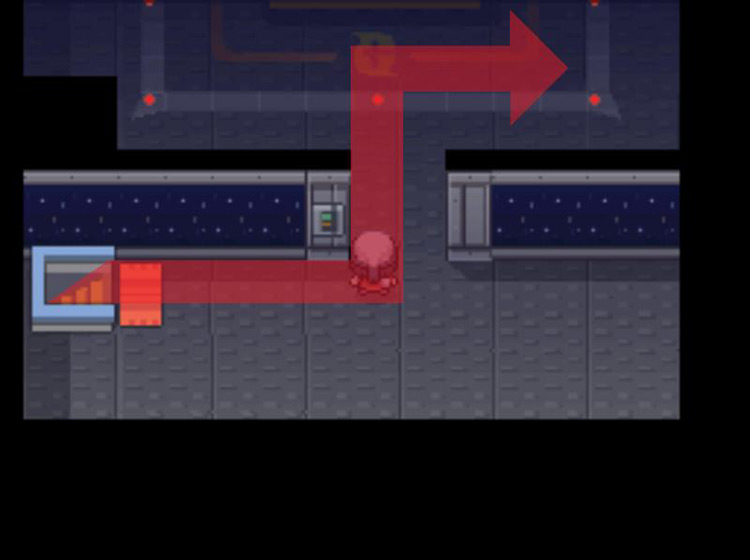
The Warp Tile will bring you to the auditorium where Cyrus makes his universal takeover speeches. Head west to the other side.
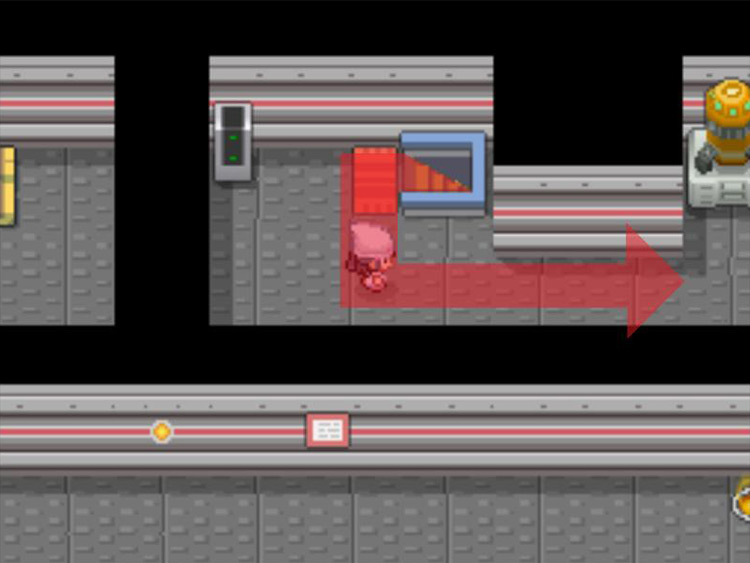
Step on the Warp Tile at the western side of the room.
Climb the staircase directly next to where you teleported.
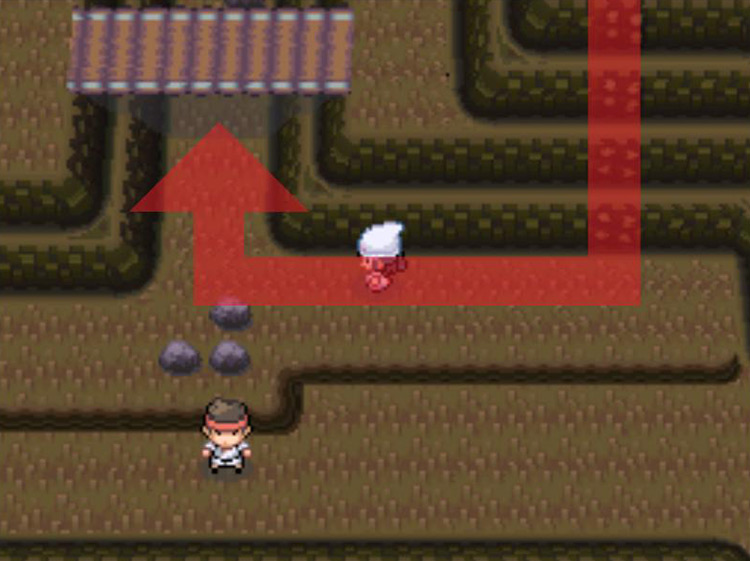
Head west through the corridor.
At the end of the corridor are three Warp Tiles. You’ll want to step onto the leftmost one.
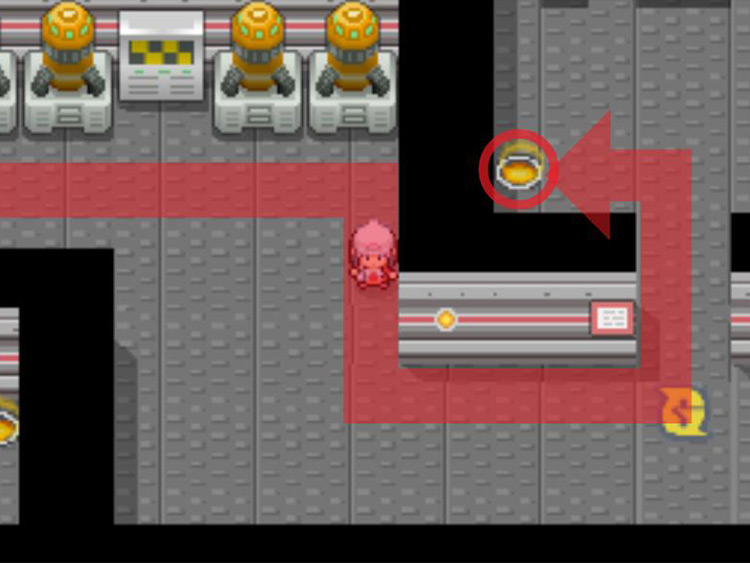
Then climb up the staircase in the next tiny room.
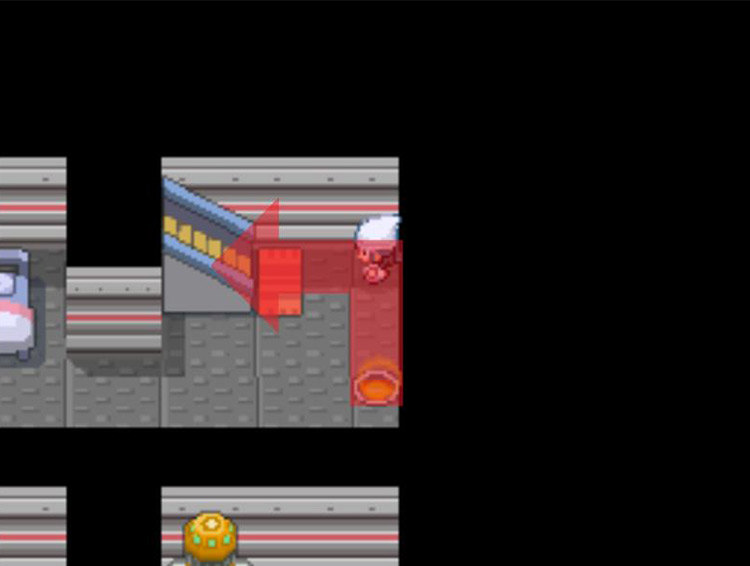
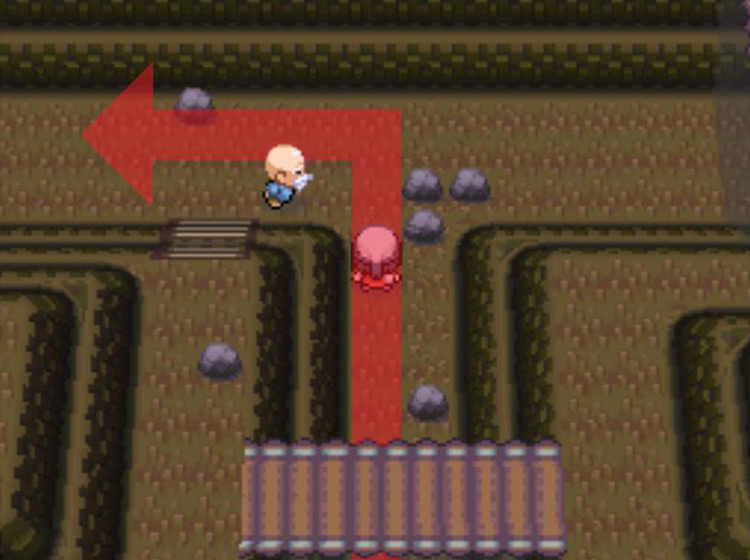
If you haven’t fought Cyrus in his office yet, you will need to open the security door with the Galactic Key and do so in order to proceed.
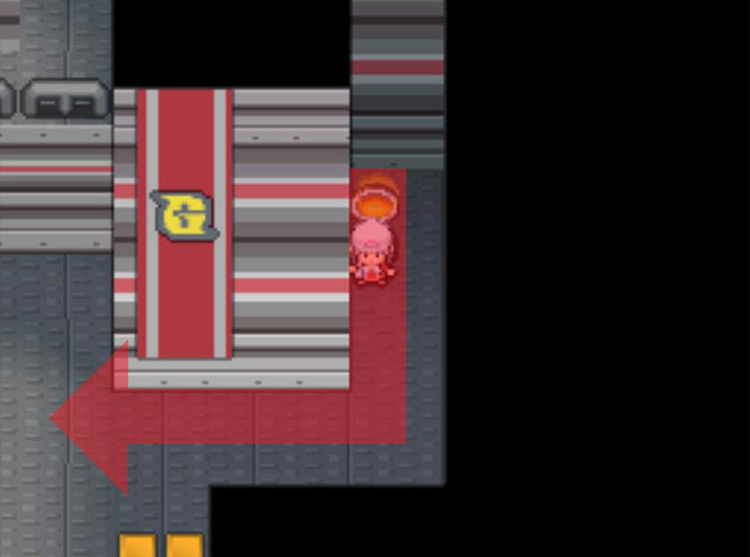
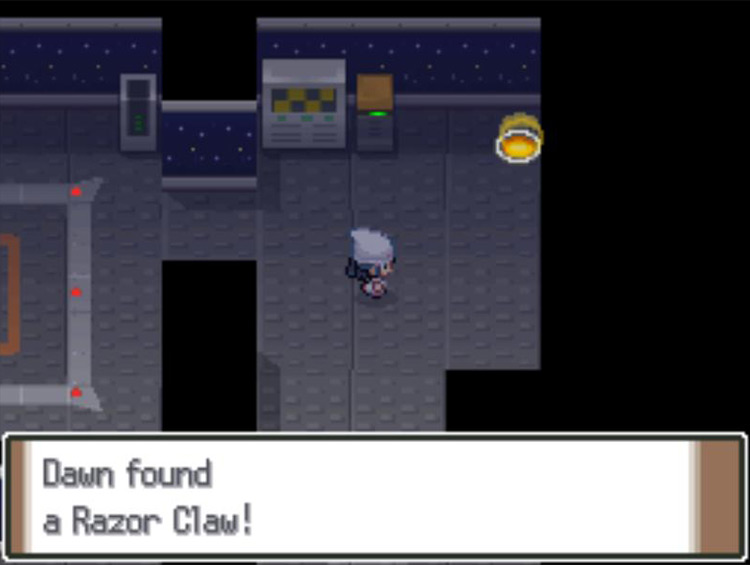
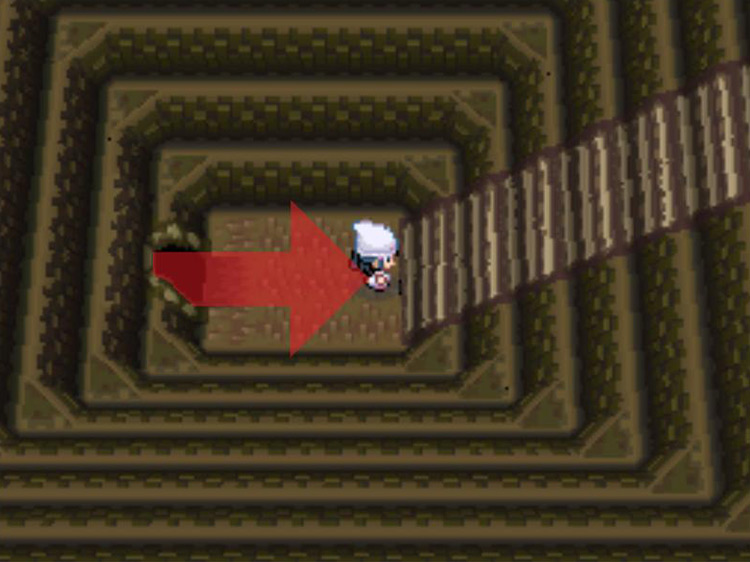
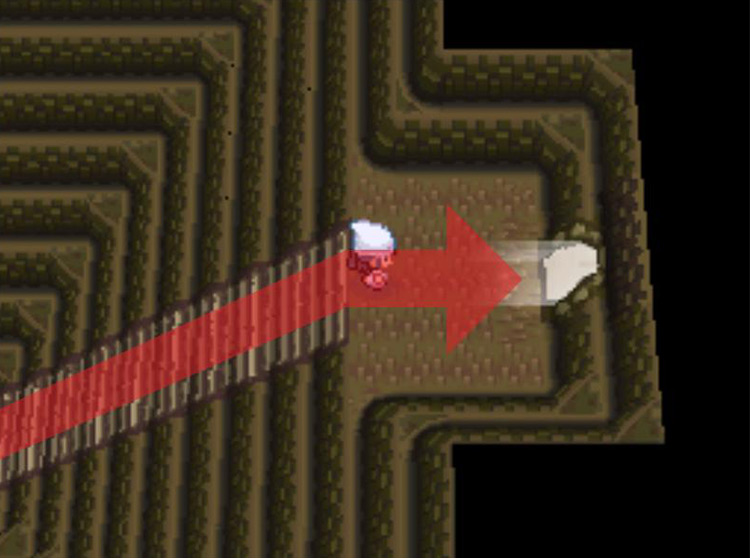
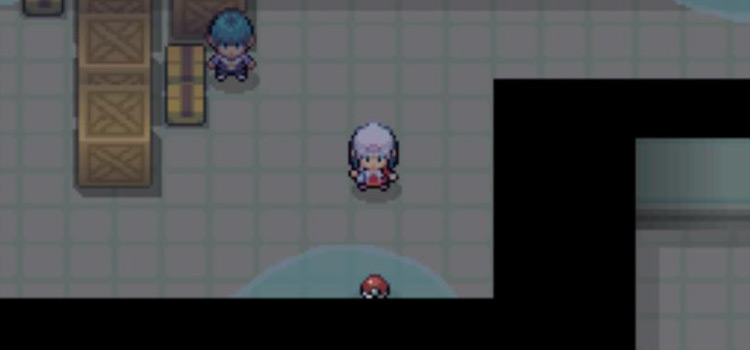
If you’ve already battled Cyrus, head through his office and into the smaller room to the east.
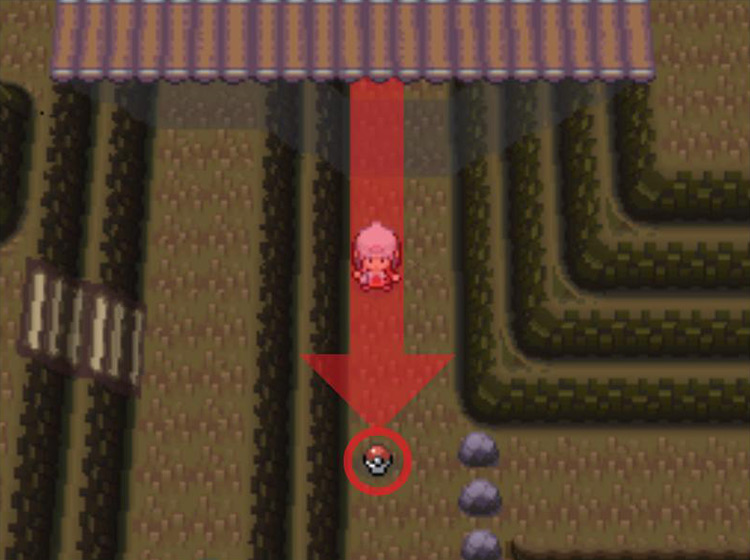
The Razor Claw is hidden in this room. Use the Dowsing Machine app to locate it.
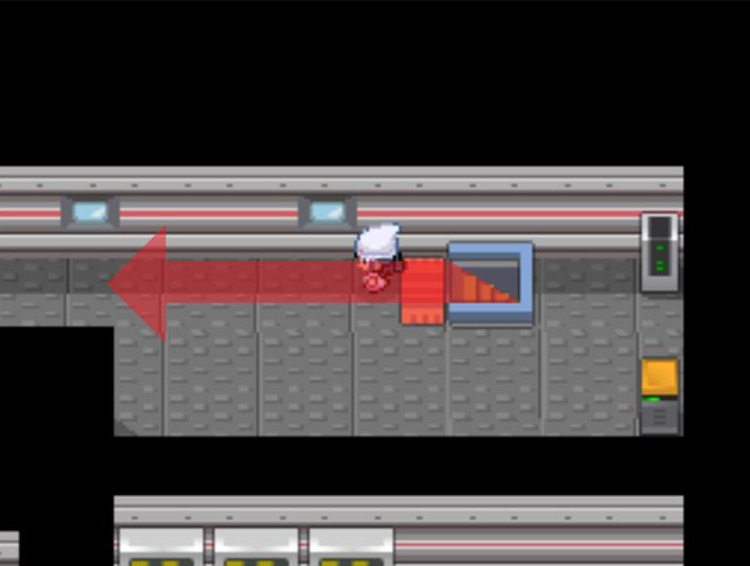
The Dowsing Machine will lead you to the tile marked with “X” below.
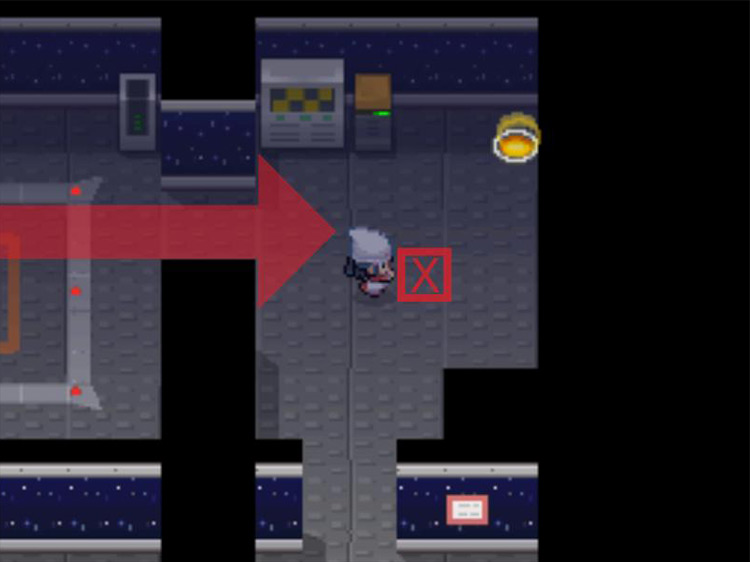
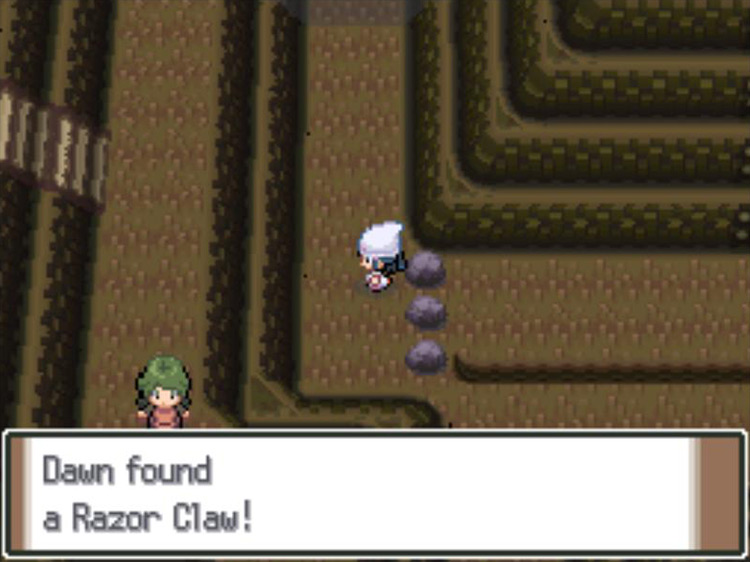
Face this tile and press A to collect the Razor Claw.
Location 2: Victory Road (Step-by-Step)
The second Razor Claw is near Victory Road’s back entrance. Surf, Waterfall, and Rock Climb are required to reach it.
When you’re fully prepared with Pokémon that know all those HMs, Fly to the Pokémon League. Use Surf and ride down the waterfall to the south.

Step ashore to the south, then turn eastward to enter Victory Road.
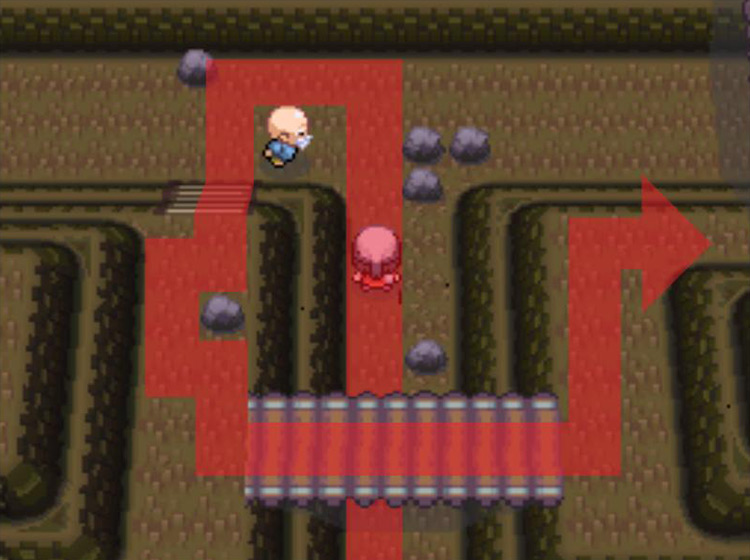
Once you’re inside, move southward down the wide corridor at the entrance.
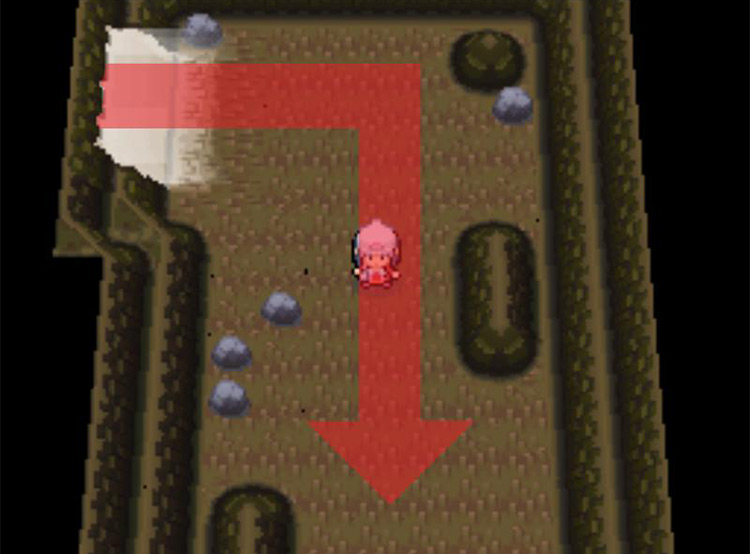
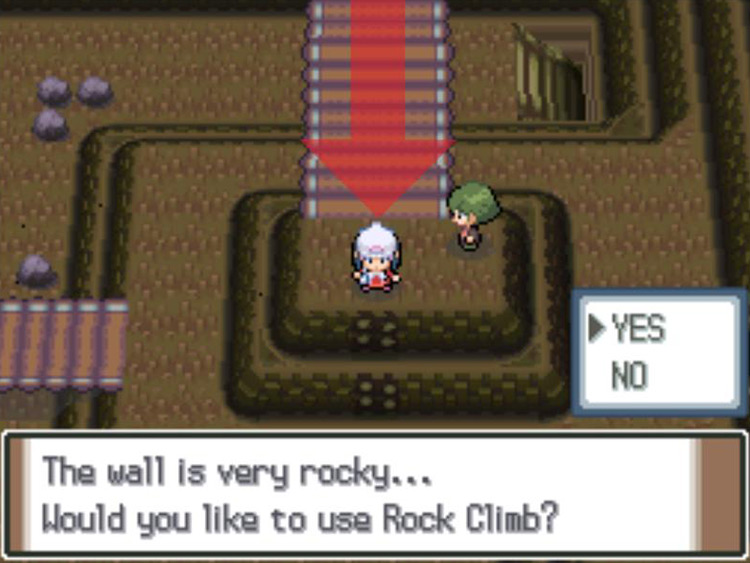
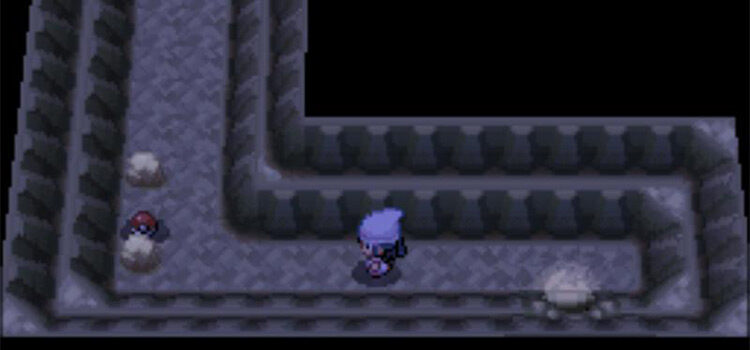
Cross the bridge to the south and use Rock Climb on the rocky wall.
Once you climb down, head over and pass under the bridge to the northwest.
When you reach the Veteran trainer, take a left. Ignore the staircase to the south.
Turn southward at the corner and head down the hallway.

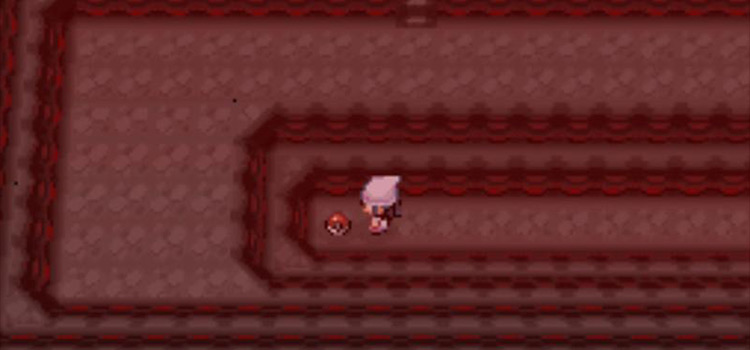
On the other side of the bridge you should see a Poké Ball item on the ground.
Pick up the Poké Ball to acquire a Razor Claw.
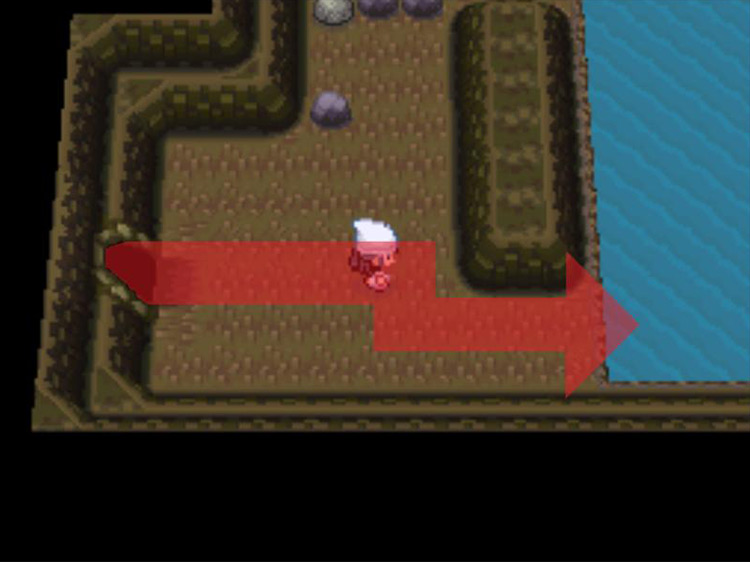
Location 3: Route 224 (Step-by-Step)
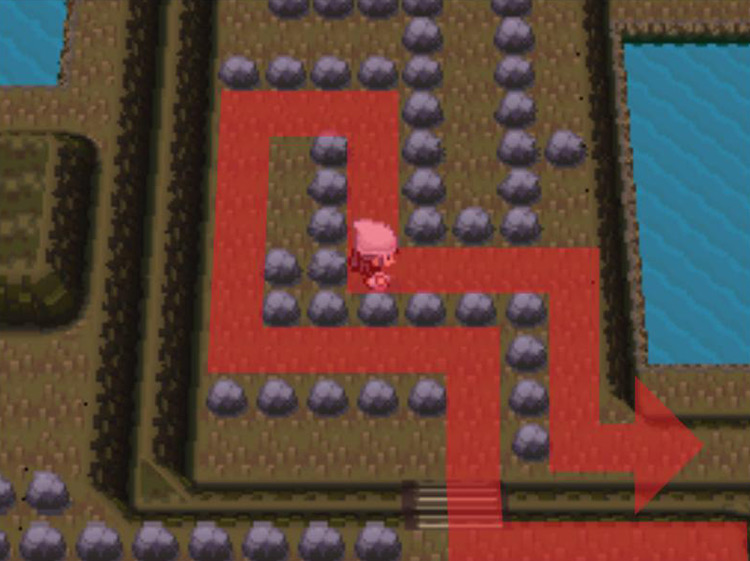
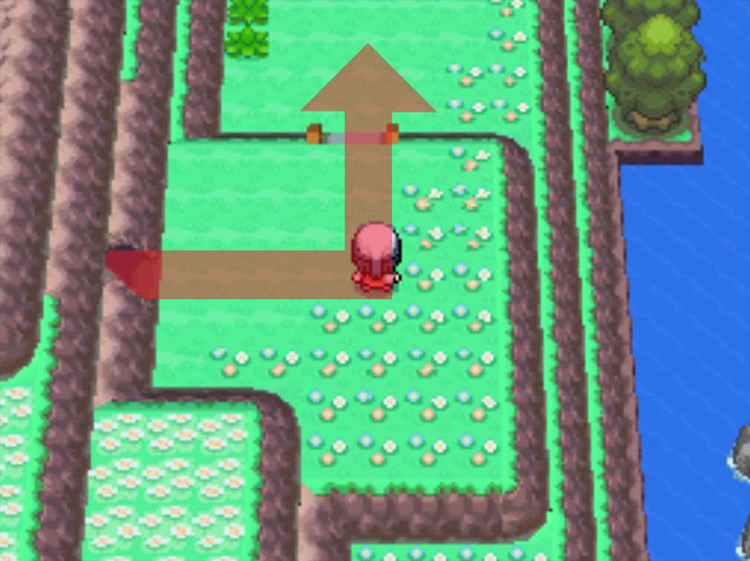
A third Razor Claw is found on Route 224, which also involves passing through Victory Road.
Route 224 is accessible only after you receive the National Pokédex.
Like the previous Razor Claw, this one requires Surf, Waterfall, and Rock Climb, but you will also need Strength if this is your first time through the newly-formed cave.
It’s a fairly long journey with strong wild Pokémon, so make sure you’re stocked up on Full Restores, Escape Ropes, and Max Repels.
When you’re fully prepared, Fly to the Pokémon League. Then use Surf at the water to the south and ride down the waterfall.

Step ashore to the south, then turn eastward to enter Victory Road.

Once inside, head south down the wide corridor at the entrance.

Cross the bridge to the south and use Rock Climb to descend the rocky wall.

Head to the west, then turn north to pass under the bridge.

Make a left turn at the Veteran trainer, head up the stairs behind him, and cross the bridge to the southeast. Move eastward.
Pass eastward under the next bridge and through the newly-accessible entrance to the next cave chamber.
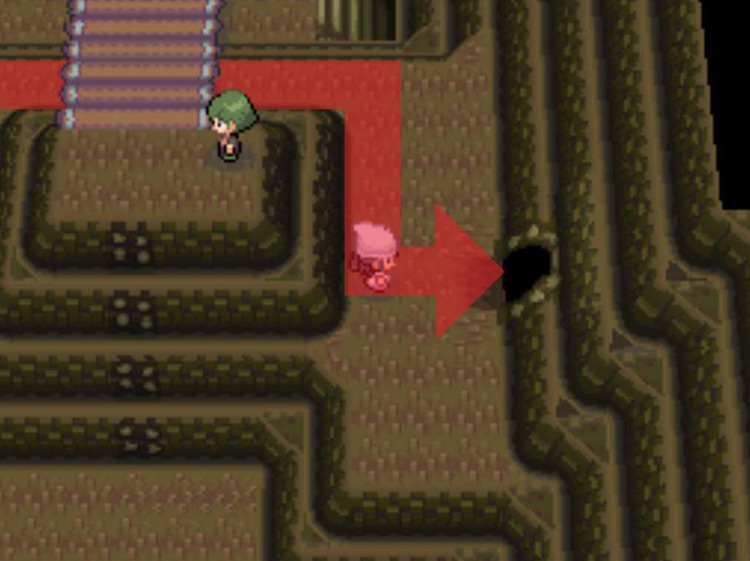
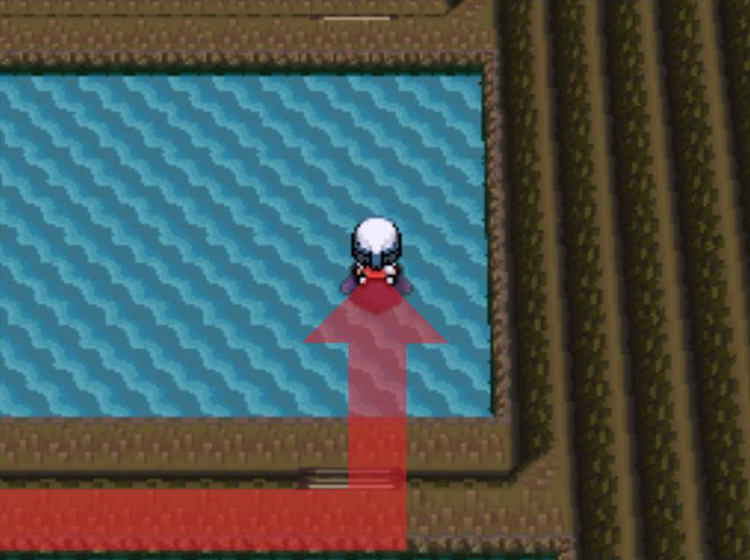
In the next area, climb down the staircase and head northeast.
Descend the staircase and head through the next doorway.
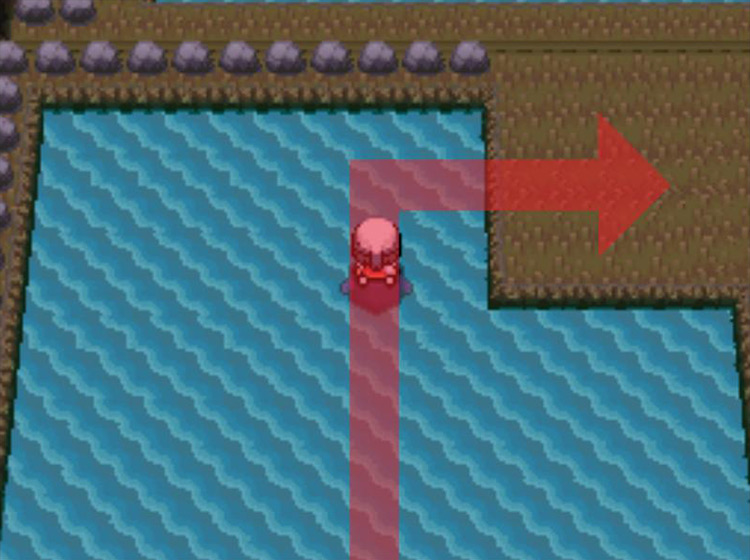
If this is your first time passing through this section of Victory Road, Marley will accompany you at this point and you will be unable to use Surf. In this case, you will need to take the longer route to the north.
Otherwise, use Surf on the water to the east.
Surf northward and disembark at the square-shaped patch of land to the east.
Climb down the staircase and head southward.
Walk around the rectangular lake and eventually start heading north, passing the two Ace Trainers.
Wind your way through the stone maze.
Head eastward after you exit the stone maze.
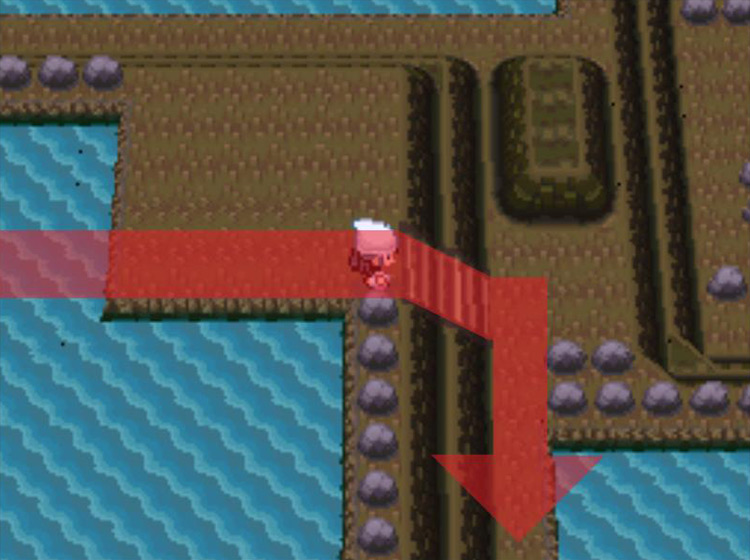
Then Climb down the stairs to the north and Surf across the next lake.
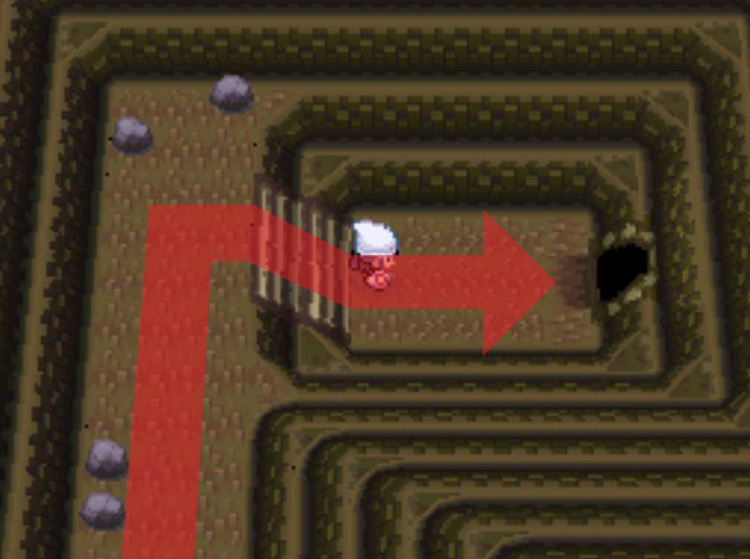
Step ashore and head north a bit, then Surf across yet another small lake.
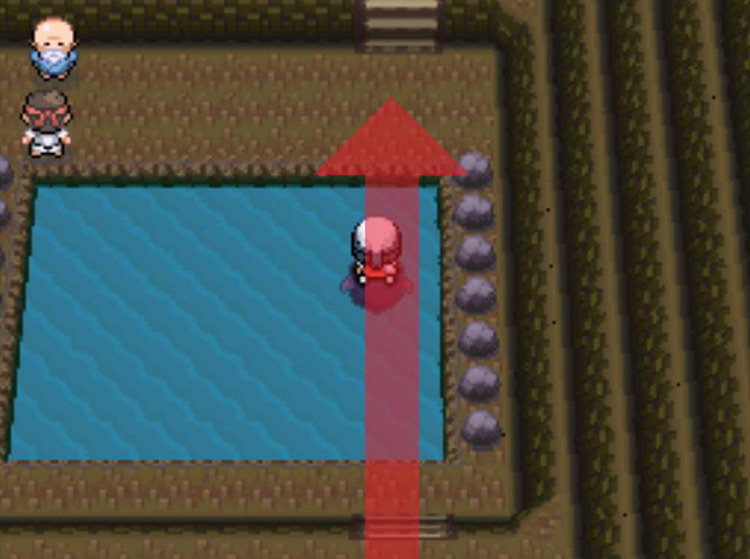
Step back on land, head up the stairs to the north, and take the exit to your right.
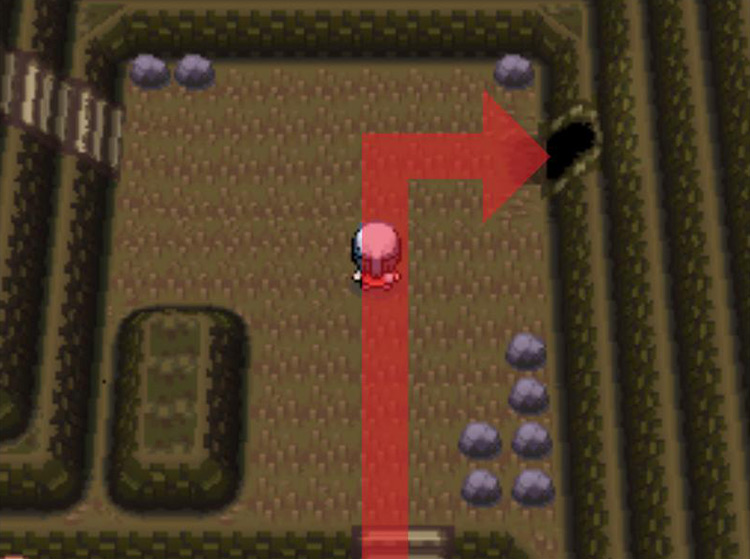
Head up the long staircase in the next room.
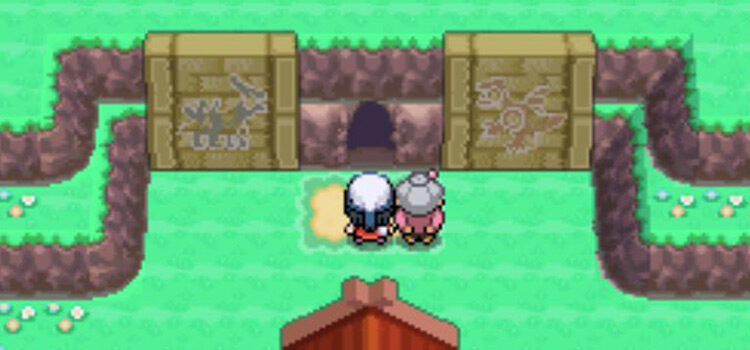
Leave Victory Road through the exit at the top.
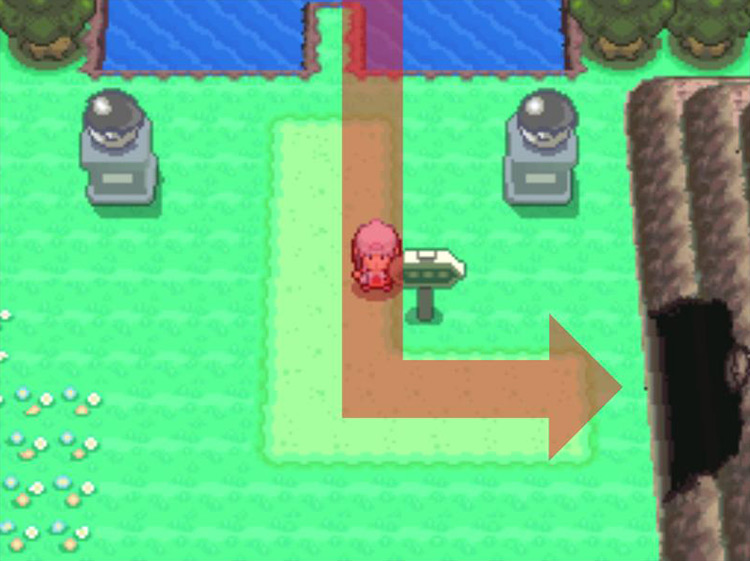
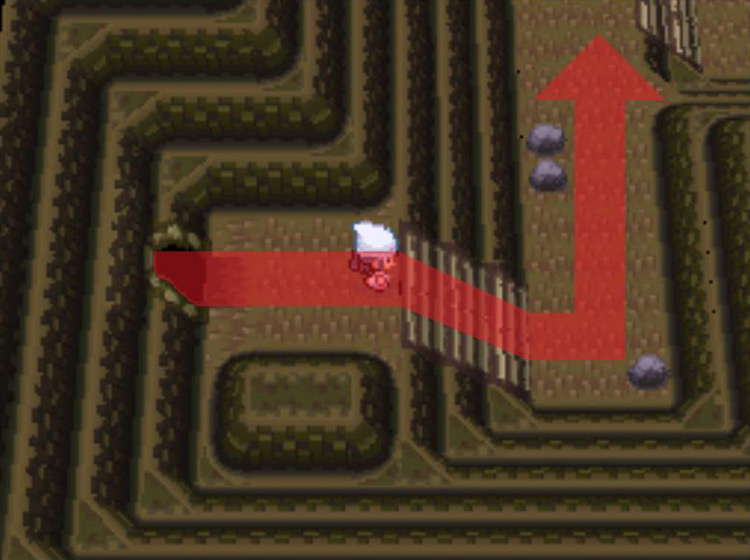
Outside on Route 224, turn northward and descend the staircase.
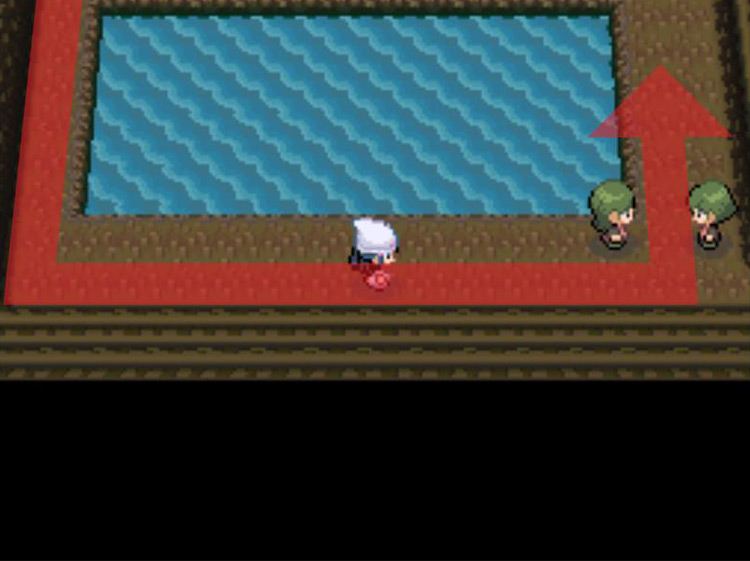
Continue northward past the Ace Trainer.
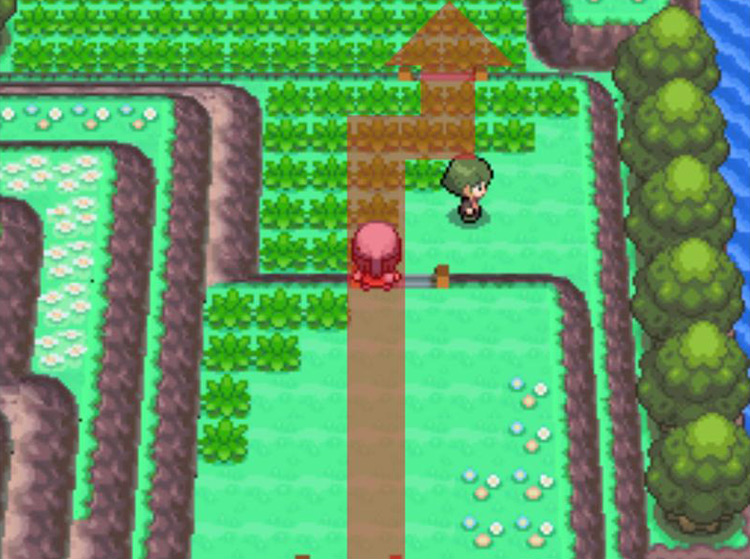
Head all the way north until you reach the Veteran trainer, and then take a right turn.
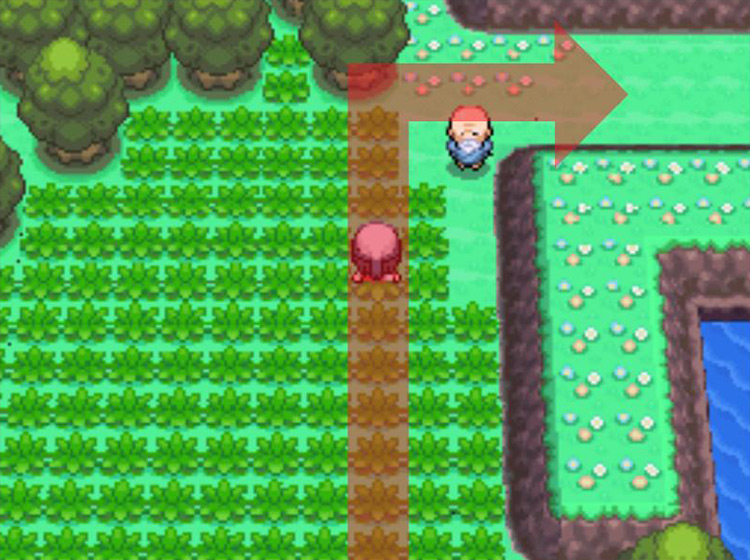
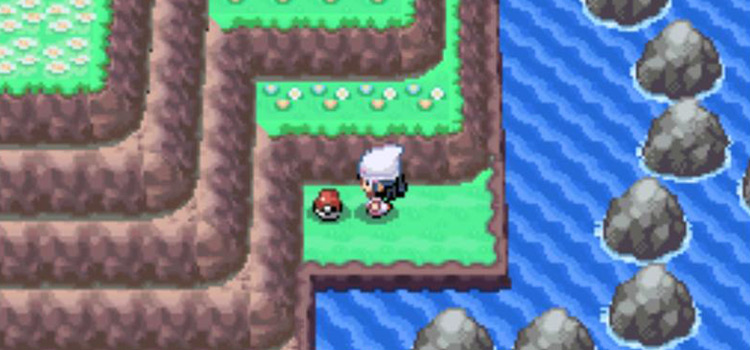
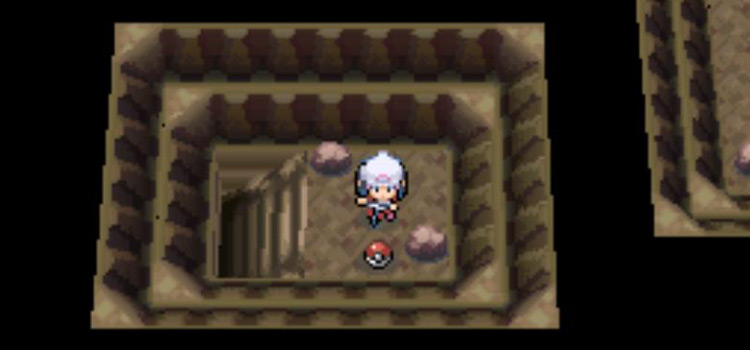
When you reach the beach area, use Surf at the very left-most edge of the water.
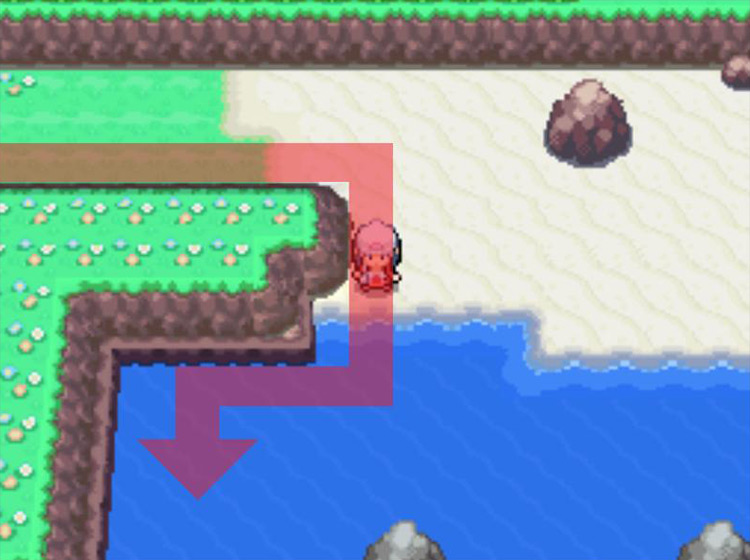
Surf south until you hit the dead end, and you will notice a Poké Ball item sitting on a tiny strip of grassland.
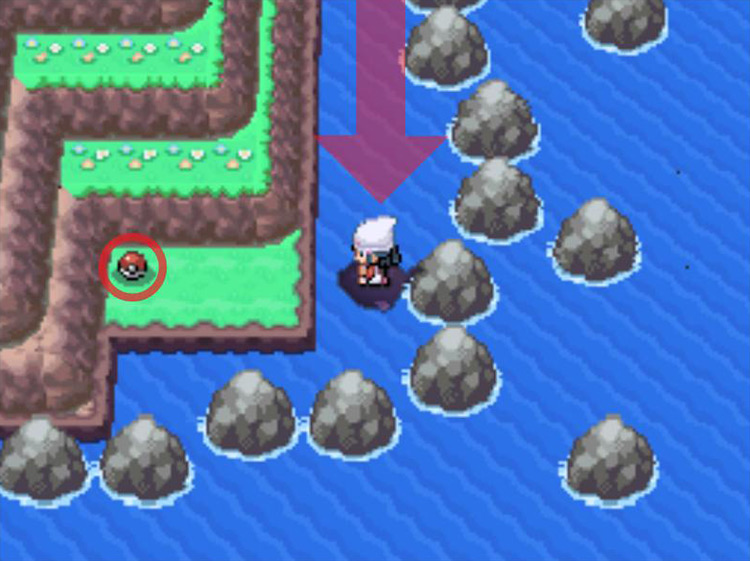
Pick up the Poké Ball to obtain the third Razor Claw.
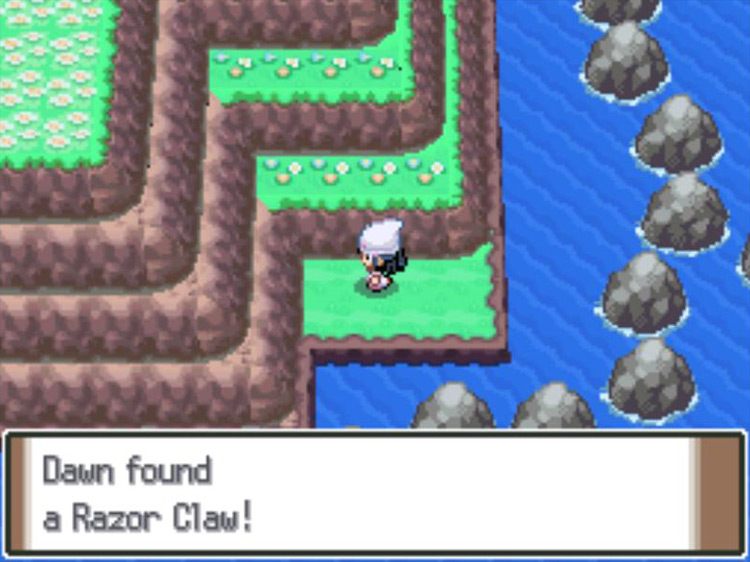
This is the final Razor Claw that can be discovered in the overworld; all others must be bought from the Battle Frontier.
Location 4: The Battle Frontier (Repeatable)
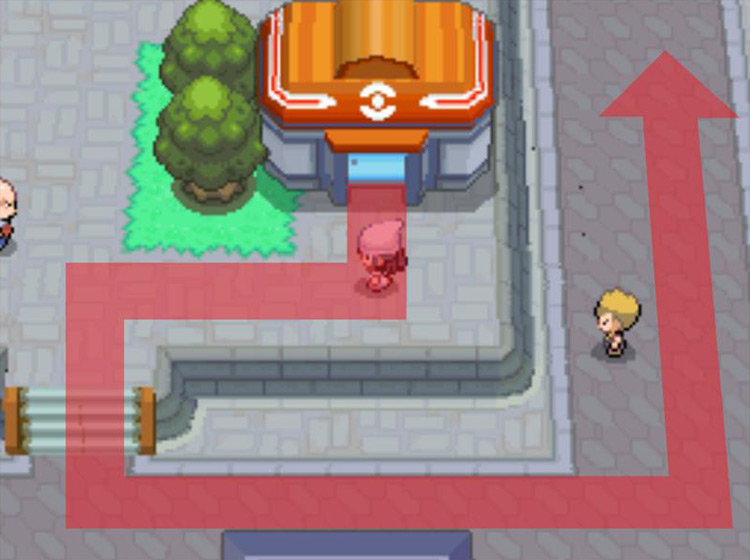
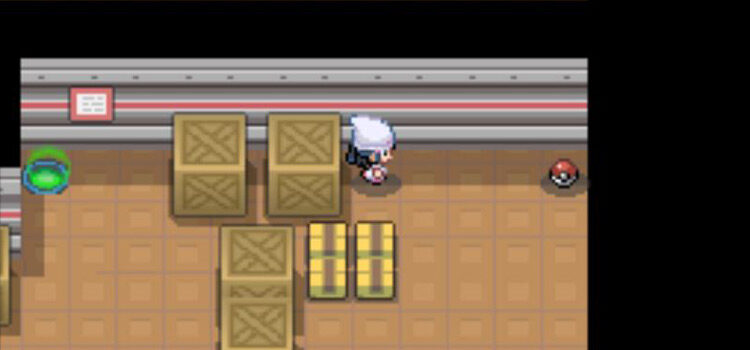
An unlimited number of Razor Claws can be found in the Battle Frontier, which is the huge building to the northeast of the Pokémon Center in the Battle Zone’s Fight Area.
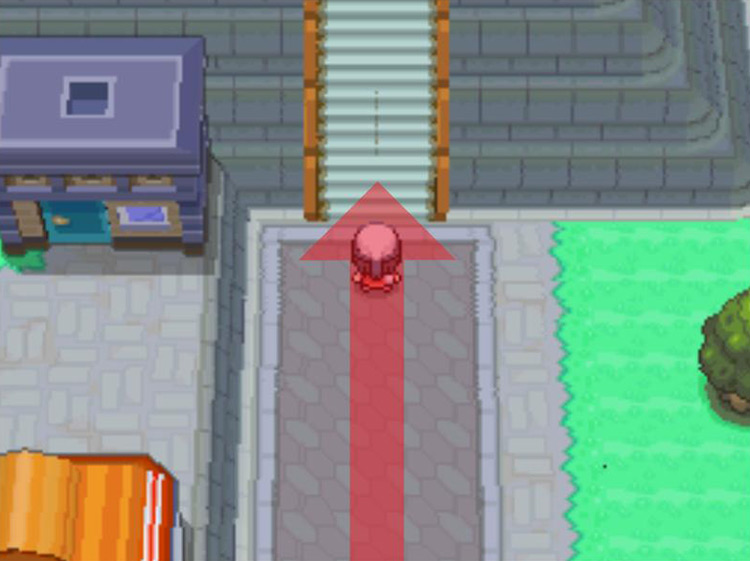
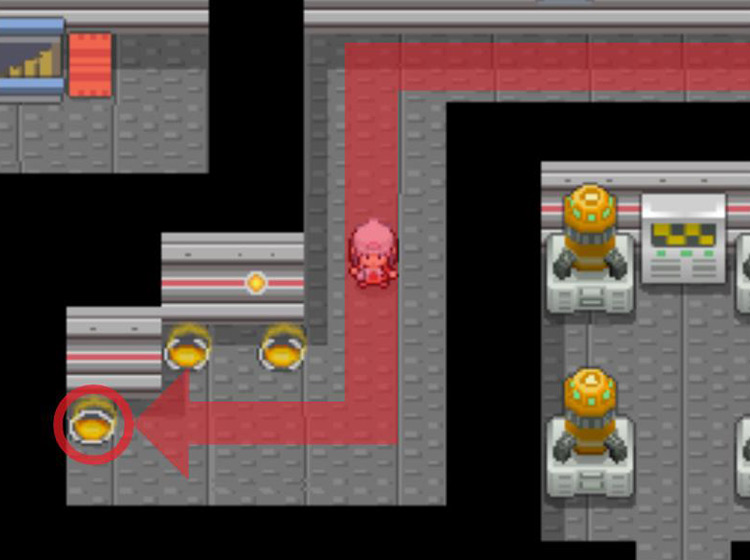
After entering the building, cut through the Entrance Hall and enter the door to the north.
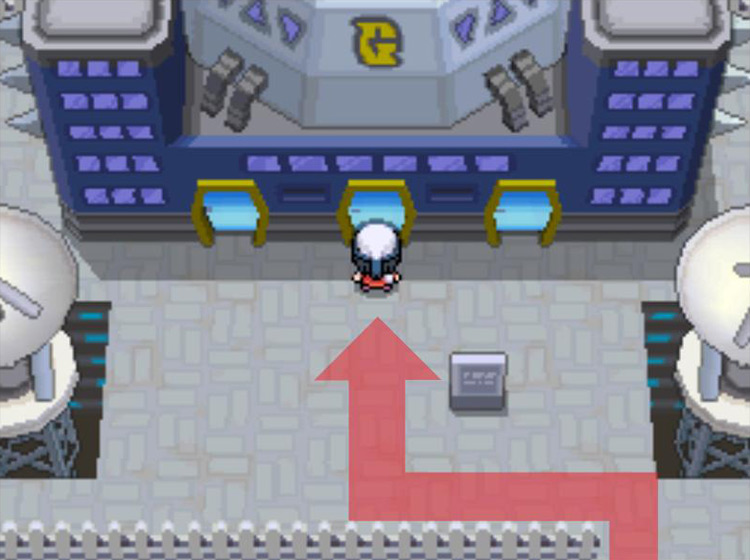
In the middle of the Main Hall will be several kiosks making up a central marketplace. This is the Exchange Service Corner.
Speak to the clerk at the southwestern kiosk with the blue and white striped canopy.
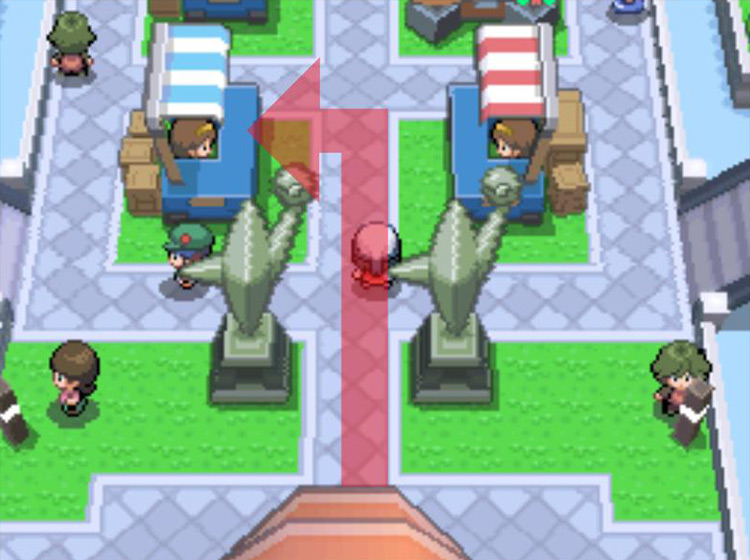
Scroll through her inventory until you find the Razor Claw listing.
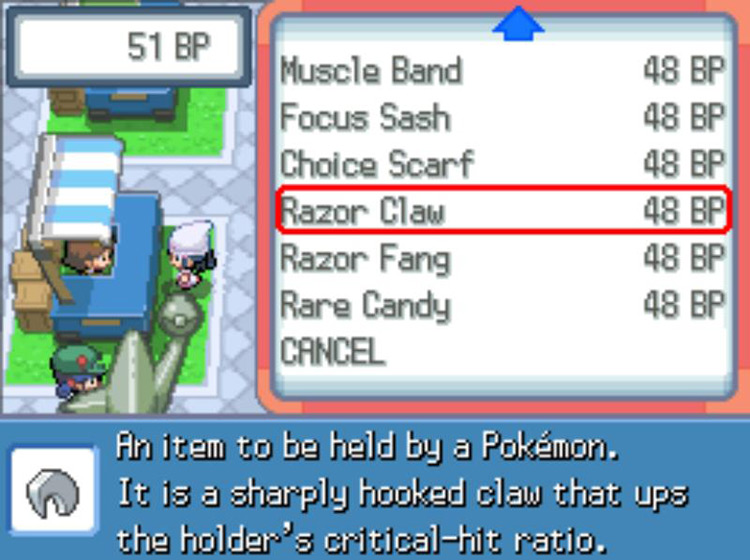
Each Razor Claw costs 48 BP (Battle Points). You can earn BP by fighting in the Battle Frontier’s various facilities.
This price makes Razor Claws one of the most expensive items at the Exchange Service Corner.
Razor Claw Details and Uses
In Battle
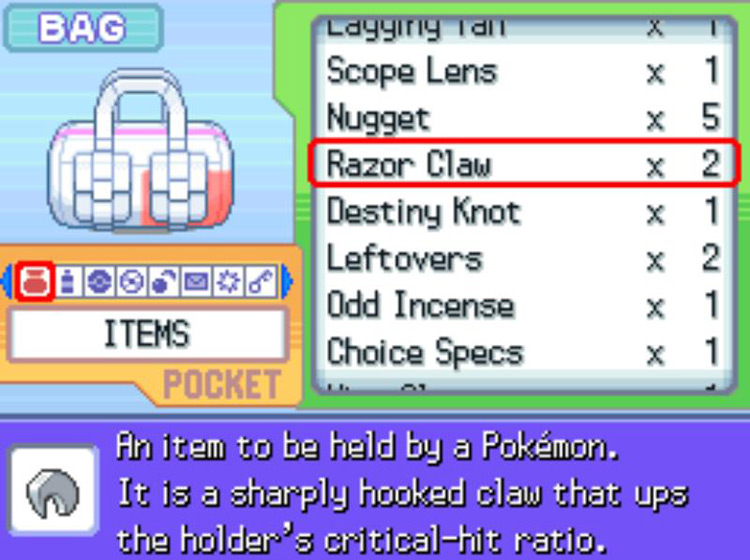
The Razor Claw is a held item that increases the holder’s critical-hit ratio by one stage.
This gives their damaging moves a 12.5% chance to hit the foe with 200% of their normal power.
The Razor Claw’s damage boosts can be further stretched by giving it to a Pokémon with the ability Sniper. That ability increases critical damage by 300% instead of 200%.
Some of the stronger Pokémon with the Ability are Kingdra and Drapion.
The Razor Claw might not be a groundbreaking item, but doubling the chance of a critical hit powered by both Sniper and STAB damage is never a bad thing.
Outside of Battle
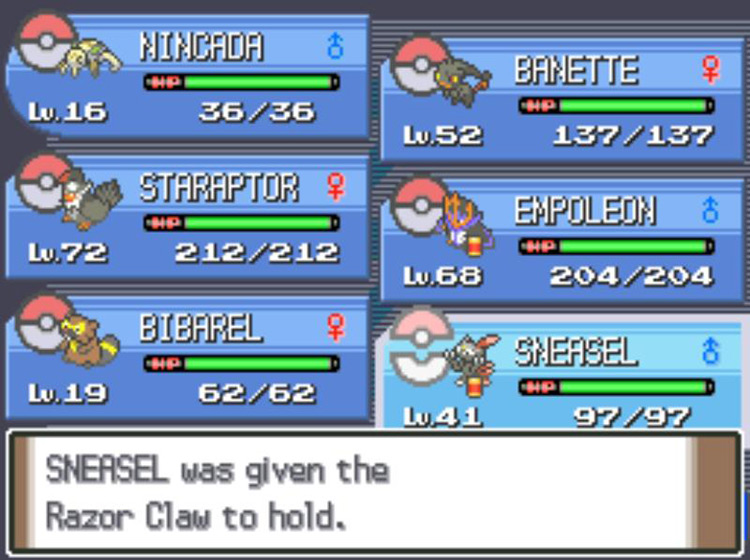
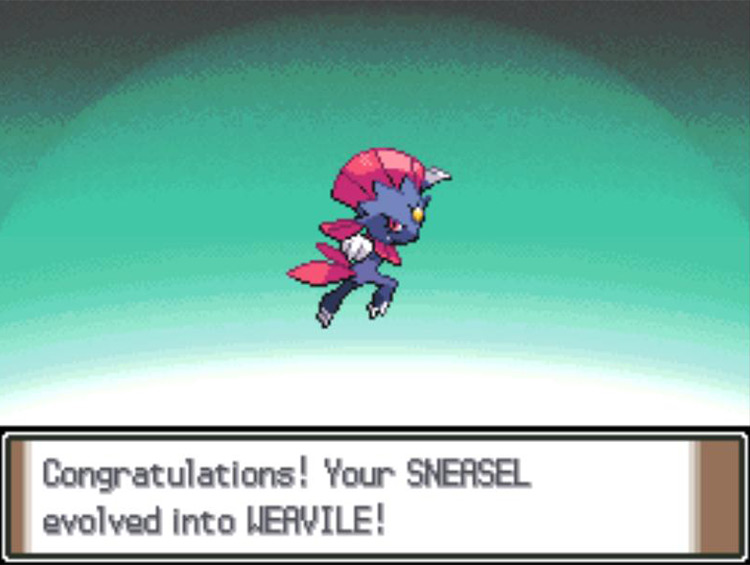
If a Sneasel levels up at night (8:00 p.m. to 3:59 a.m.) while holding a Razor Claw, it will evolve into Weavile.
Note that this evolutionary process will consume the item permanently.
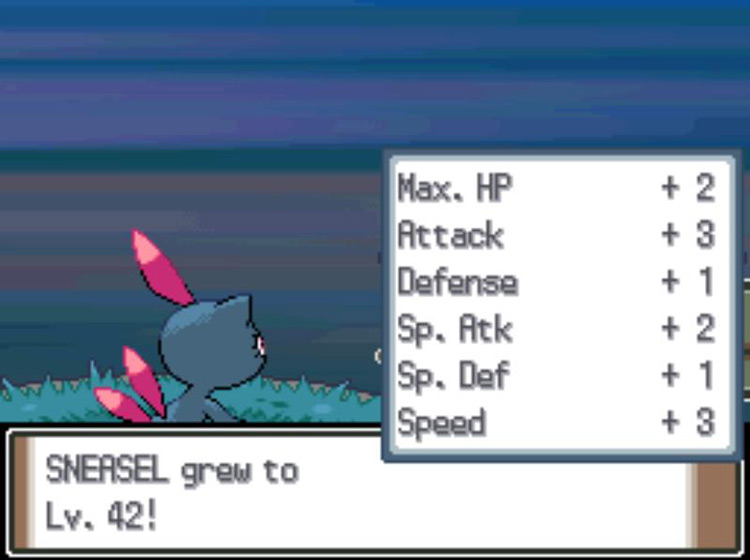
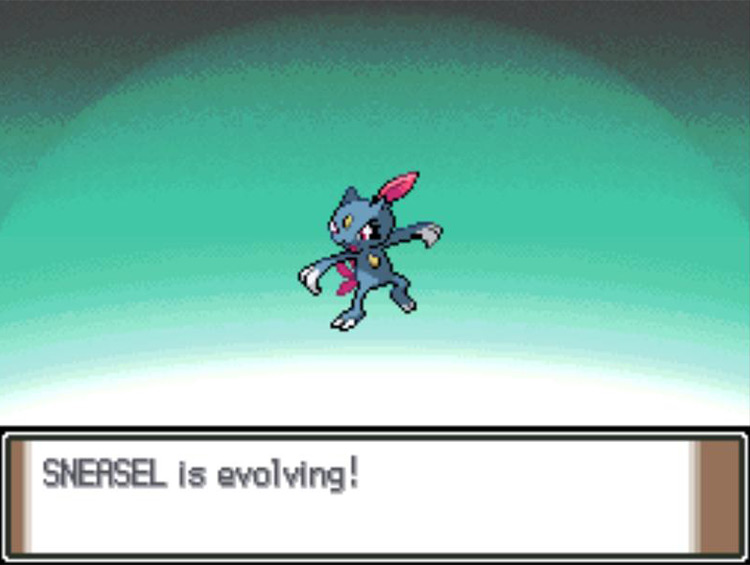
This is the first Generation of Pokémon games to include a Sneasel evolution.
Weavile has some of the highest Speed and Attack stats in the game, but like many Ice types, it suffers from low HP and Defense.
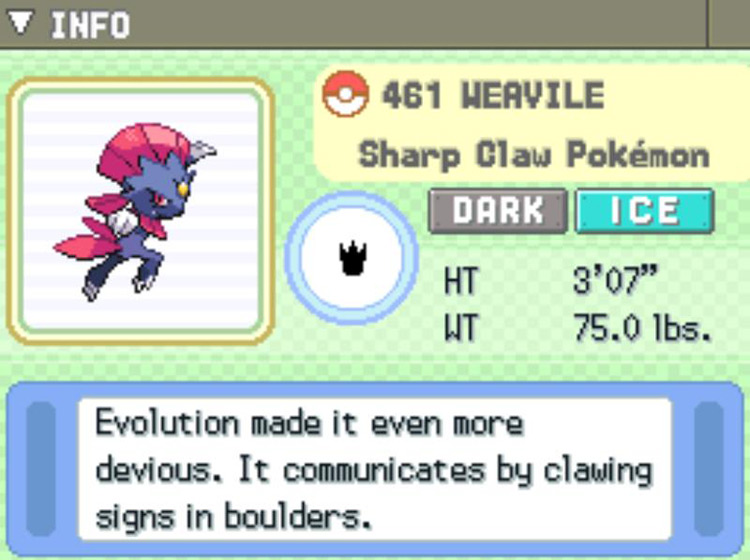
Sneasel and Weavile are the only Dark/Ice dual-types in Platinum.
This grants them an immunity to Psychic, resistances to Ghost, Dark, and Ice, and weaknesses to Fighting, Rock, Steel, Bug, and Fire (and Fairy, in future titles).
Weavile’s stats make it the perfect definition of a Glass Cannon, suited best for striking fast and wreaking as much havoc as possible before being knocked out.
However, certain held items can help mitigate Weavile’s weaknesses and keep it in battles for longer.
For instance:
Weavile is one of the best Pokémon to give a Focus Sash, which will prevent it from taking a one-hit KO as soon as it enters the battle by leaving Weavile with 1HP. Or you can lean fully into Weavile’s high Attack stat by giving it a Choice Band, boosting the power of its already dreaded physical moves by 50%.
-
Pokémon Platinum
- How To Get Razor Claws in Pokémon Platinum
Related Posts:
 How To Get TM21 Frustration in Pokémon Platinum
 How To Get TM36 Sludge Bomb in Pokémon Platinum
 How To Get TM02 Dragon Claw in Pokémon Platinum
 How To Get TM49 Snatch in Pokémon Platinum
 How To Get HM03 Surf in Pokémon Platinum
 How To Get TM71 Stone Edge in Pokémon Platinum
 How To Get Iron Balls in Pokémon Platinum
 How To Get TM26 Earthquake in Pokémon Platinum