TABLE OF CONTENTS
List of All Puzzles + Rewards
Here’s an overview of all the six puzzles in the Trick House and what you get as a reward from each of them:
SCROLL
| Puzzle No. | Required TM/HM | Hiding Spot | Reward |
|---|---|---|---|
| Puzzle 1 | HM01 Cut | Under the desk | TM12 Taunt |
| Puzzle 2 | HM06 Rock Smash | Inside the right tree pot | Hard Stone |
| Puzzle 3 | TM70 Flash | Inside the left dresser | TM92 Trick Room |
| Puzzle 4 | HM04 Strength | Behind the left window | Smoke Ball |
| Puzzle 5 | None | Inside the right cupboard | Magnet |
| Puzzle 6 | None | Under the bottom-right cushion | Red Tent (OR) or Blue Tent (AS) |
What is the Trick House?
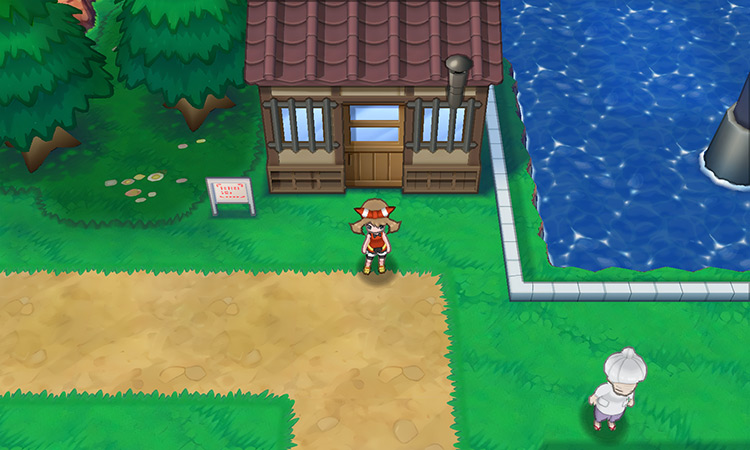
Located on Route 110, The Trick House is a peculiar house filled with ever-changing puzzles and mazes, designed to test your skills as a trainer.
To start each puzzle you must find the Trick Master, who’s hiding somewhere in the first room.
After finding the Trick Master, you can access the main part of the house.
This section features a maze revolving around a unique mechanic, which might require the use of a specific TM or HM to solve. Half of the mazes even have multiple trainers that will battle you along the way.
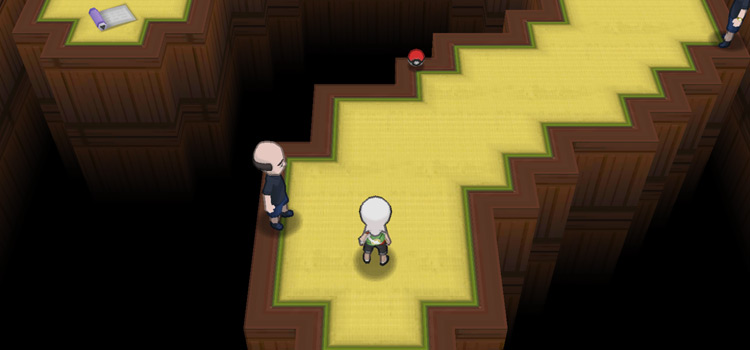
Navigating each maze leads to a scroll that provides a secret code. You’ll use this code to reach the prize room. Additionally, you can find items and rare regional specialties that are permanently missable if you don’t get them in each maze.
Tip: Because certain puzzles require you to use specific HM moves, you’ll need to obtain at least four Gym Badges to be able to challenge all six puzzles of the Trick House.
Puzzle 1
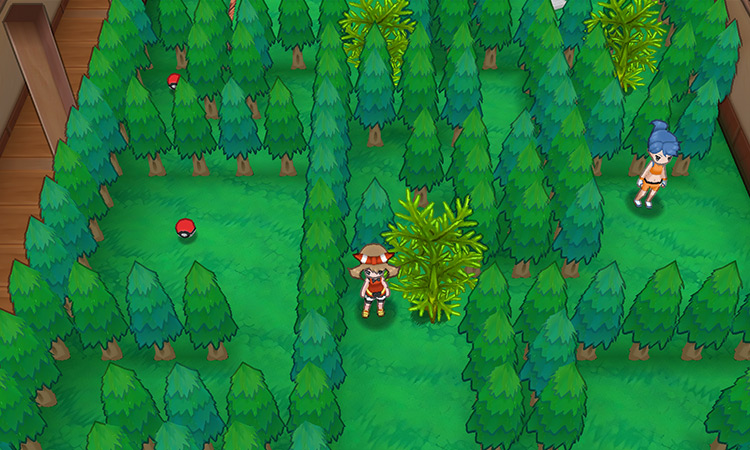
The first puzzle involves navigating a maze filled with prickly trees that need to be cut down with HM01 Cut to move forward.
Here’s a list of all the items you can find in this version of the Trick House:
| Item | Location |
|---|---|
| Escape Rope | Gift from Trick Master before entering the maze |
| Lava Cookie ×2 |
|
| Expert Belt | Next to the TV in the prize room |
| TM12 Taunt | Reward from Trick Master for completing Puzzle 1 |
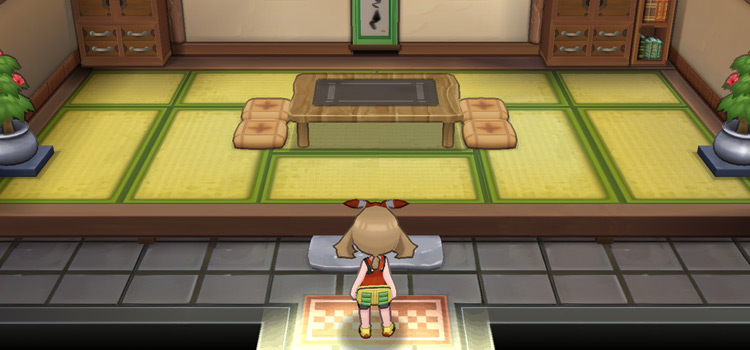
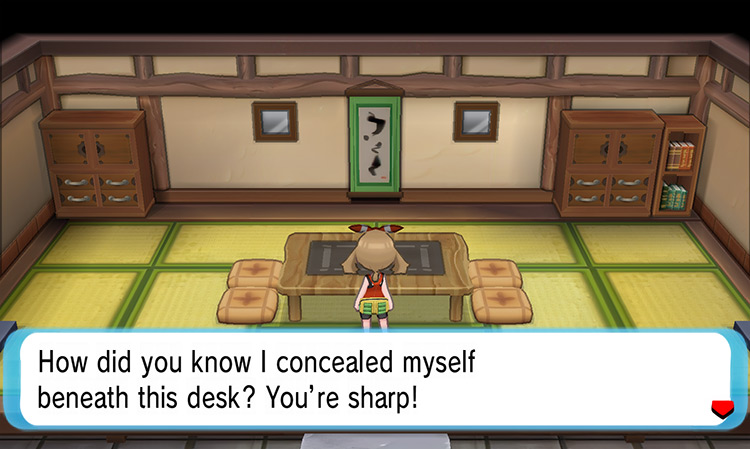
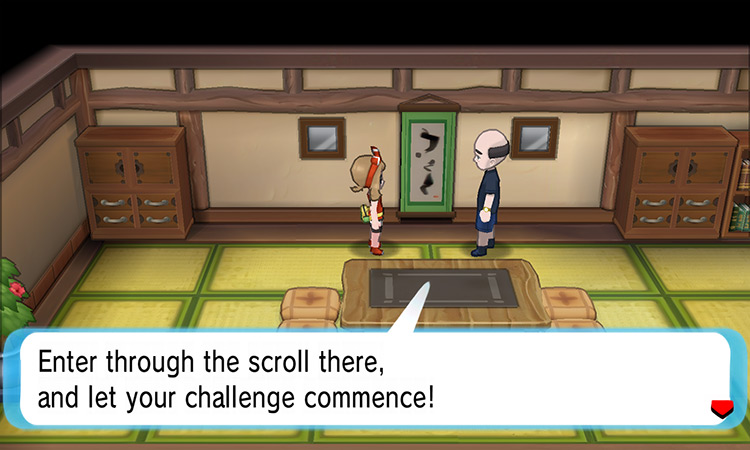
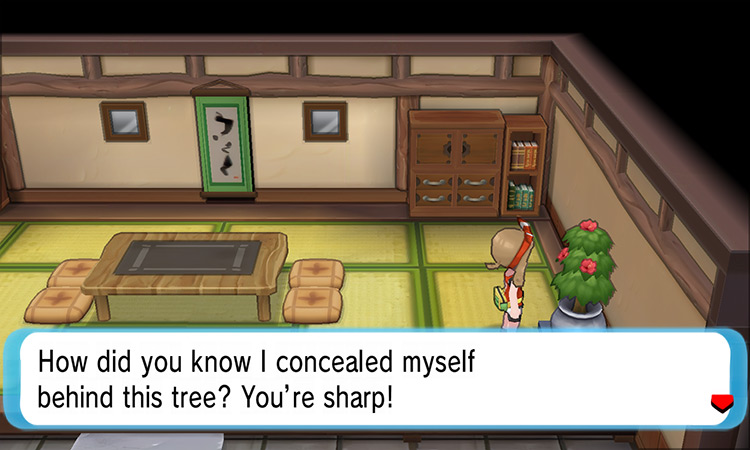
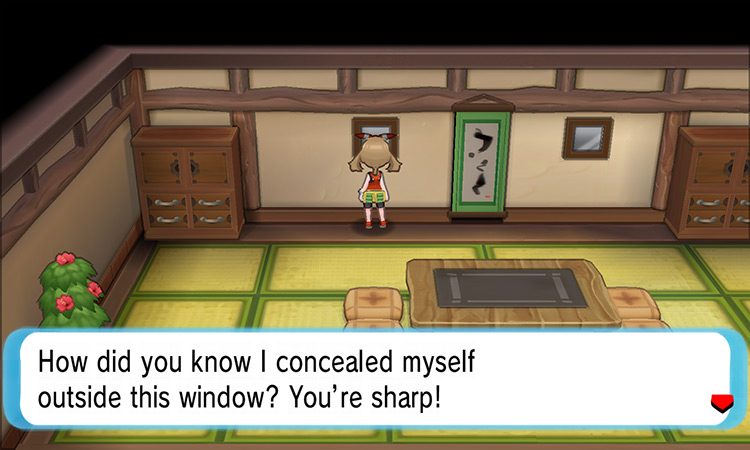
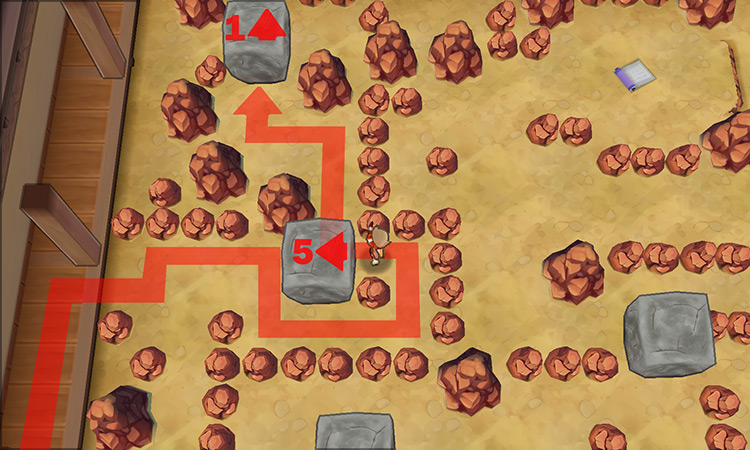
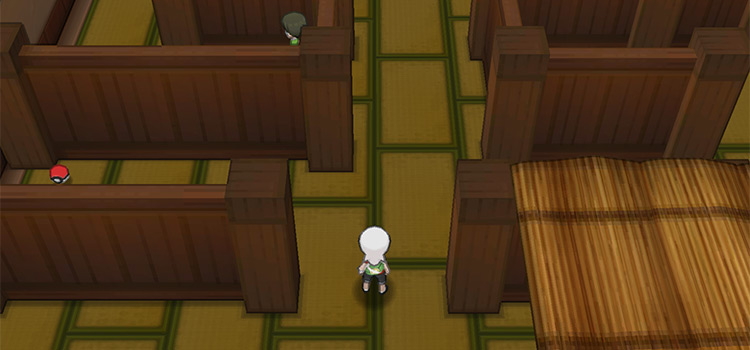
Step 1: Whenever you enter the Trick House, you’ll need to look for the Trick Master. During your first visit, you’ll find him hiding under the desk.
Step 2: After speaking with the Trick Master, interact with the scroll on the wall to enter the maze.
Step 3: Begin by heading to the right side of the maze with the cuttable tree.
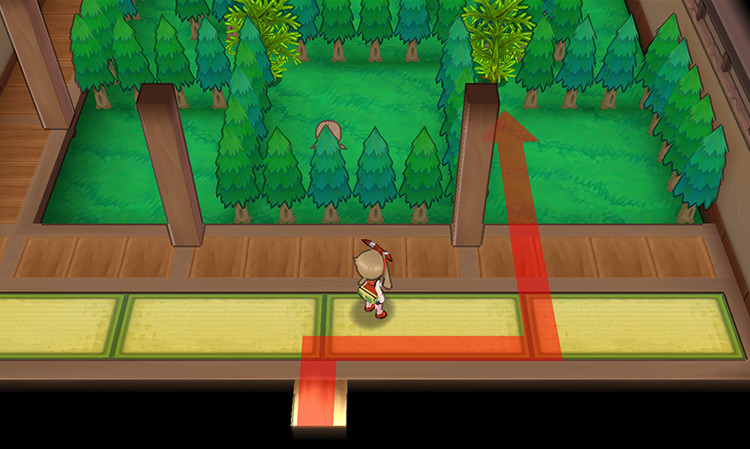
Step 4: As you progress, you’ll come across a series of prickly trees blocking your path. Use HM01 Cut to clear all three trees and follow the path as shown in the image below.
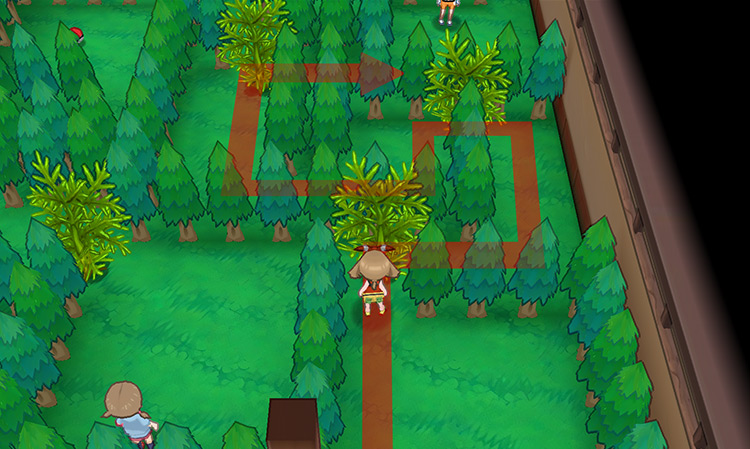
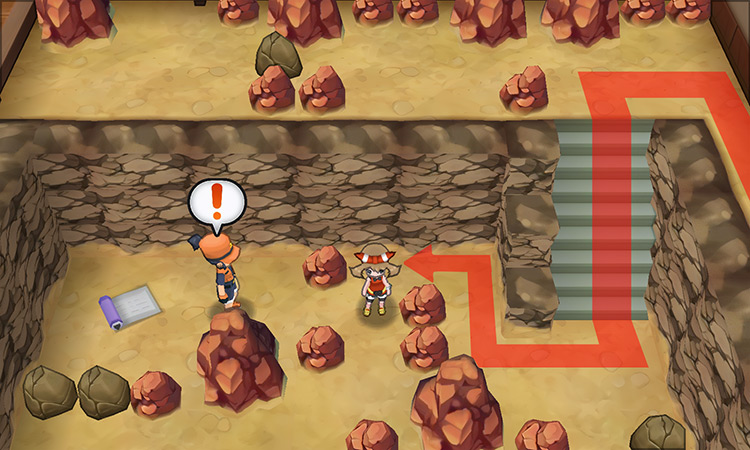
Step 5: After cutting the three trees blocking your path, turn right and you’ll encounter a trainer. Win a battle against her to move ahead.
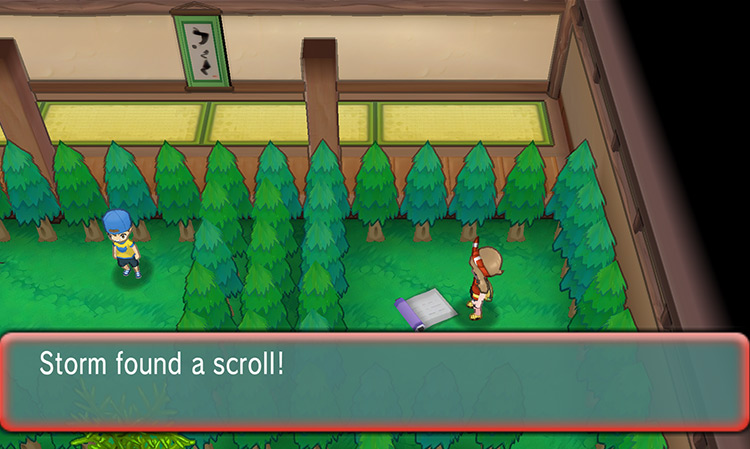
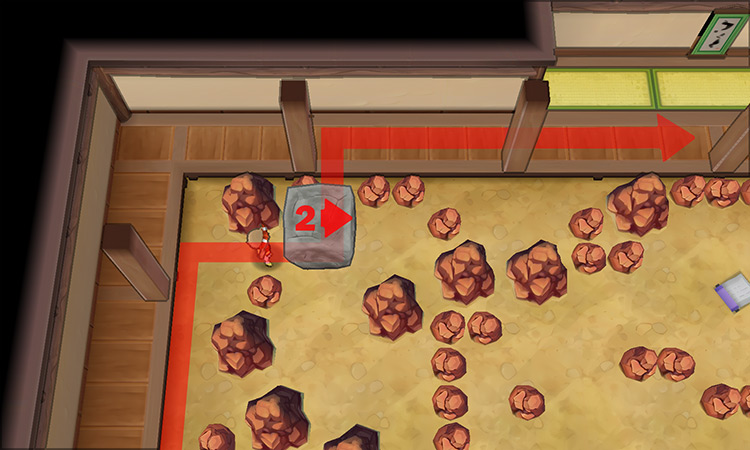
Step 6: After winning the battle, head up north and use HM01 Cut one more time. Then interact with the scroll up ahead to learn the secret code needed to exit the maze.
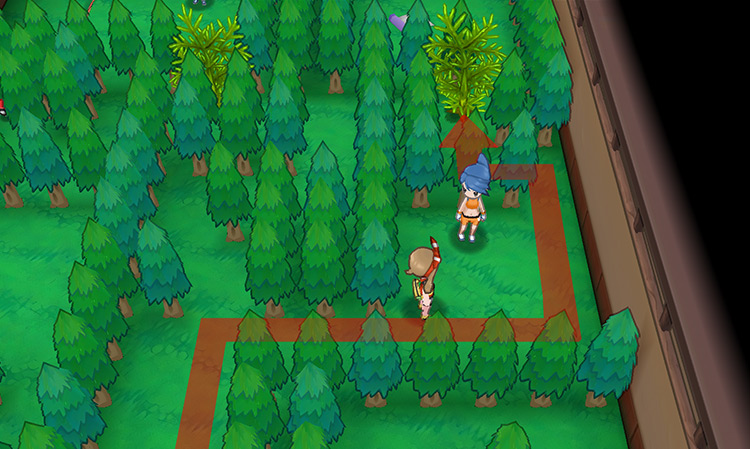
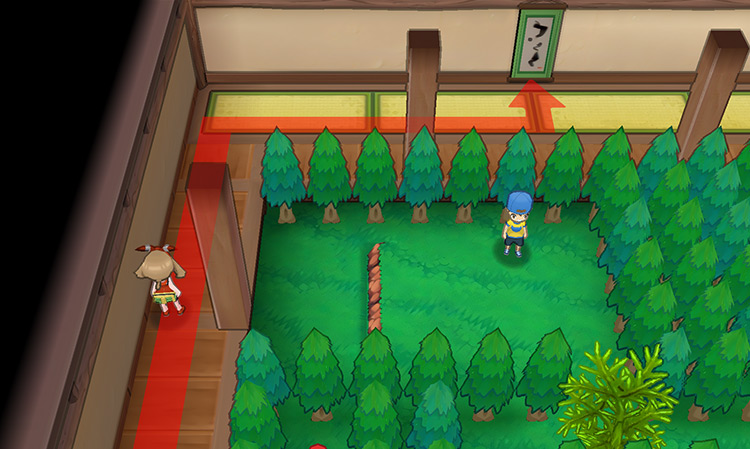
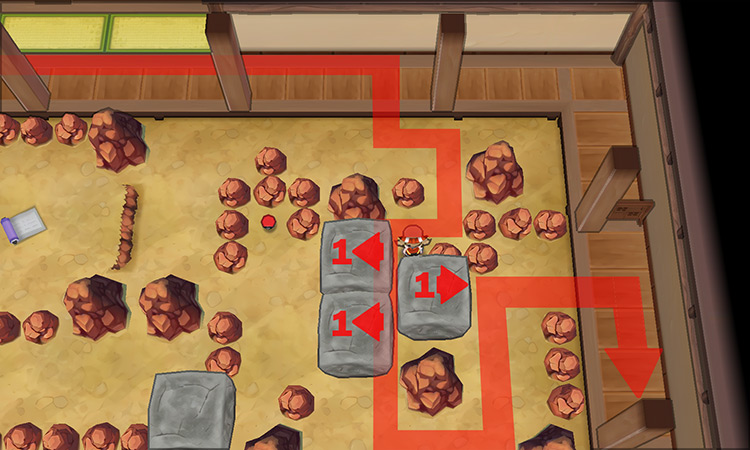
Step 7: Then head back towards the entrance and locate the hallway on the left side that leads north.
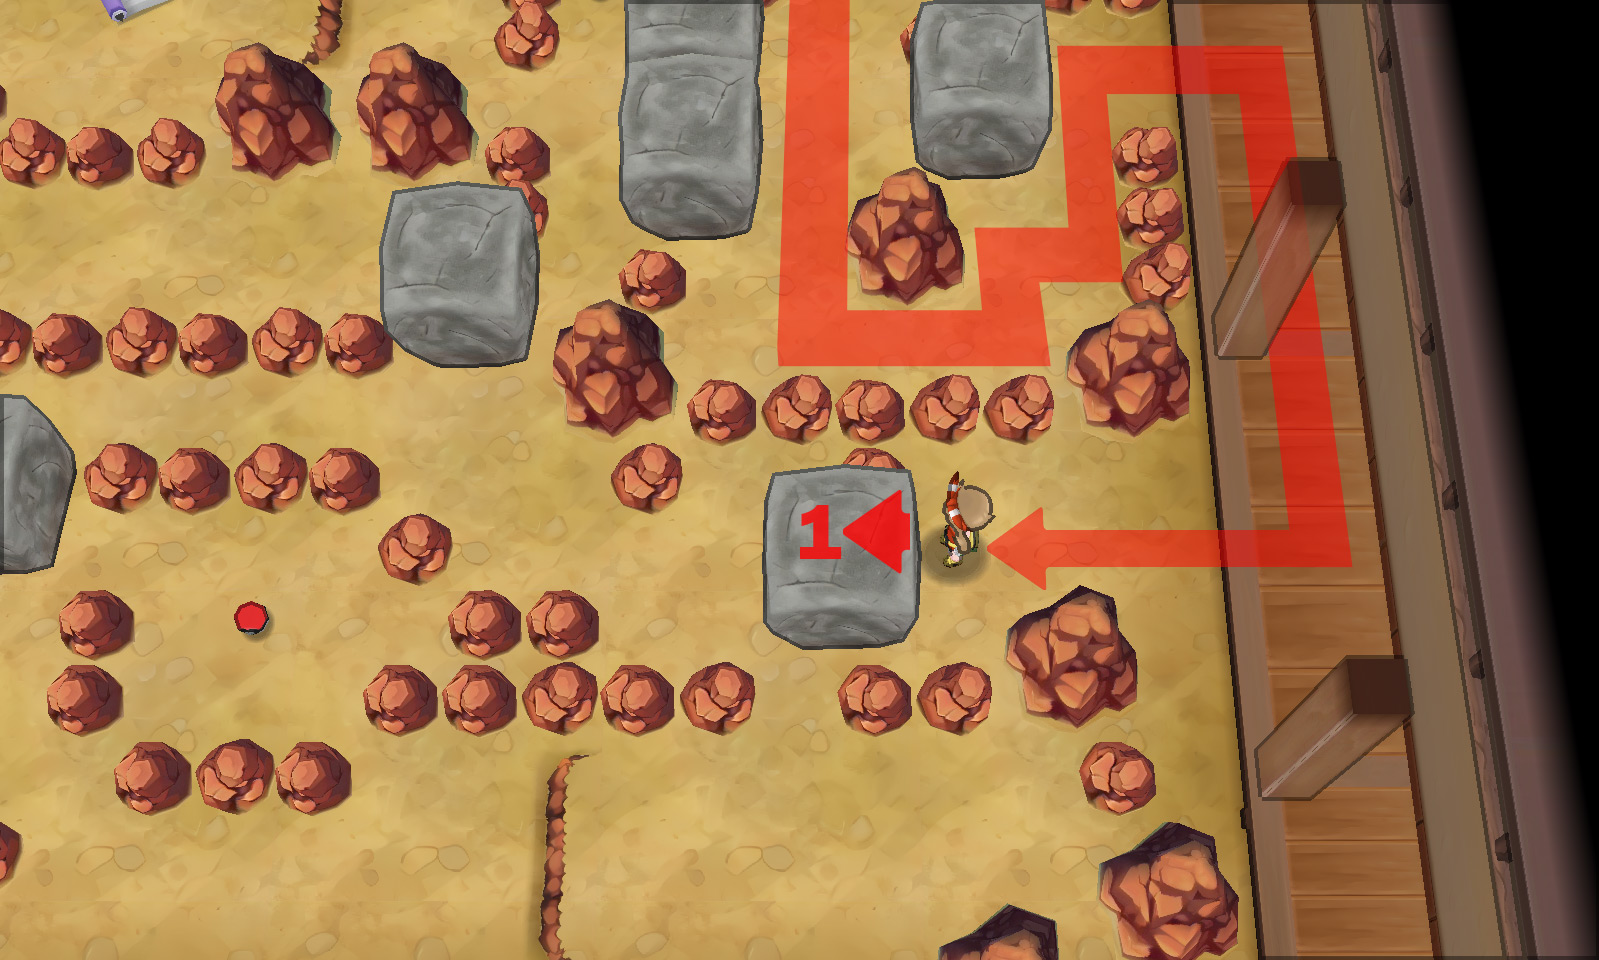
Once you reach the center of the northern wall, you’ll find another scroll on the wall. Interact with it to reveal the maze’s hidden exit.
Step 8: This will take you to the Trick Master’s prize room.
You can obtain an Expert Belt next to the TV set. Then talk to the Trick Master to obtain your reward for successfully navigating the maze – a Hard Stone.

Puzzle 2
In the second puzzle, there’s a maze with lots of rocks you can break with HM06 Rock Smash. And unlike usual breakable rocks, wild Pokémon or items won’t appear when they’re destroyed.
Here’s a list of all the items you can find in this version of the Trick House:
| Item | Location |
|---|---|
| Rage Candy Bar ×2 |
|
| Hard Stone | Reward from Trick Master for completing Puzzle 2 |
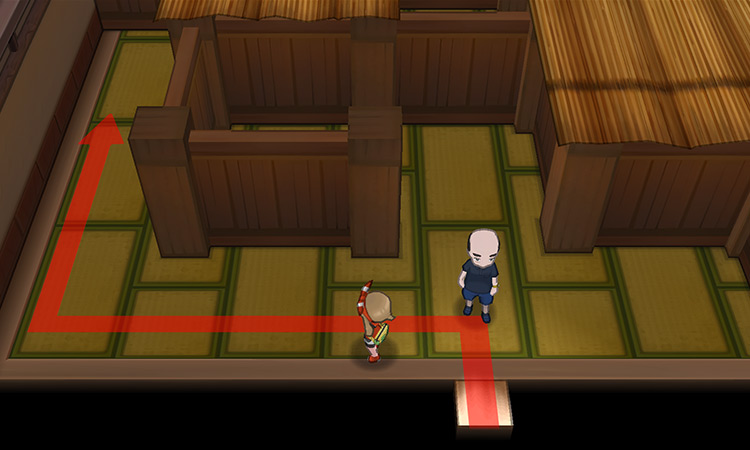
Step 1: The Trick Master will be hiding behind the small tree pot on the right. Speak with him to get started.
Step 2: Proceed through the scroll to discover the new maze.
Inside, a Mechadoll resembling the Trick Master will offer an Escape Rope for sale.
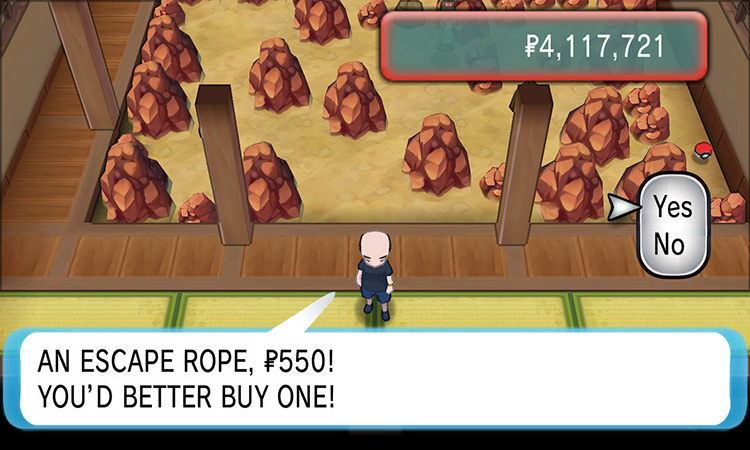
Step 3: Like before, you’ll need to locate a hidden scroll within the maze. Start by using HM06 Rock Smash on the rock to your left.
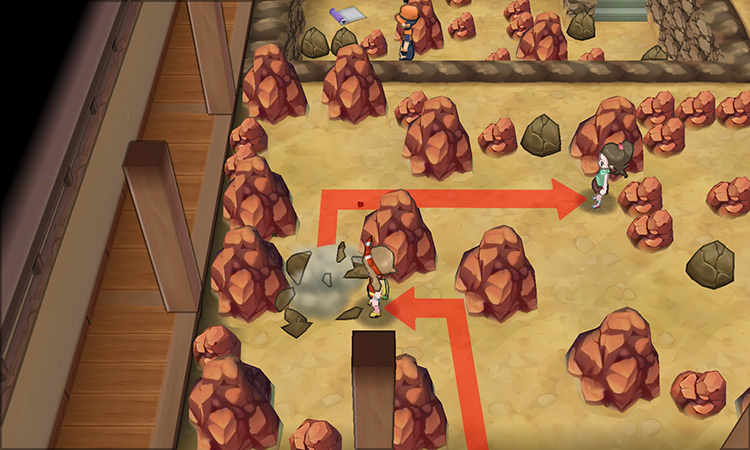
Step 4: After breaking the rock, either battle or avoid the nearby trainer.
Continue onward by going up and breaking another rock to access the narrow corridor on the right side of the room.
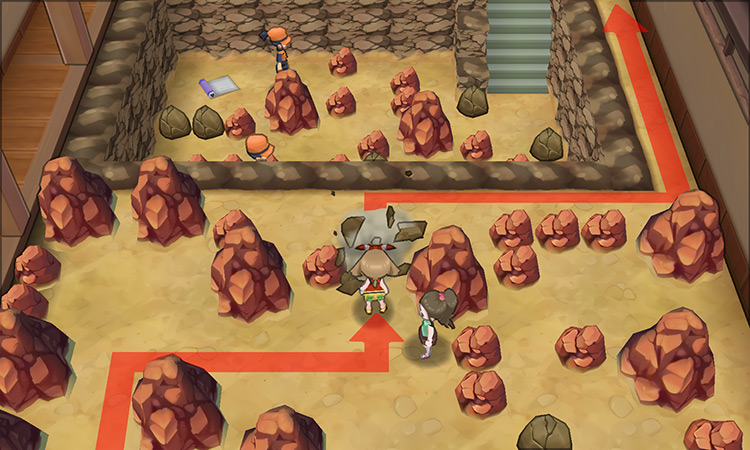
Step 5: Then head down the nearby staircase and use Rock Smash once more to destroy the nearby rock on your left.
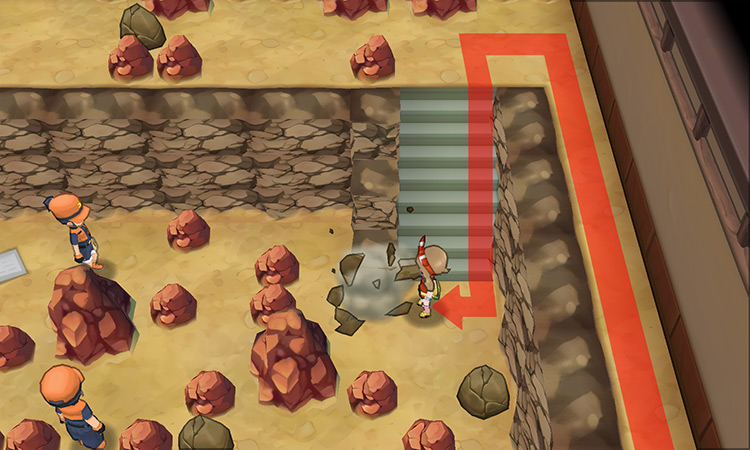
Step 6: Follow the narrow path leading to the scroll up ahead.
While on your way you’ll encounter another trainer to battle.
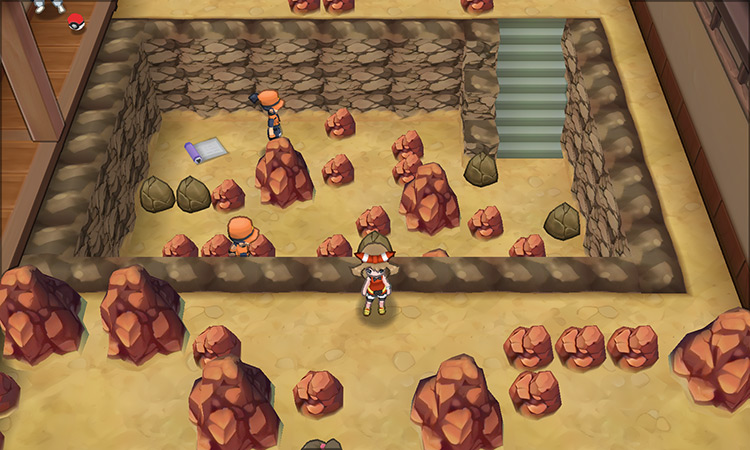
Step 7: After winning, carefully head west if you want to avoid the next trainer. Then just break another rock to learn the secret scroll code required to exit the maze.
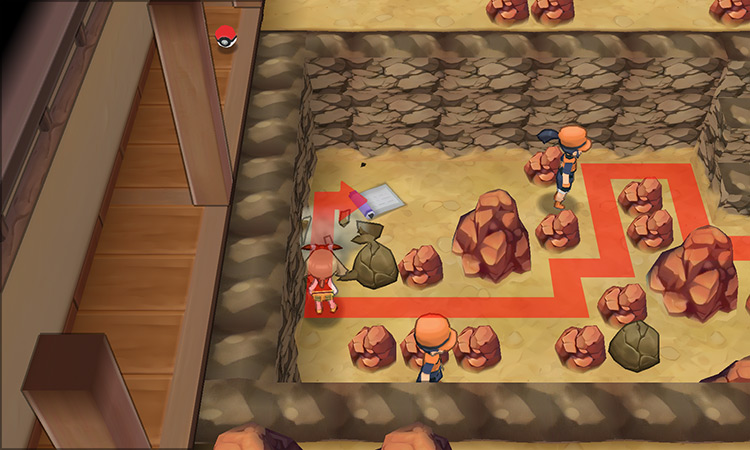
Step 8: Once you have the code, head back up the stairs and turn left toward one last rock.
Breaking this rock will grant you access to the scroll on the wall, which leads to the Trick Master’s prize room.
Step 9: When you reach the Trick Master’s prize room, talk to him to receive your reward for successfully navigating the maze – a Hard Stone.

Puzzle 3
For the third puzzle, you’ll find yourself in a dimly lit maze that can be illuminated with TM70 Flash. The TM is not actually required since the room is not completely pitch black, but the maze will be easier to navigate with Flash.
Here’s a list of all the items you can find in this version of the Trick House:
| Item | Location |
|---|---|
| Lumiose Galette ×2 |
|
| TM92 Trick Room | Reward from Trick Master for completing Puzzle 3 |
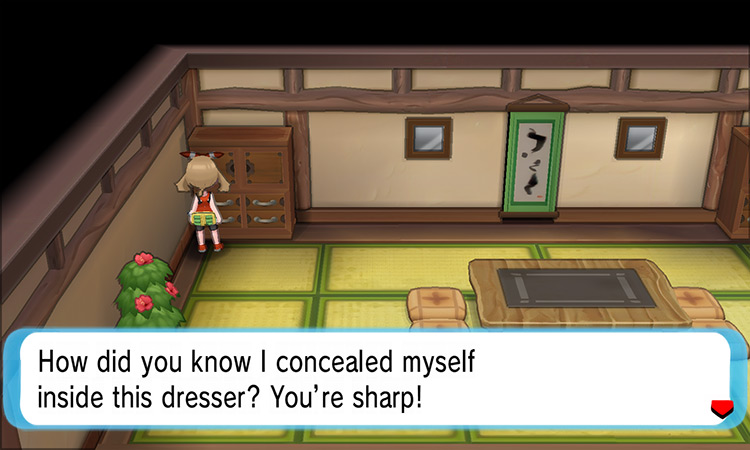
Step 1: As you step into the Trick House, the Trick Master has changed his hiding spot once again. This time you’ll find him inside the left dresser.
Speak with him here and then interact with the scroll on the back wall to enter the dimly lit maze.
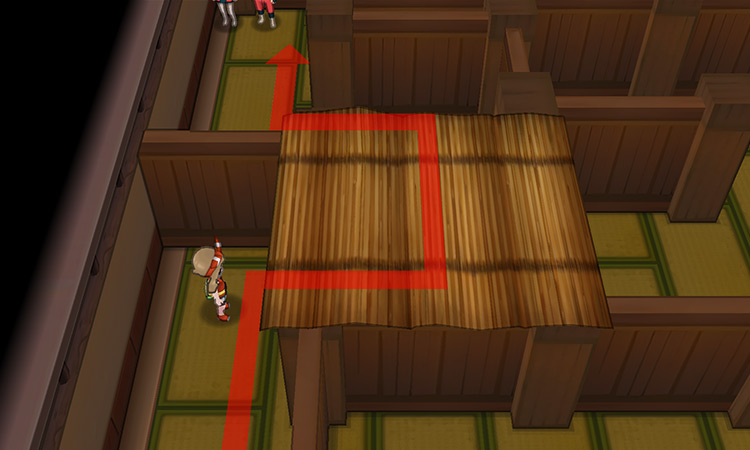
Step 2: If you’ve brought a Flash user, use it now to light up the room. Then head up the left side of the maze.
Step 3: To get to the scroll’s location, head north toward the Ace Duo up ahead. You can choose to fight them or avoid them, if you prefer.
Step 4: Afterwards, make a right turn and continue north by following the path through the middle of the maze.
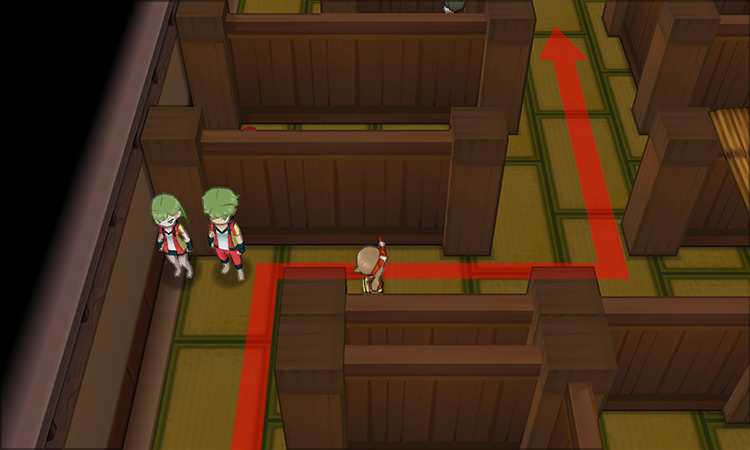
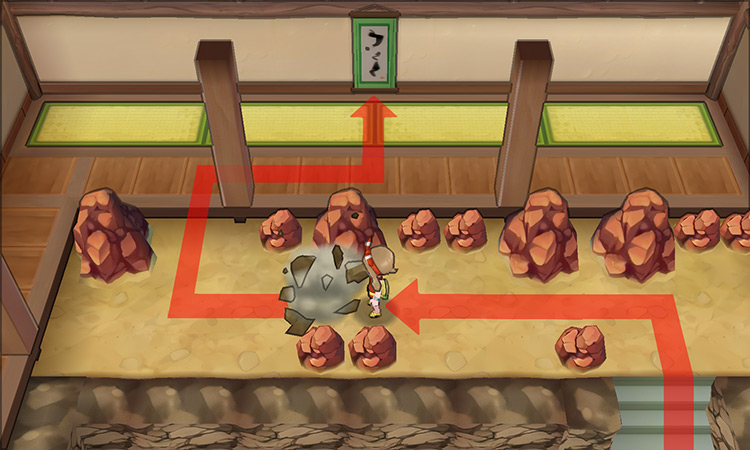
Step 5: Upon reaching the hanging scroll against the back wall, take a right turn to find a hidden staircase. Descend these stairs and continue southward.
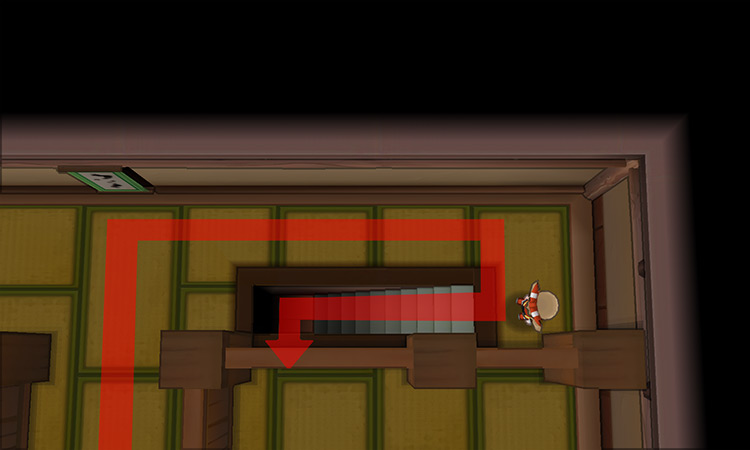
Step 6: When you hit a wall, go east. This will take you to the scroll on the ground that’s required to exit the maze.
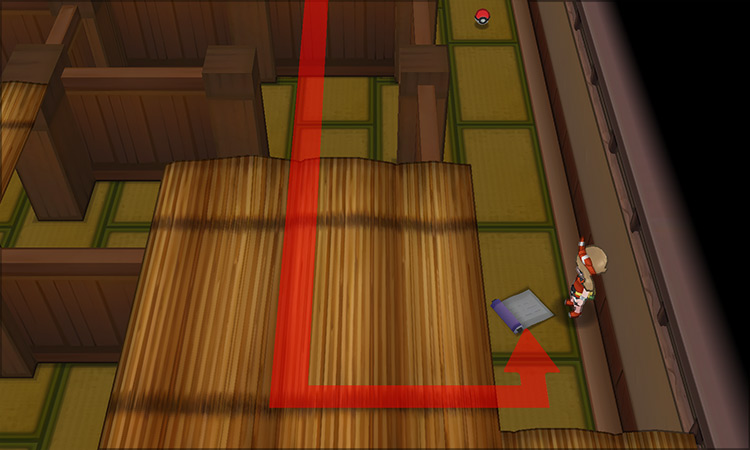
Step 7: Once you have the code you can head back to the stairs and interact with the scroll on the wall and write down the secret code. This should take you to the Trick Master’s prize room once again.

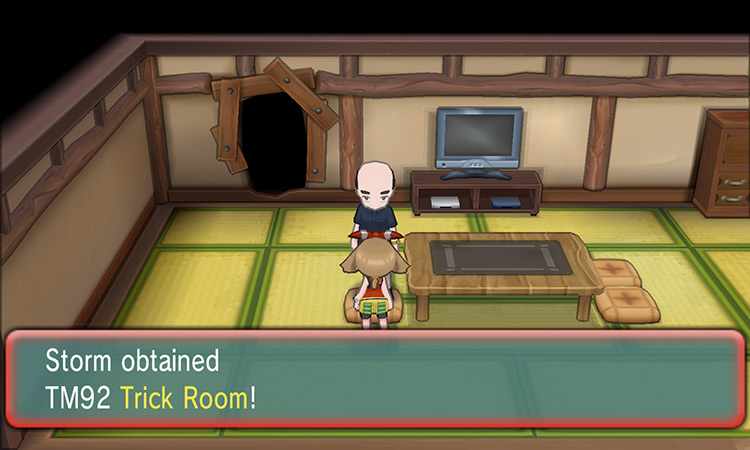
Step 8: When you reach the Trick Master’s prize room, talk to him to receive your reward for successfully navigating the maze – TM92 Trick Room.
Puzzle 4
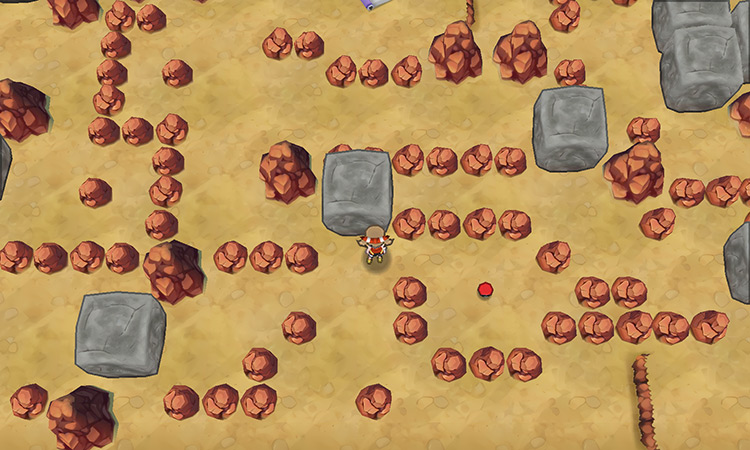
In the fourth puzzle you’ll find a room full of boulders that require HM04 Strength to push aside.
We’ll show you the correct solution, but be careful not to block your path by pushing them too far or in the wrong direction.
Here’s a list of all the items you can find in this version of the Trick House:
| Item | Location |
|---|---|
| Casteliacone ×2 |
|
| Smoke Ball | Reward from Trick Master for completing Puzzle 4 |
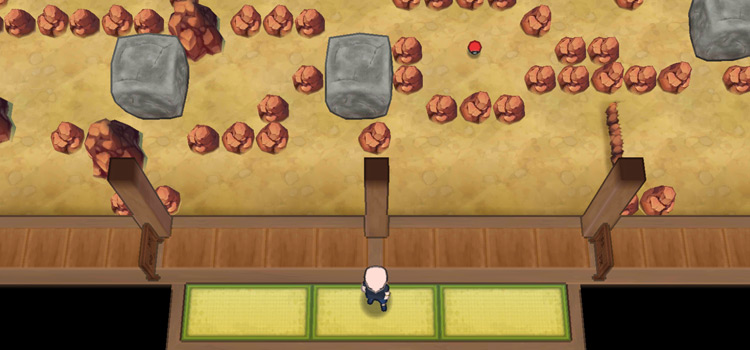
Step 1: Inside the Trick House, the Trick Master will be in the left window on the back wall.
Speak with him here and then interact with the hanging scroll to enter the maze room.
Step 2: No trainers are around here, but you’ll need to use HM04 Strength to move boulders and create a path to the scroll.
Start by pushing the nearby boulder up three times. This will open a path towards your left between a couple brown rocks.
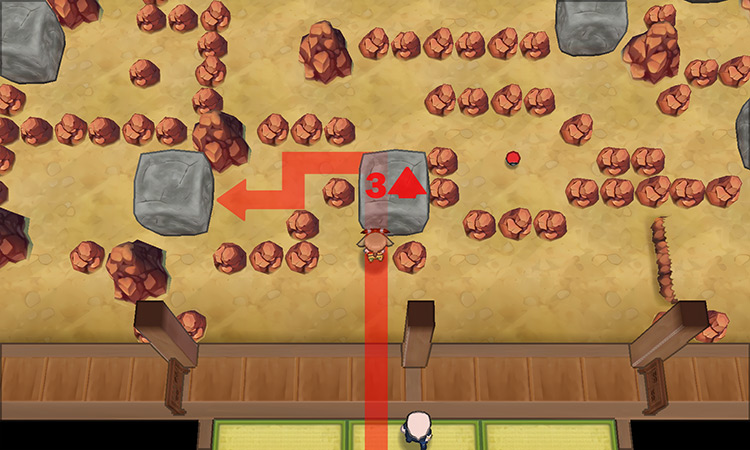
Step 3: Once the path is open, go left and push the next boulder to the left once.
This will clear the way to the leftmost side of the room.
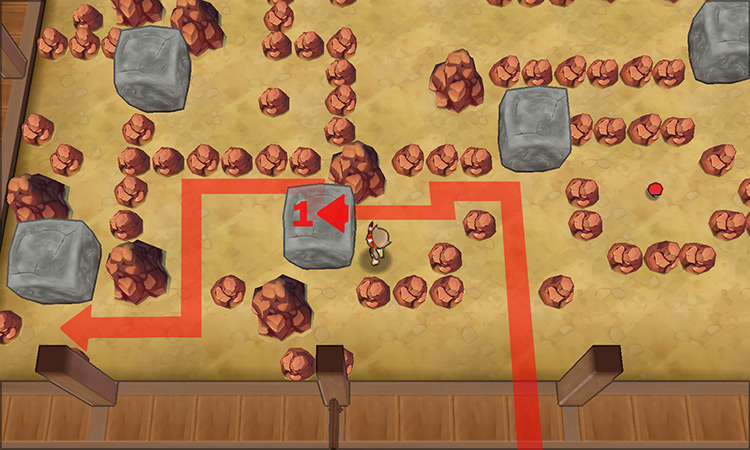
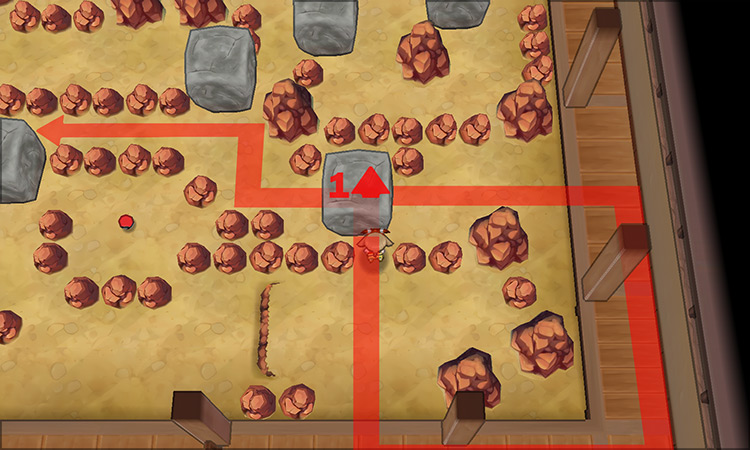
Step 4: Go left and proceed up the narrow hallway, and then push the boulder marked in the screenshot below – you want to push it to the right two times.
Step 5: Then walk around & move to the right side of that same boulder and push it all the way to the left until it reaches the wall.
This should clear the way to the boulder in the northwest corner. Once you reach that boulder, push it upward once.
Step 6: Make your way back to the boulder in the southwest corner. Push it down once, and then proceed to walk around it to get to the northwest corner of the room.

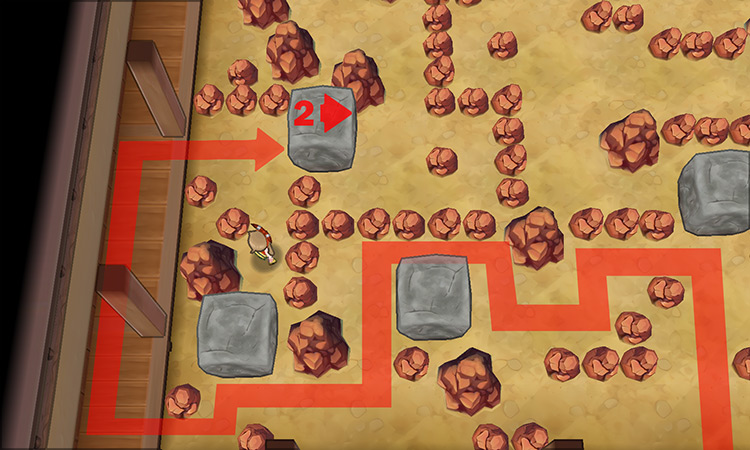
Step 7: Push the nearby boulder in the northwest corner over to the right twice.
Then cross over to the right side of the room with the newly-opened pathway.
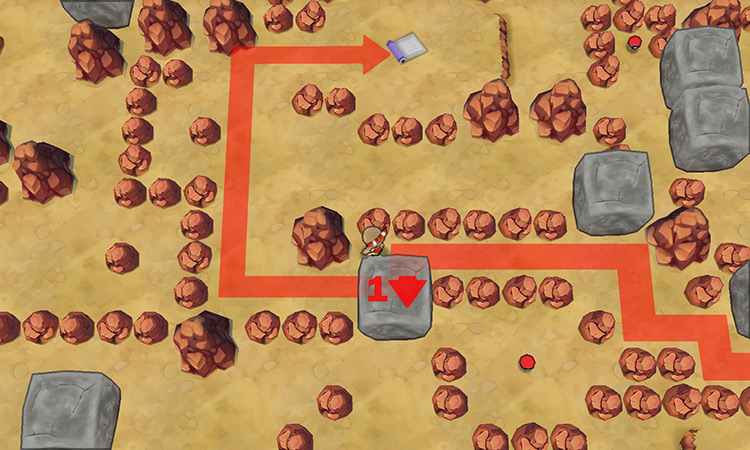
Step 8: On the right side of the room, enter the narrow opening where three boulders are arranged side by side.
Move all of them as indicated below to create a path for yourself (each boulder gets pushed once to its respective side).
Step 9: Travel through the new opening and then in the southeast side of the room, move the nearby boulder once to the left.
Step 10: Then walk back & down to make your way around the boulder. Your goal is to position yourself on the bottom side of this boulder (pictured below).
Push it upward once. Then proceed along the westward path to reach the last boulder you’ll need to move.
Step 11: Now you’ll end up standing on the north side of the first boulder you pushed in the maze.
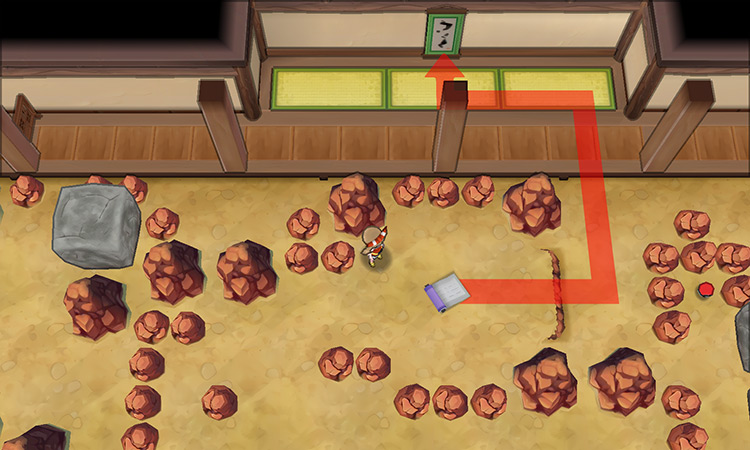
Push it down once to fully open the path to the scroll. After you read it you’ll be able to exit the maze.
Step 12: After reading the secret code, proceed down the nearby ledge and approach the hanging scroll on the wall. Write down the secret code to access the Trick Master’s prize room once again.
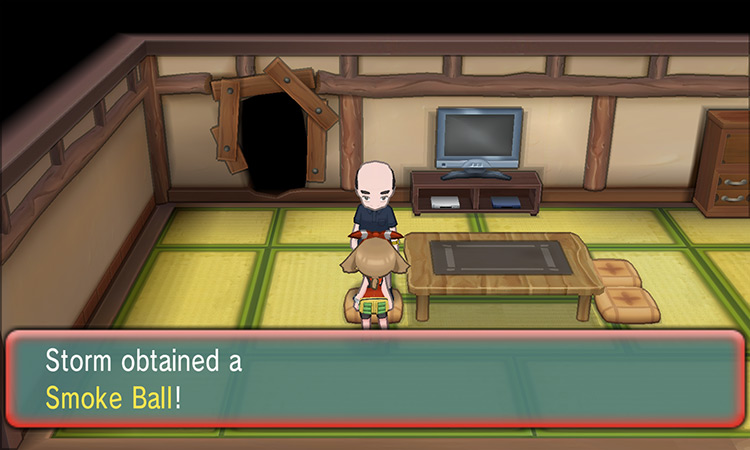
Step 13: When you reach the Trick Master’s prize room, talk to him to receive your reward for successfully navigating the maze – a Smoke Ball.
Puzzle 5
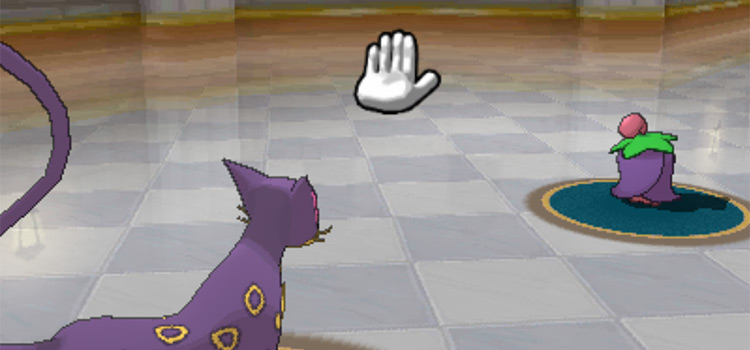
The fifth puzzle involves five robots called Mechadolls that ask you increasingly difficult questions.
Get the answers right to advance; get them wrong, and you’ll be sent back to the room’s entrance.
Each Mechadoll will randomly ask you one question from a pool of three questions, so the sequence of correct answers will differ each time.
Here’s a list of all the items you can find in this version of the Trick House:
| Item | Location |
|---|---|
| Old Gateau ×2 |
|
| Escape Rope | From the third Mechadoll after answering the question correctly |
| Magnet | Reward from Trick Master for completing Puzzle 5 |
And then below we’ll guide you through the maze with a list of all possible questions and the correct answers for all of them.
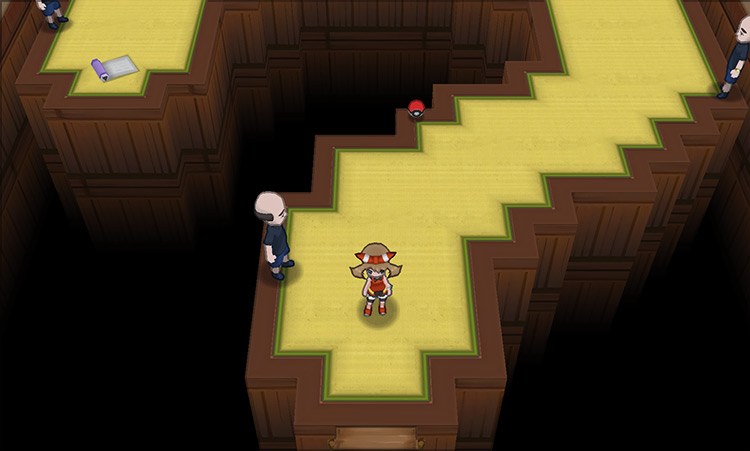
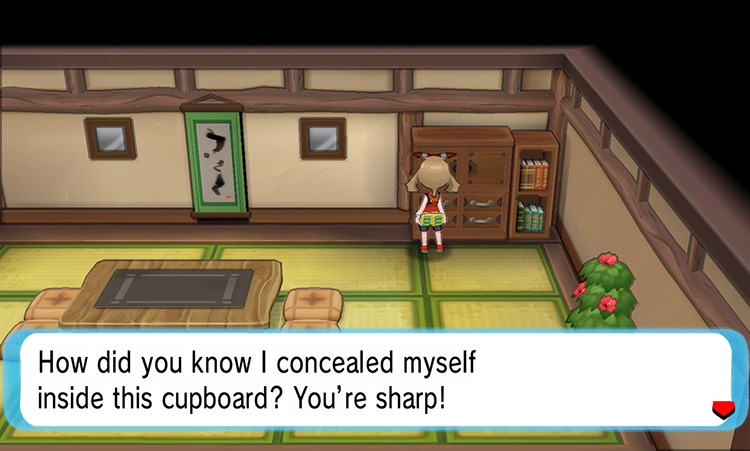
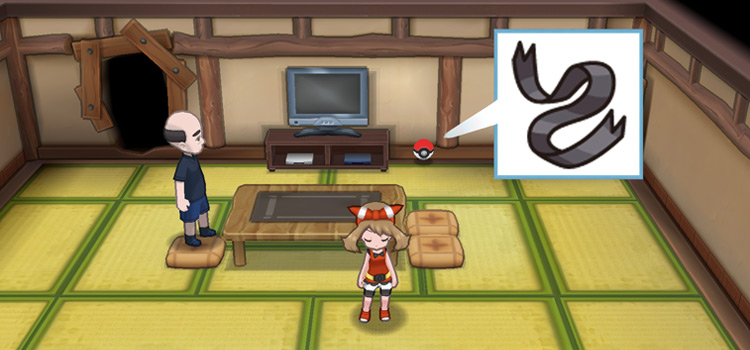
Step 1: As usual, when you enter the Trick House you’ll need to find where the Trick Master is hiding. This time you’ll discover him concealed inside the cupboard on the right side of the room.
Step 2: When you enter the scroll leading into the maze, you’ll arrive in a room shaped like a question mark.
No HM is required to navigate through the maze and there are no trainers to battle.
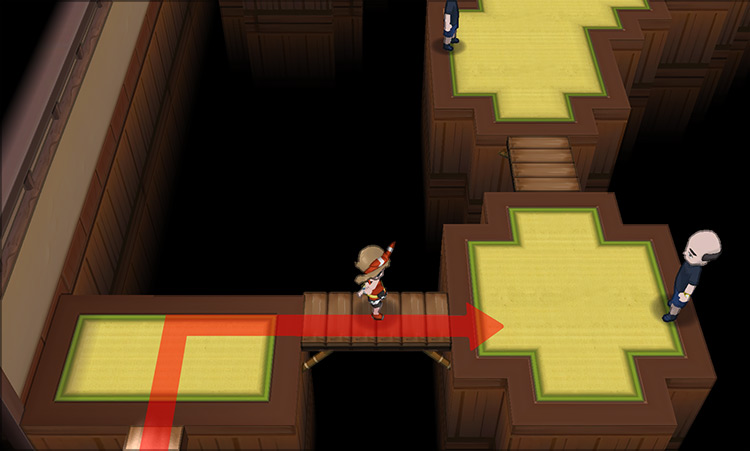
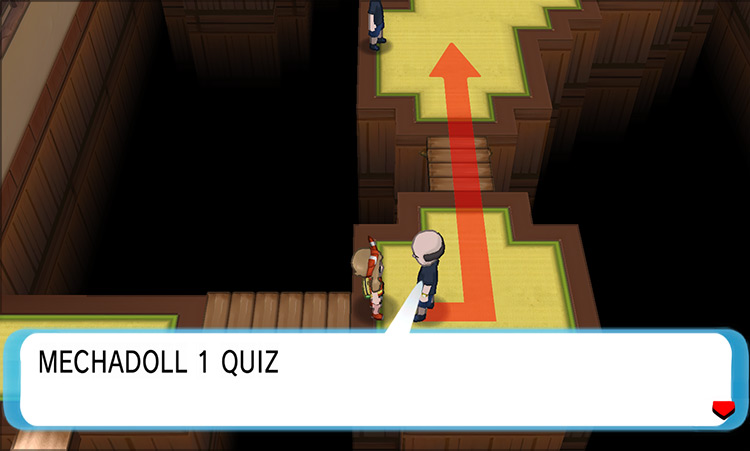
Instead, you’ll need to reach the end of the room and obtain the scroll by successfully completing the Mechadolls’ quiz. Begin by heading east to approach Mechadoll 1.
Step 3: Here’s a list of all the possible questions and their corresponding answers for Mechadoll 1’s quiz:
| Mechadoll 1’s Questions | Correct Answer |
|---|---|
| One of these Pokémon is not found on Route 103. Which one is it? | Nincada |
| One of these Pokémon is not of the Grass type. Which one is it? | Nincada |
| One of these Pokémon uses Scratch. Which one is it? | Nincada |
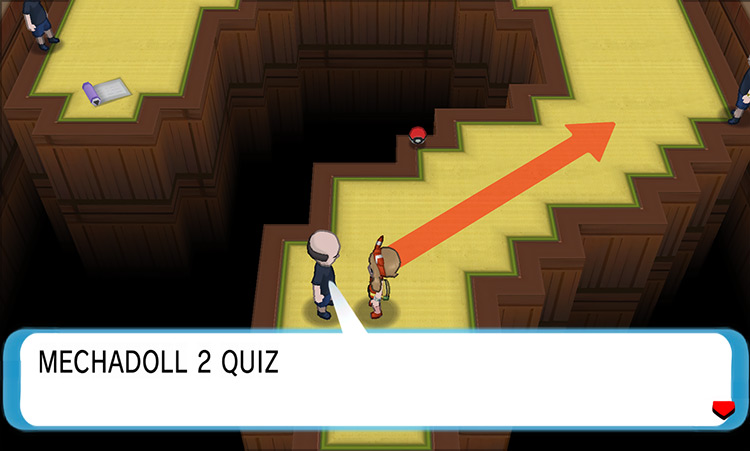
Step 4: Head north, and then here’s a list of all the possible questions and their corresponding answers for Mechadoll 2’s quiz:
| Mechadoll 2’s Questions | Correct Answer |
|---|---|
| In Professor Birch’s Bag, there were three Pokémon. Which one was at the right? | Mudkip |
| Which Pokémon was offered for a trade at the Pokémon Trainers’ School? | Seedot |
| What Pokémon was the Devon researcher looking for in Petalburg Woods? | Shroomish |
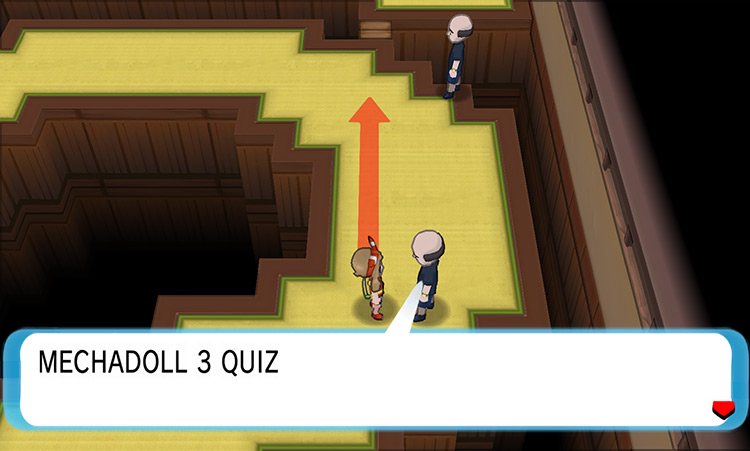
Step 5: Keep following the path to the next Q&A. Here’s a list of all the possible questions and their corresponding answers for Mechadoll 3’s quiz:
| Mechadoll 3’s Questions | Correct Answer |
|---|---|
| Which costs more? Three Poké Balls or one Super Potion? | The Super Potion |
| Sell one Escape Rope and buy one Antidote. How much money remains? | 175 |
| Which would cost more, a Full Heal plus a Great Ball, or one Revive? | Revive |
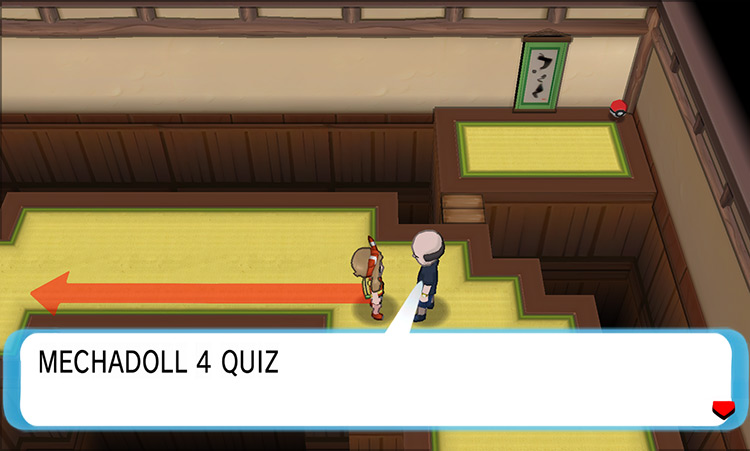
Step 6: Head north a bit and you’ll get your fourth quiz. Here’s a list of all the possible questions and their corresponding answers for Mechadoll 4’s quiz:
| Mechadoll 4’s Questions | Correct Answer |
|---|---|
| Rustboro Gym Leader Roxanne used a Geodude. Was it female or male? | Female |
| In Dewford Hall, were there more men or women? | More men |
| Was the first Trainer in Dewford Gym male or female? | Female |
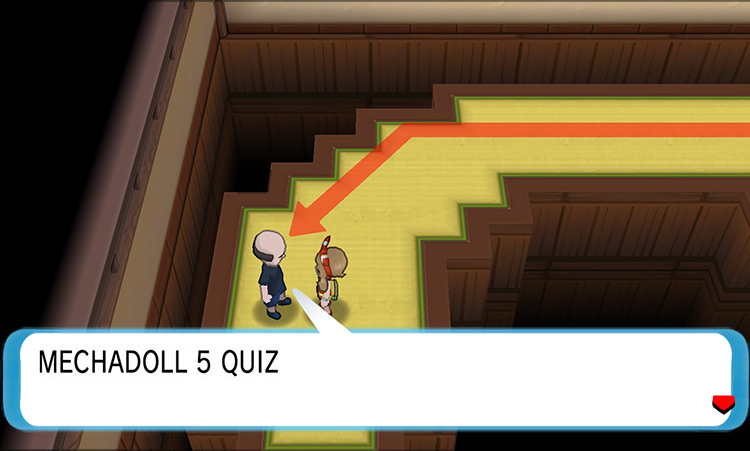
Step 7: Head towards the left to follow the path – and here’s a list of all the possible questions and their corresponding answers for Mechadoll 5’s quiz:
| Mechadoll 5’s Questions | Correct Answer |
|---|---|
| How many Bikes does Rydel have on display outside his cycle shop? | Two |
| How many people give you Berries at the Pretty Petal flower shop? | One |
| How many signs are there in Lilycove City? | Eight |
Step 8: After answering the final question correctly, interact with the scroll on the ground near the fifth Mechadoll.
Step 9: Return to the northeast corner of the room. Here you’ll find the scroll on the wall, which will lead you to the Trick Master’s prize room.
Step 10: When you reach the Trick Master’s prize room, talk to him to receive your reward for successfully navigating the maze – a Magnet.

Puzzle 6
The final puzzle requires you to navigate through a large room with tiles that move you in the direction they point.
Here’s a list of all the items you can find in the last version of the Trick House:
| Item | Location |
|---|---|
| Shalour Sable ×2 |
|
| Red Tent (OR) or Blue Tent (AS) |
Reward from Trick Master for completing Puzzle 6 |
| Big Nugget | Under Trick Master’s seat in the prize room |
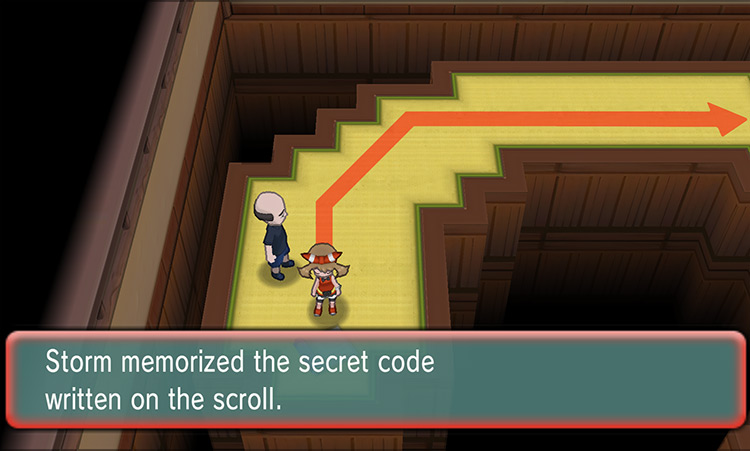
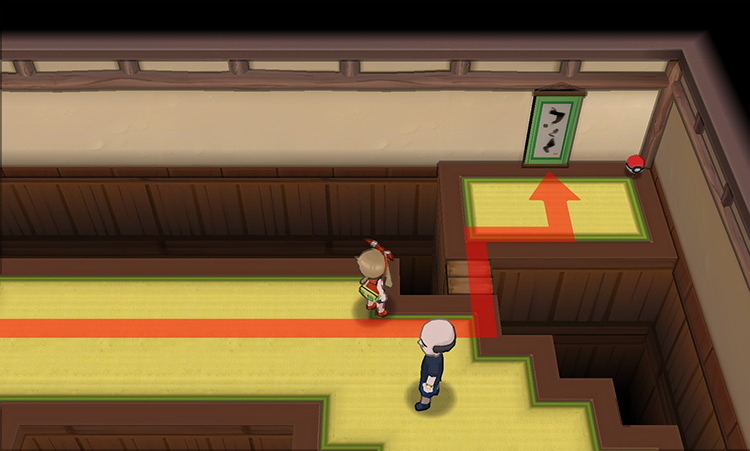
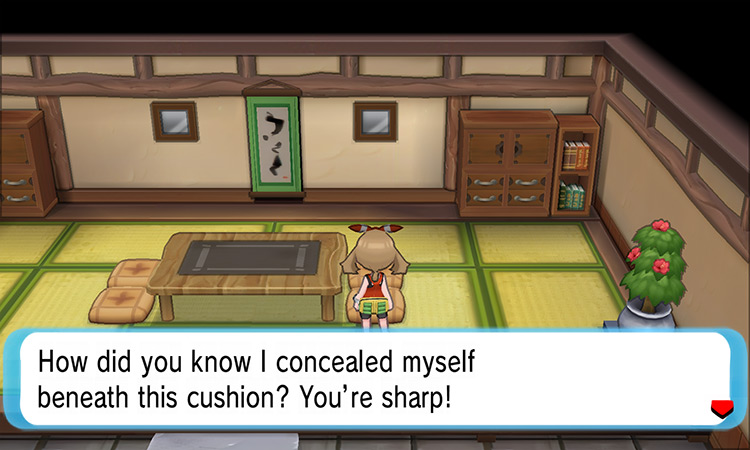
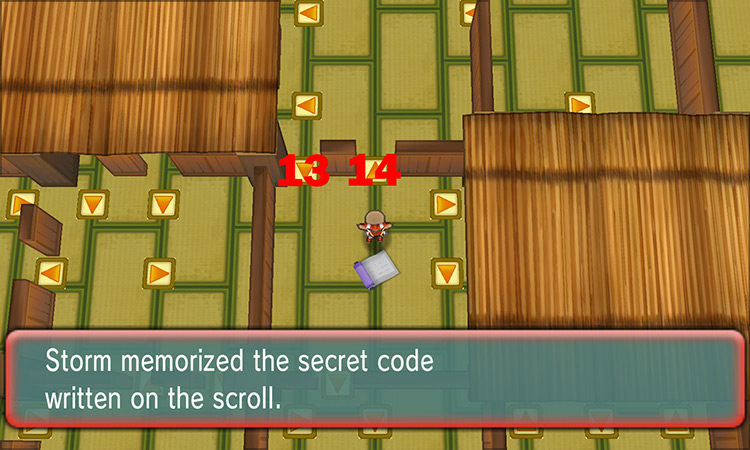
Step 1: When you enter the Trick House for this last puzzle you’ll once again have to find where the Trick Master is hiding. This time you’ll spot him underneath the bottom-right cushion near the table.
Find him in the pillow, then interact with the scroll on the wall to enter the maze.
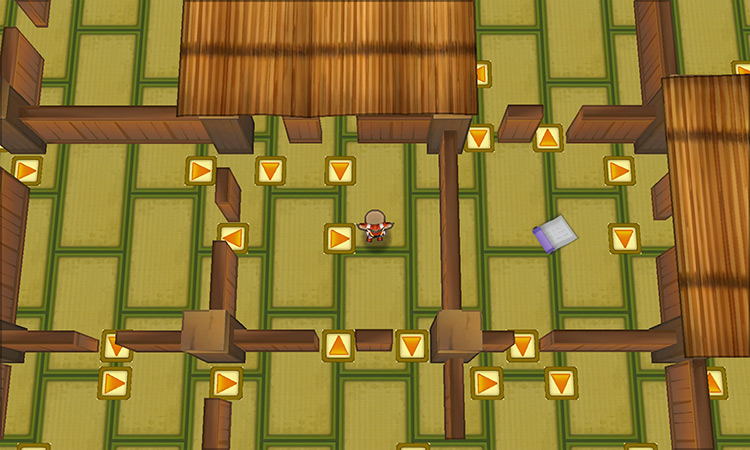
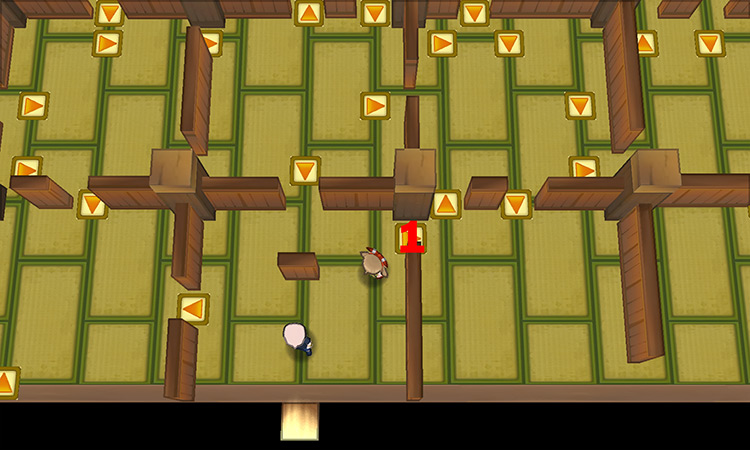
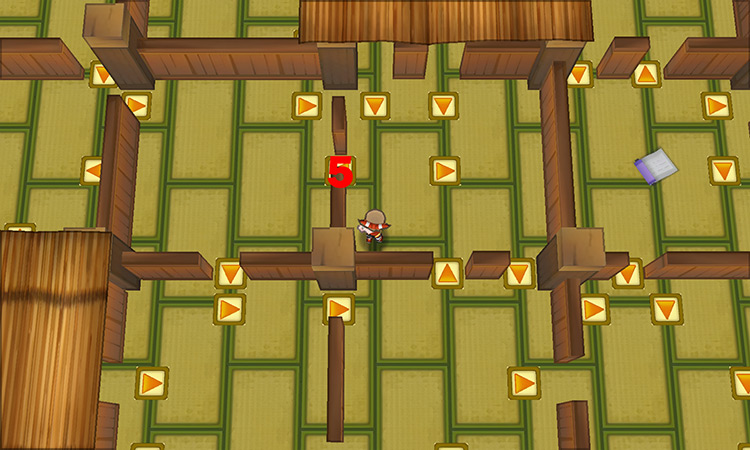
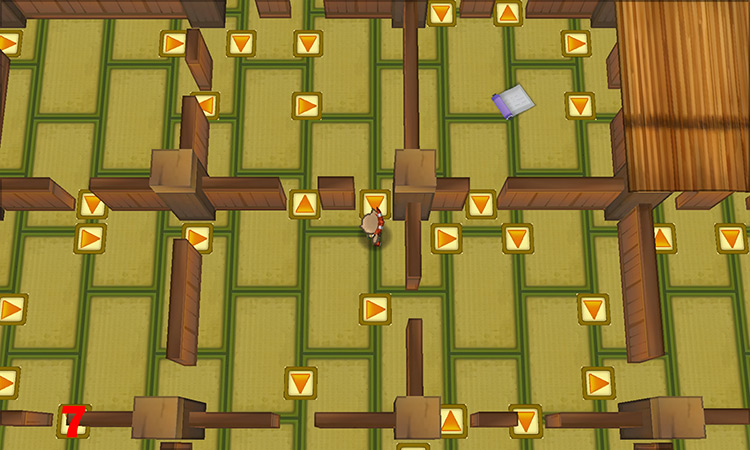
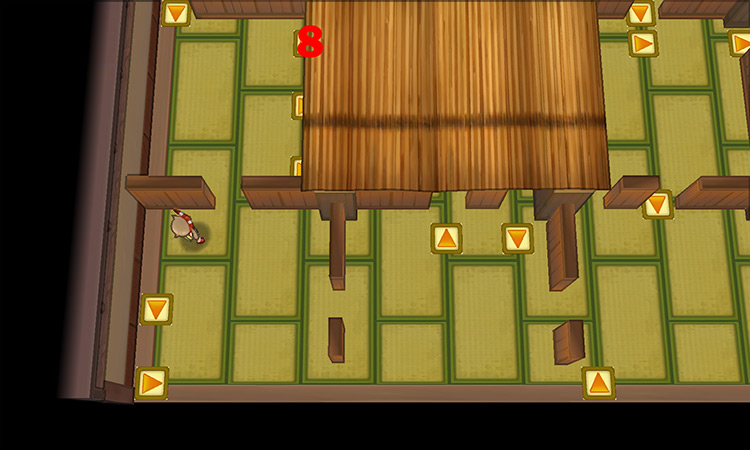
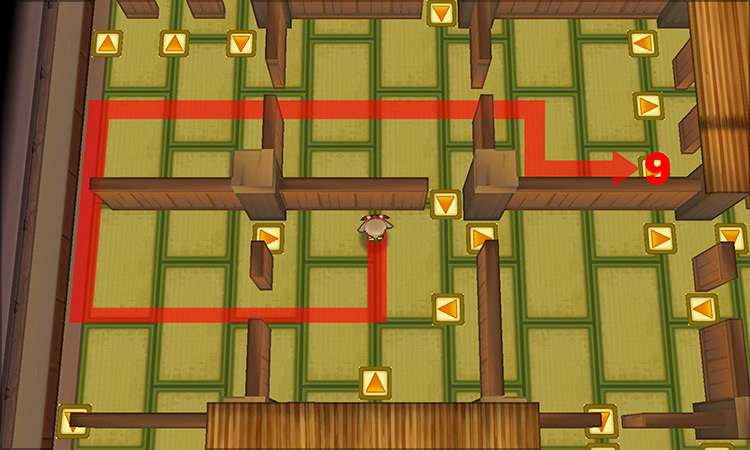
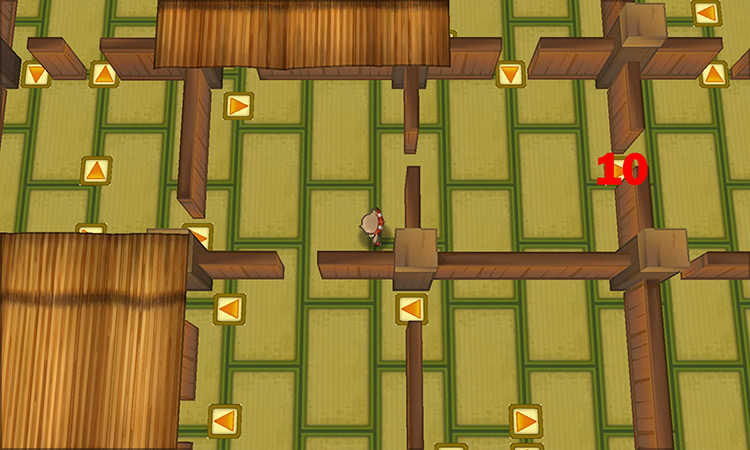
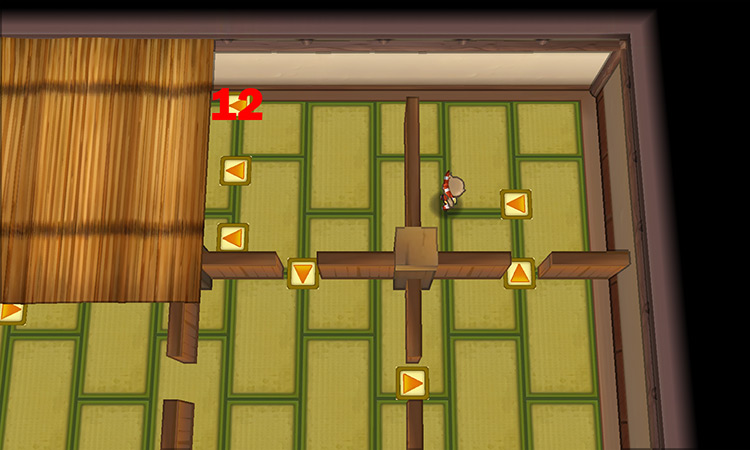
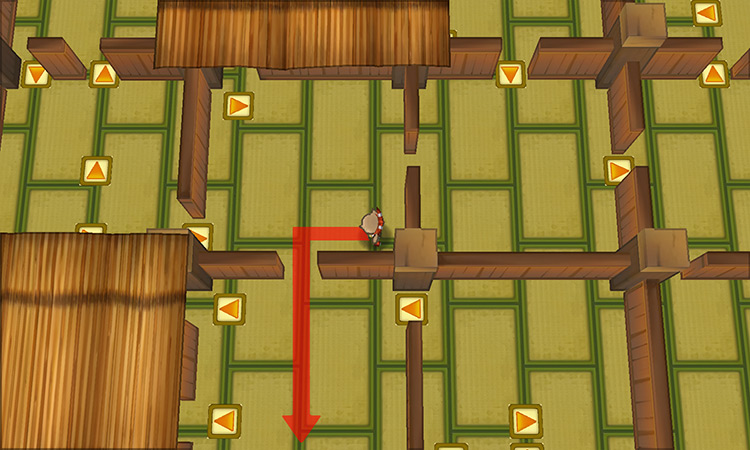
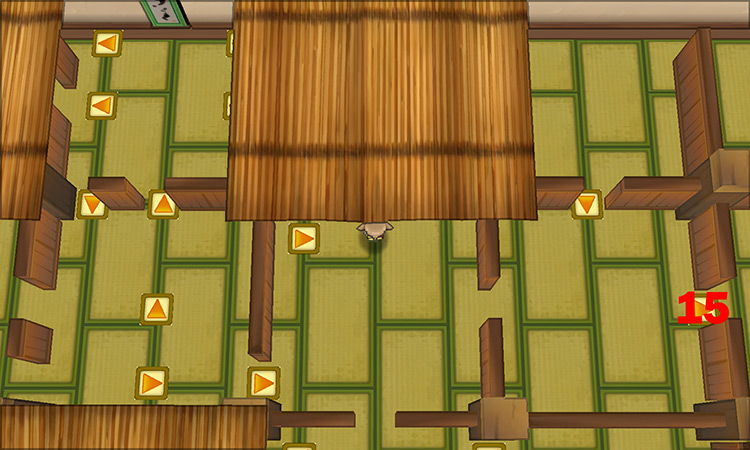
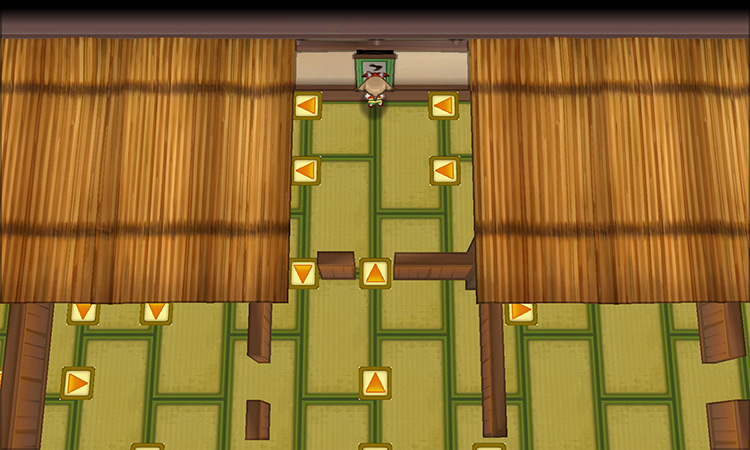
Step 2: To navigate through the maze, step on the numbered spin tiles in the sequence indicated in the images below. After each numbered spin tile, the subsequent image will display where you should end up and where to go next.
Start by stepping on the top-right spin tile in the current room.
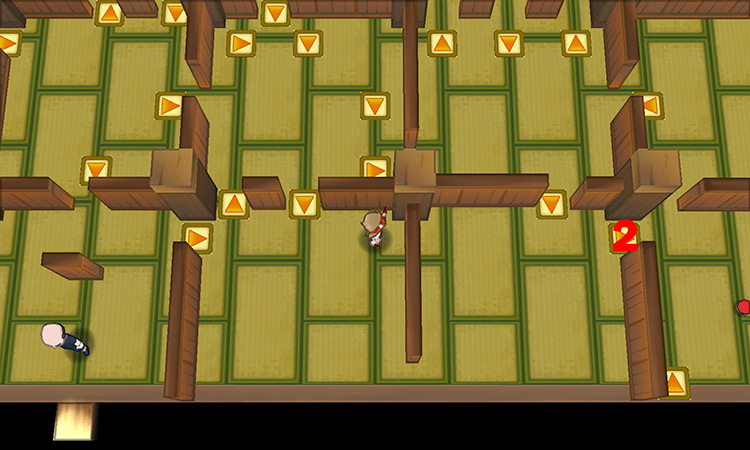
Step 3: Walk over to the room on your right and use the top-right spin tile.
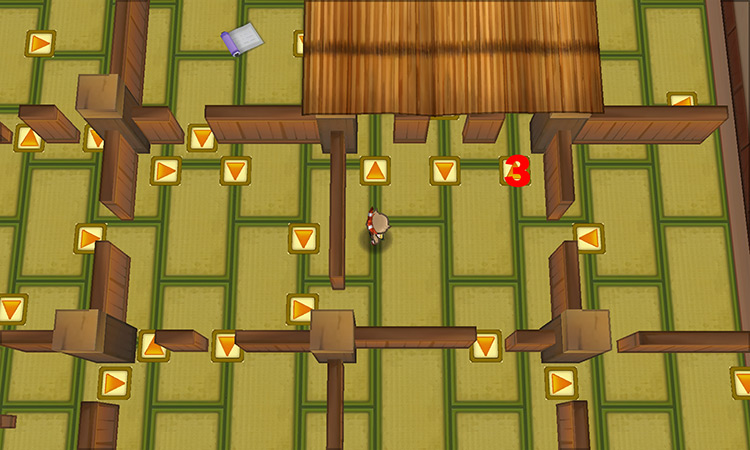
Step 4: Then use the top-right spin tile near the roofed area that’s heading north.
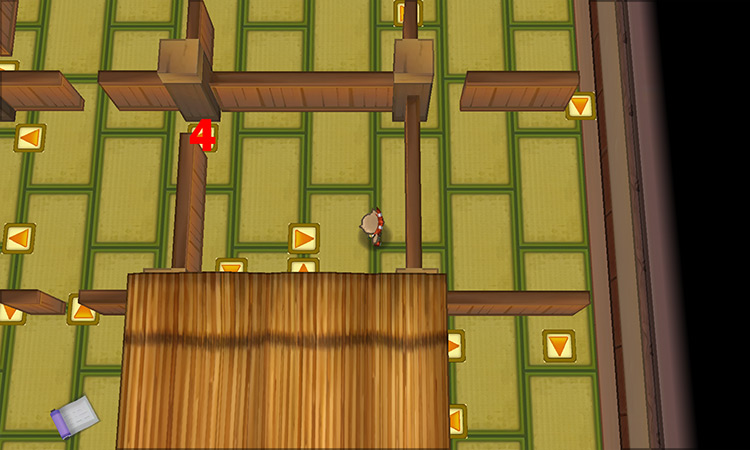
Step 5: Use the spin tile on the top-left corner of the room you’re in.
Step 6: Go slightly upward and use the spin tile going left.
Step 7: Use the south spin tile of the room you’re in.

Step 8: Make your way toward the room to your left without using any spin tiles. Then once you’re there, use the south spin tile in that room.
Step 9: The next spin tile you’ll need to use is located in the southwest side of the maze.
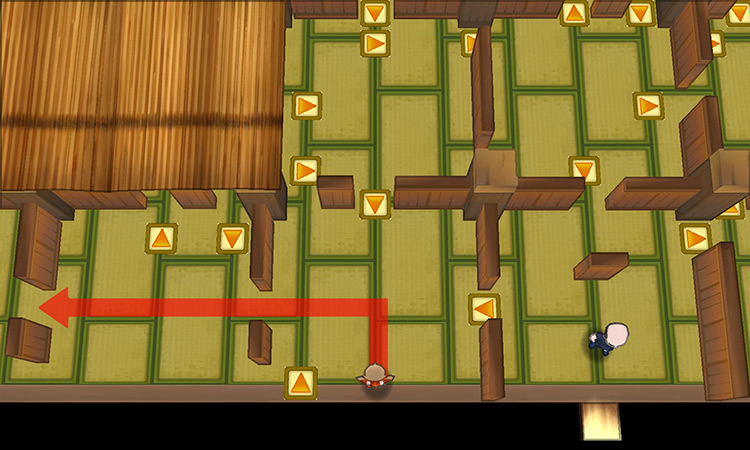
So turn to head left and pass through the narrow gap in the wall, avoiding any nearby spin tiles as you go.
Step 10: Go as far to the left as you can and you’ll come across three spin tiles near another roofed area.
Use the topmost spin tile among them.
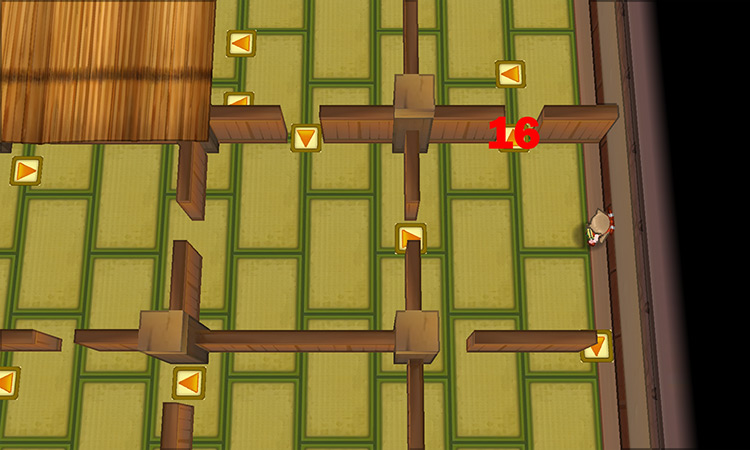
Step 11: Proceed to another roofed area located to the northeast from your current position. Just walk through the room dividers while avoiding any spin tiles until you’re in the northeastern room.
Then use the bottommost spin tile along the roofed structure within that room.
Step 12: Walk toward the room on your right, then use the spin tile on the right.
Step 13: In this next room, use the top spin tile.

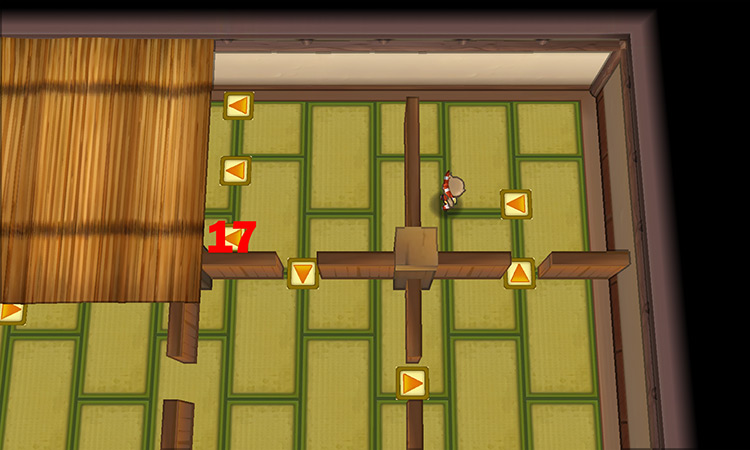
Step 14: You should now be in the northeast corner of the maze.
Move to the left room and use the topmost spin tile next to the north wall.
Step 15: After coming to a halt, walk down into the room located south of your current location.
Step 16: Use the bottom-left spin tile to reach the room where the scroll is located.
After learning the secret code, use the next spin tile directly above the scroll to go back to your previous room.
Step 17: Walk into the room on your right and use the spin tile located all the way on the right side of that room.
Step 18: Use the northern spin tile to return to the northeast corner of the maze.
Step 19: Just like last time, enter the room to the left. However, this time you should use the bottom-left spin tile near the roofed section.
Step 20: This will position you directly in front of the hanging scroll on the wall. Enter the secret code one last time to enter Trick Master’s prize room.
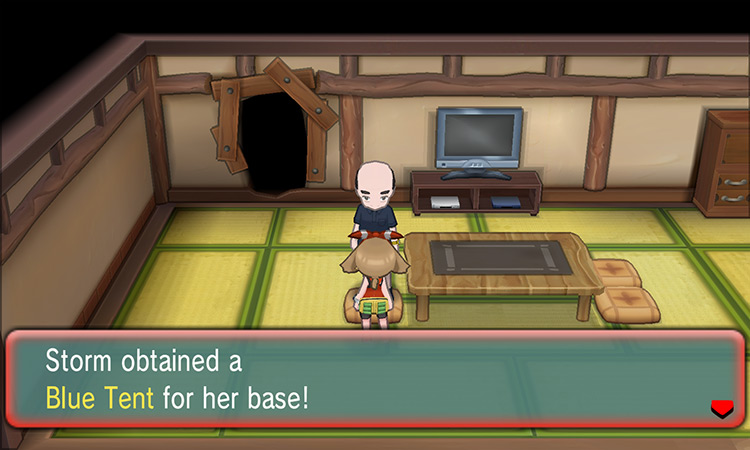
Step 21: When you reach the Trick Master’s prize room, talk to him to receive your reward for successfully completing all the puzzles inside the Trick House.
- In Omega Ruby, you’ll get the Red Tent for your Secret Base
- In Alpha Sapphire, you’ll receive the Blue Tent instead

-
Pokémon ORAS
- All Trick House Puzzles in Pokémon ORAS
Related Posts:
 How To Get Magnets in Pokémon ORAS
 Where To Get the Master Ball in Pokémon ORAS
 How To Get TM92 Trick Room in Pokémon ORAS
 How To Get Smoke Balls in Pokémon ORAS
 How To Get Expert Belts in Pokémon ORAS
 How To Get TM12 Taunt in Pokémon ORAS
 How To Get the Cameruptite in Pokémon ORAS
 How To Get the Sharpedonite in Pokémon ORAS