You can unlock the Level 24 normal-difficulty dungeon “The Thousand Maws of Toto-Rak” by accepting the Level 24 MSQ “Into the Beast’s Maw” from Buscarron in South Shroud (X:18.1, Y:19.8).
We’ll cover this quest in detail to help you unlock the dungeon, plus we’ve added boss details further into this guide.
TABLE OF CONTENTS
Unlocking Quest: Into the Beast’s Maw
“Into the Beast’s Maw” is a Level 24 MSQ from the patch 2.0 Main Scenario Questline of A Realm Reborn. You’ll need to finish every quest leading up to it before it can be unlocked.
Take your time going through the story and dungeons until you reach this quest.
Then head to South Shroud (X:18.1, Y:19.8) and talk to Buscarron to begin.
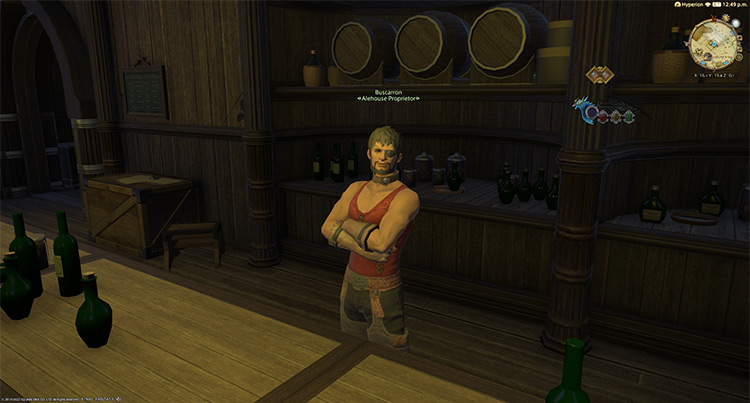
At this point in the story, you and your fellow scions are searching for the elder sylph named Frixio. Buscarron has finally gathered reliable information on the elder sylph’s whereabouts thanks to a sylph named Noraxia.
Noraxia explains that she saw Frixio entering The Thousand Maws of Toto-Rak while fleeing from Garlean soldiers. With the elder’s life in danger, you and your scion friends waste no time chasing after her.
Talk to Bloisirant outside Toto-Rak in South Shroud (X:19.6, Y:18.1) to continue.
The Gridanian guard will grant you and your friends passage into the dungeon after informing him of the current situation.
Once you finish talking to Bloiserant, The Thousand Maws of Toto-Rak will be unlocked.
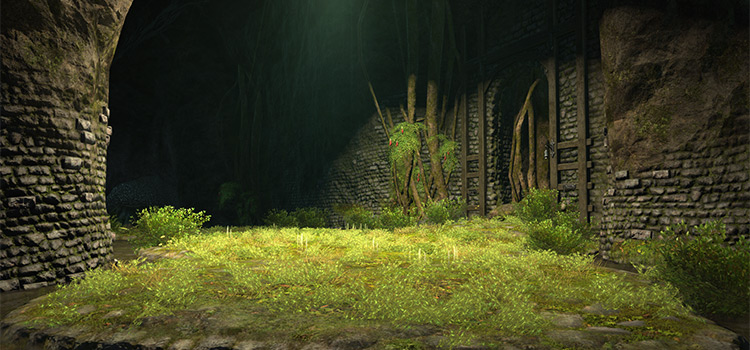
This dungeon requires at least a Level 24 Disciple of War or Magic job to enter and has no average item level requirement.
While this dungeon isn’t as hard or annoying as before, it still poses a nice challenge, especially for new players.
Miniboss: Coeurl O’ Nine Tails
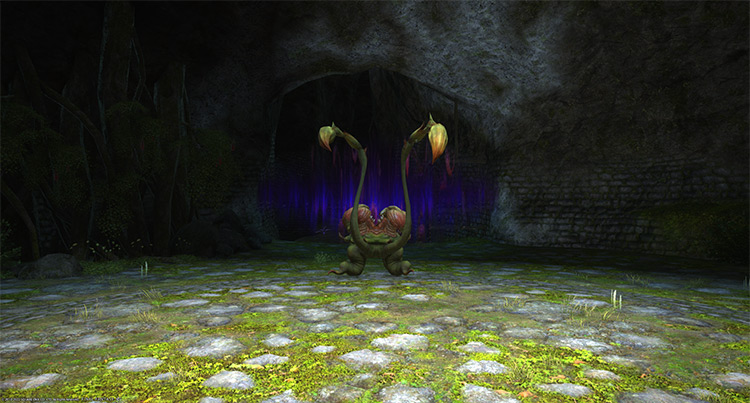
You’ll face this miniboss twice on your way to the main boss. These fights are relatively simple, with the second fight having an extra mechanic.
Mechanics:
- Acid Mist: A non-telegraphed, point-blank AoE that applies a 15-second “Poison” DoT to anyone hit. Stay away from the boss if you’re using a ranged job.
- Warden’s Whip (2nd fight): The second “Coeurl O’ Nine Tails” you’ll fight will spawn two mini versions of itself. These whips will also use “Acid Mist”.
Rewards
Coeurl O’ Nine Tails #1
| Name | Type | Rarity |
|---|---|---|
| Warden’s Barbut | Head | Dungeon (Green) |
| Nighthawk Visor | Head | Dungeon (Green) |
| Torturer’s Monocle | Head | Dungeon (Green) |
| Warden’s Gauntlets | Hands | Dungeon (Green) |
| Brigand’s Gloves | Hands | Dungeon (Green) |
| Ascetic’s Halfgloves | Hands | Dungeon (Green) |
Coeurl O’ Nine Tails #2
| Name | Type | Rarity |
|---|---|---|
| Eternal Shade | Body | Dungeon (Green) |
| Brigand’s Acton | Body | Dungeon (Green) |
| Ascetic’s Halfrobe | Body | Dungeon (Green) |
| Warden’s Trousers | Legs | Dungeon (Green) |
| Brigand’s Breeches | Legs | Dungeon (Green) |
| Ascetic’s Tights | Legs | Dungeon (Green) |
Boss: Graffias
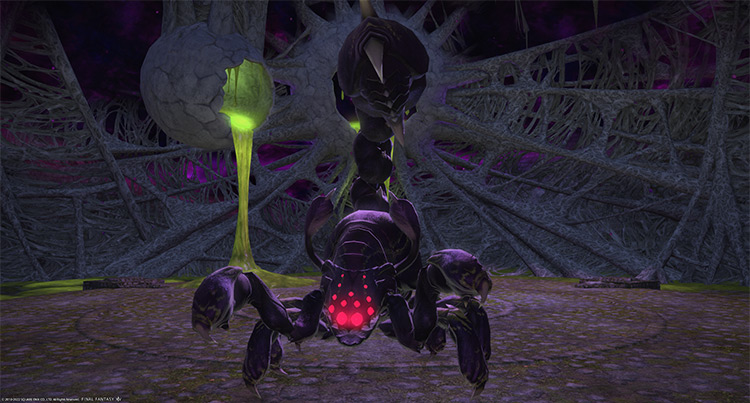
The outer edges of the arena will be covered in green goo. Standing in the goo will result in a constant “Leaden” debuff that slows your movement.
Mechanics:
- Silkscreen: A line attack that knocks players back on hit.
- Sticky Web: A random player will be targeted with a “Fleshy Pod” that will explode after some time. Move away from the pod before it explodes.
- Pod Burst (Fleshy Pod): A large point-blank AoE around the pod that applies 14-second “Poison” DoT on hit.
- Realm Shaker: A non-telegraphed, point-blank AoE. Stay away from the boss as much as possible.
- Comesmite: Smaller versions of the boss with no notable attacks. Kill them quickly to avoid unnecessary damage.
- Tail Molt: When the boss’ HP drops under 50%, its tail will start glowing and become targetable. Destroy the tail as soon as possible. Destroying it will give the boss a 60-second “Vulnerability Up” debuff.
- Deadly Thrust (Graffias’s Tail): A large AoE attack toward a random player that drops a large green puddle. Standing in the puddle will result in a constant “Pollen DoT.” Drop the puddles near the edge of the arena to leave safe spots in the middle.
Rewards
| Name | Type | Rarity |
|---|---|---|
| Pupil’s Book of Brass | Book | Dungeon (Green) |
| Bow of Owls | Bow | Dungeon (Green) |
| Kple Kple | Cane | Dungeon (Green) |
| Antares Needles | Daggers | Dungeon (Green) |
| Brigand’s Leggings | Feet | Dungeon (Green) |
| Torturer’s Duckbills | Feet | Dungeon (Green) |
| Warden’s Leggings | Feet | Dungeon (Green) |
| Howling Talons | Fist Weapon | Dungeon (Green) |
| Elmlord’s Tusk | Greataxe | Dungeon (Green) |
| Gladiator’s Frostbite Arms (Lv. 24) | Other | Dungeon (Green) |
| Crimson Tide | Polearm | Dungeon (Green) |
| Thalassian Targe | Shield | Dungeon (Green) |
| Taurus Staff | Staff | Dungeon (Green) |
| A Thousand Screams Orchestrion Roll | Orchestrion Roll | Basic |
Extra Treasure Coffers

Apart from the boss rewards, there are four treasure coffers located throughout the dungeon that you can open for more gear or crafting material rewards:
- (X:10.3, Y:13.3)
- (X:12.2, Y:12.4)
- (X:11.4, Y:10.3)
- (X:12.3, Y:9.2)
Lore Readings
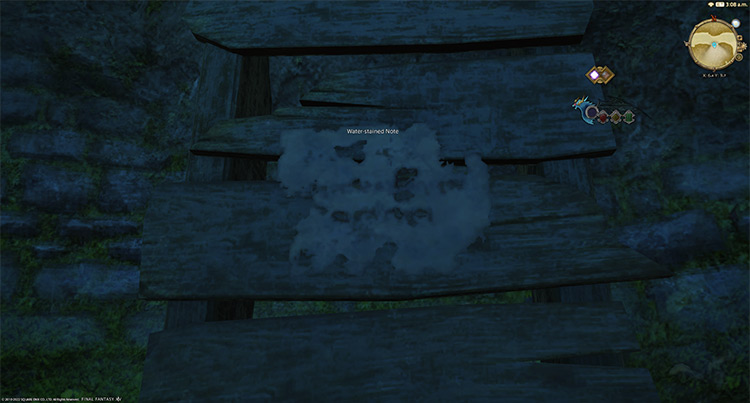
The Thousand Maws of Toto-Rak is one of the few dungeons where you can read lore info while exploring. Here’s a list of all the locations of reading materials (“Water-stained Notes”) found in the dungeon:
- (X:6.4, Y:9.7)
- (X:9.7, Y:13.2)
- (X:9.8, Y:8.6)
-
Final Fantasy XIV
- The Thousand Maws of Toto-Rak: How To Unlock + Dungeon Guide (FFXIV)
Related Posts:
 FFXIV The Qitana Ravel: Unlock + Boss Guide
 FFXIV The Temple of the Fist: Unlock + Boss Guide
 FFXIV Pharos Sirius (Normal): How To Unlock + Dungeon Guide
 FFXIV Dohn Mheg: How To Unlock + Boss Guide
 FFXIV Copperbell Mines (Hard): How To Unlock + Boss Guide
 FFXIV Malikah’s Well: How To Unlock + Dungeon Guide
 FFXIV The Tower of Babil: Unlock + Dungeon Guide
 FFXIV Mt. Gulg: Unlock + Dungeon Boss Guide